Site24x7 Advisor
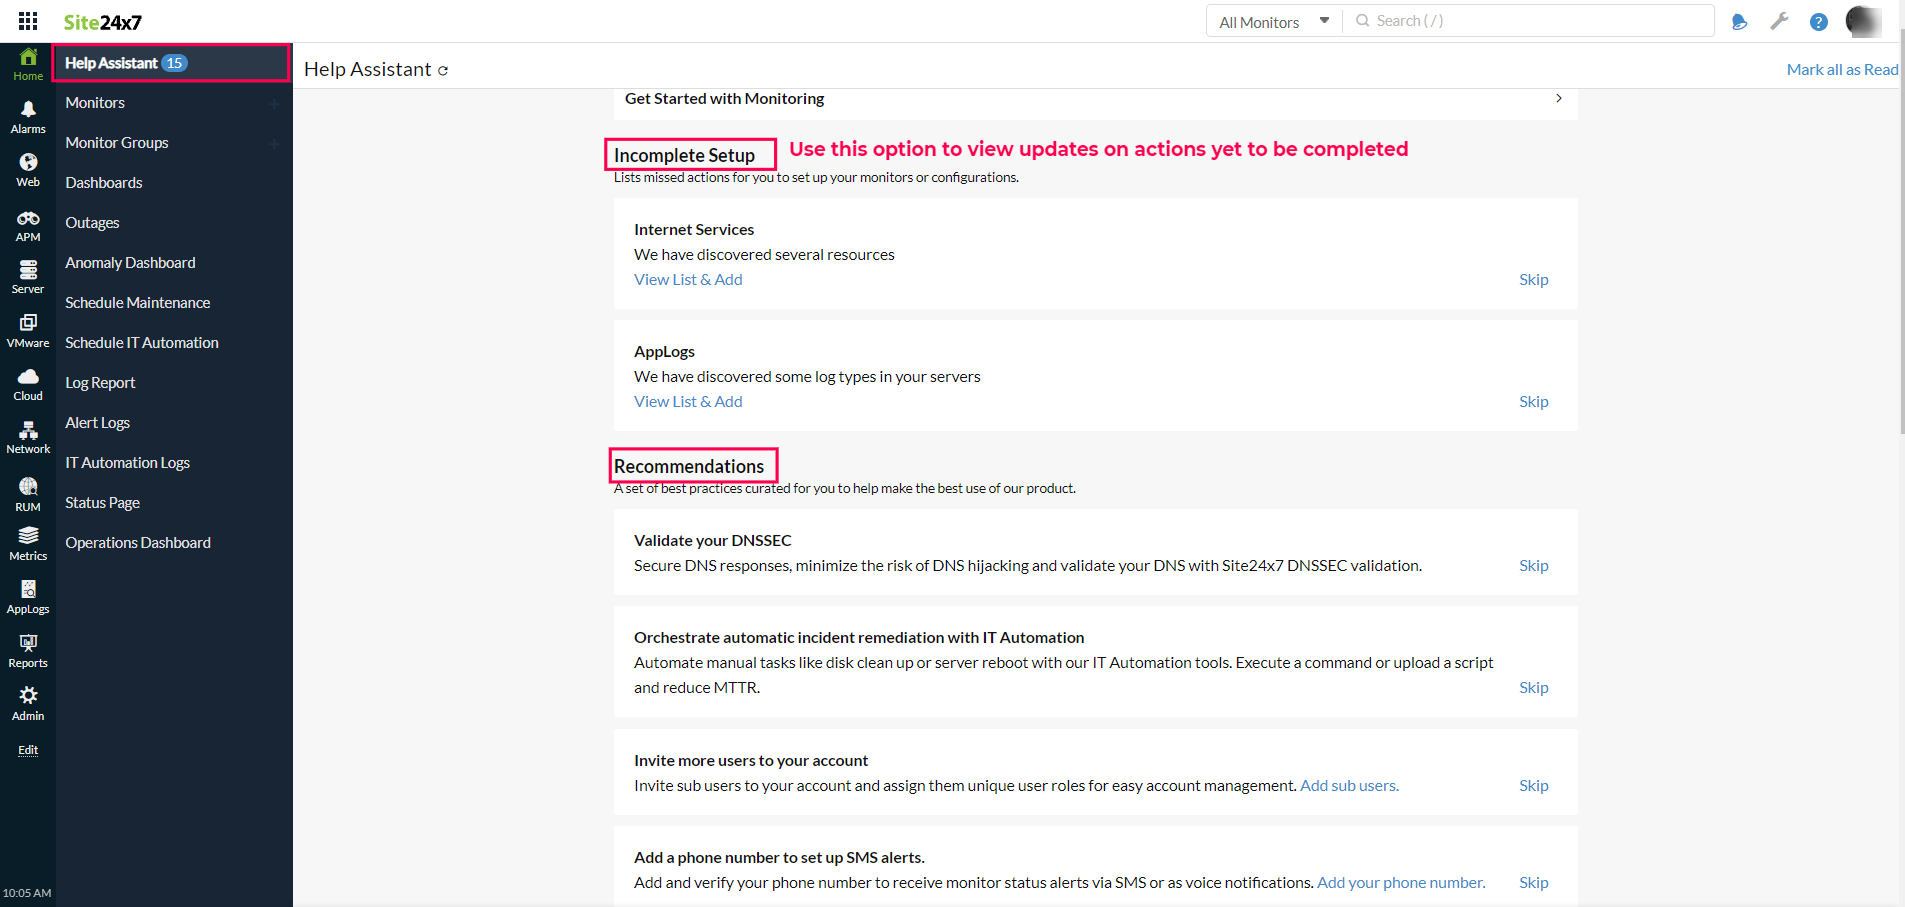
We would like to inform you that Site24x7 Advisor will now be available under Home > Help Assistant.
Advisor contains personalized suggestions that help you adhere to best practices so you can monitor your IT deployments with ease. It analyzes your existing account configuration and usage stats; then suggests unused features and configurations that can help you perform comprehensive monitoring to improve the overall resource availability and performance of your IT resources. You can get our out-of-the box set of best practices and recommendations as part of this.
Key Features of Advisor
You can get started with Site24x7 Advisor by following these steps:
- Log in to your Site24x7 web client.
- Navigate to Home > Help Assistant.
Advisor helps you:
- Receive proactive, actionable, and personalized recommendations for your Site24x7 set up.
- Share recommendations with users by exporting it as a PDF document.
- Quickly filter recommendations using in-built priority filters (High or Moderate) or search.
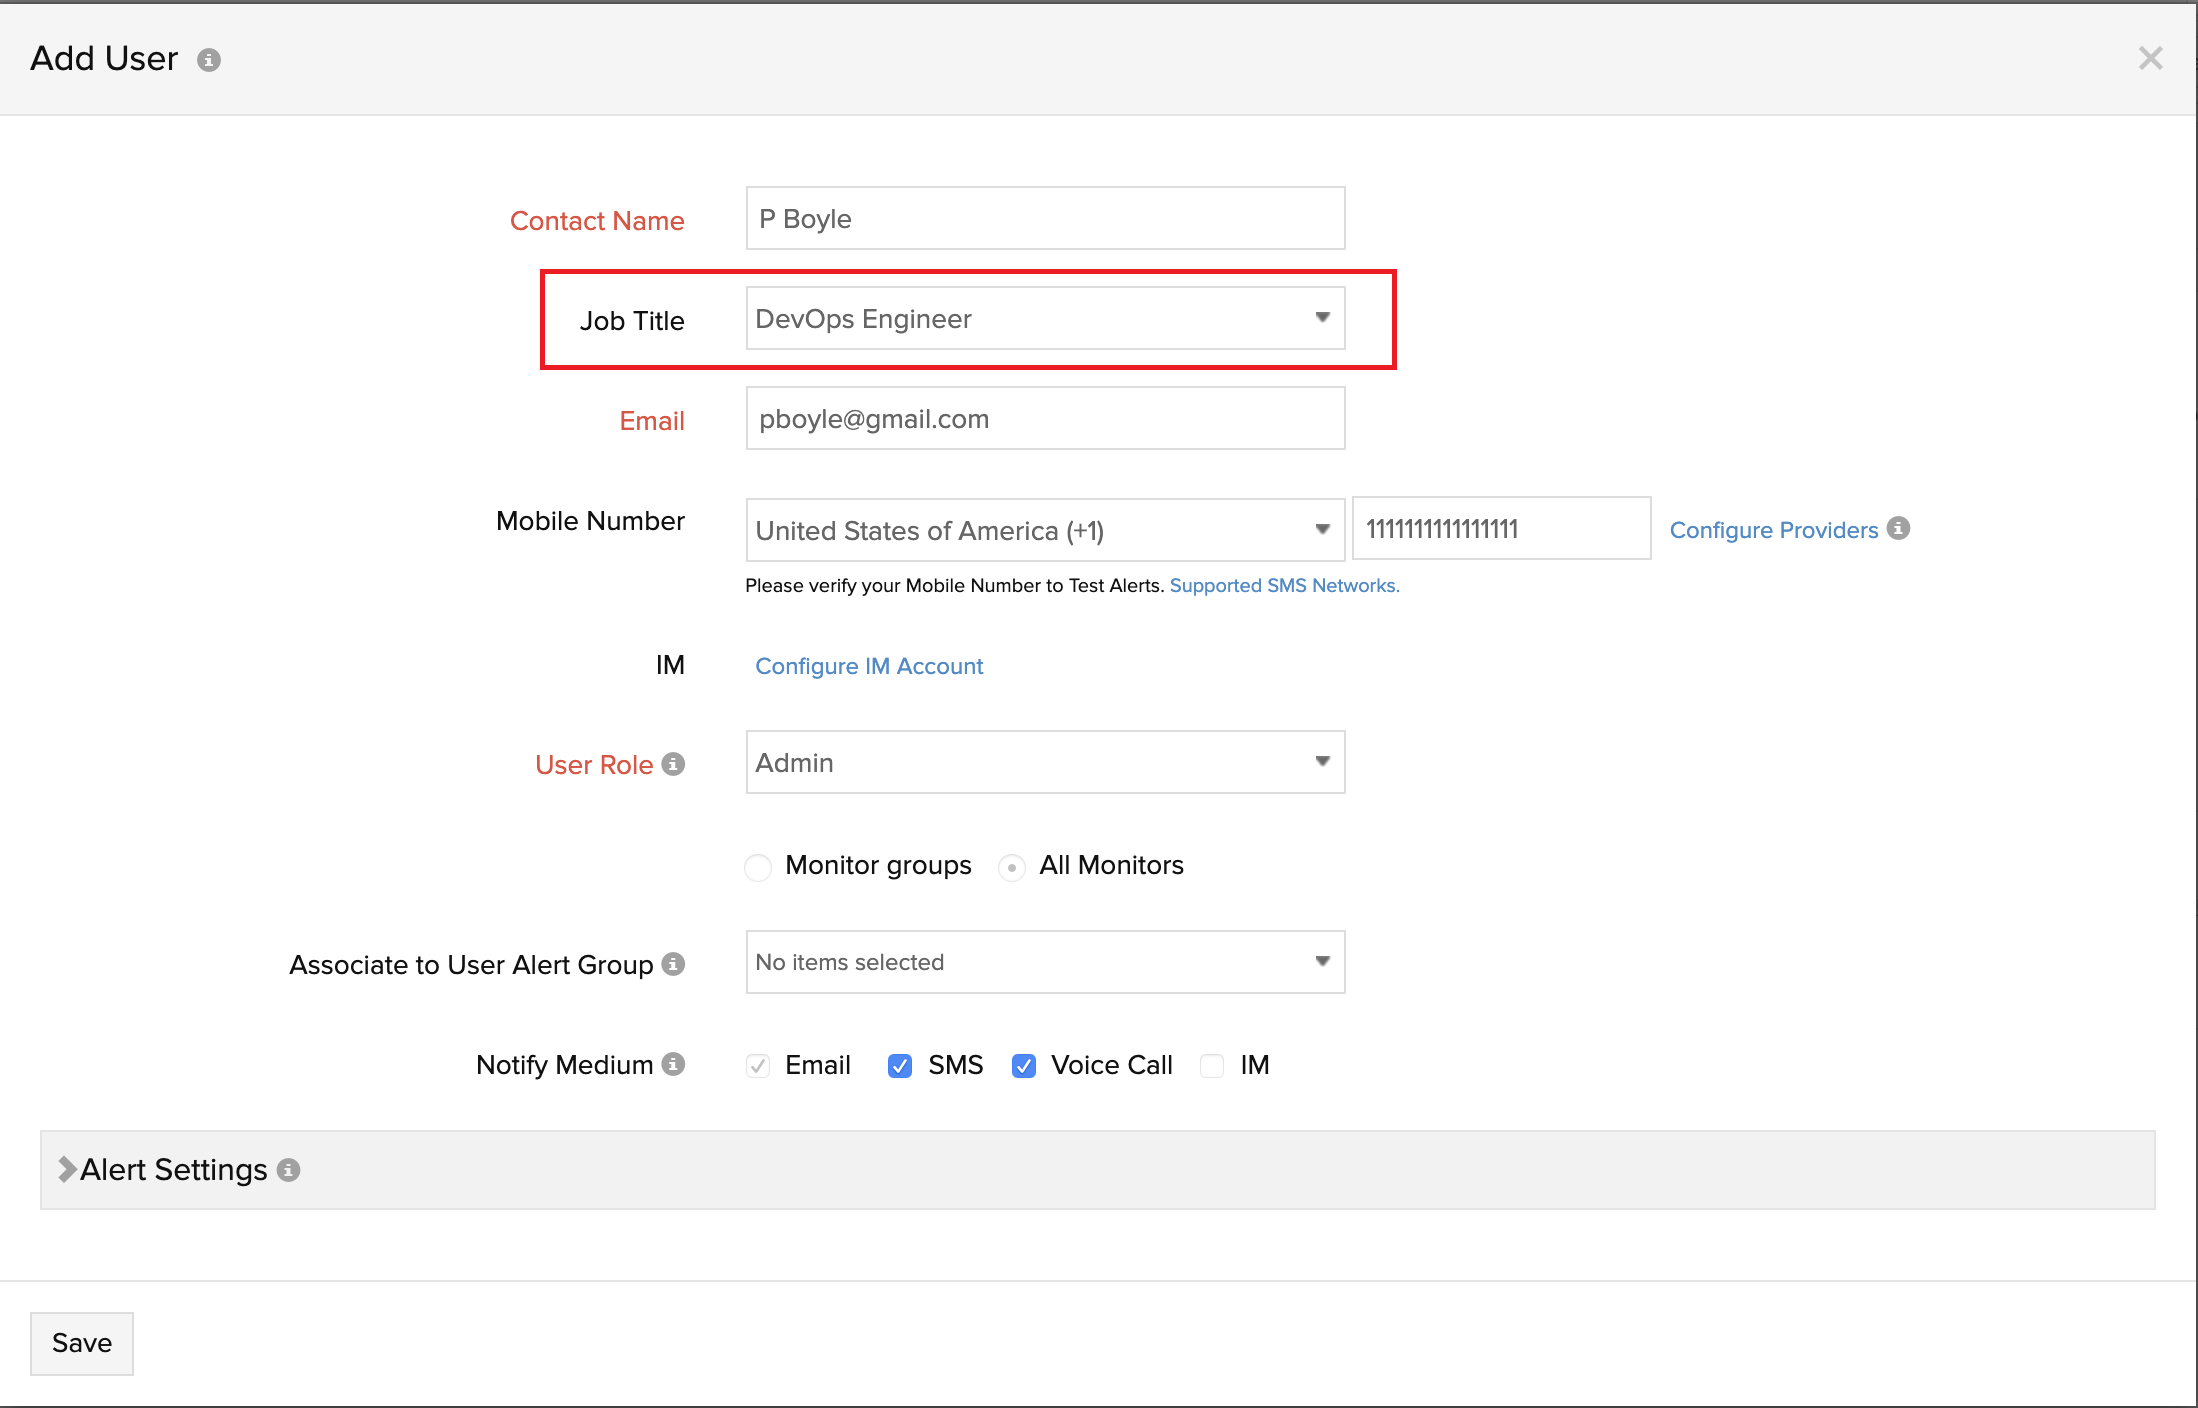
- Get accurate suggestions with proposed actions inline. For Paid users, specify your job title to get exclusive recommendations. Learn more.
- Get information about your subscription license and recent product announcements.

Incomplete Setup
Incomplete Setup section provides you updates on the actions you're yet to complete in the Site24x7 client.The incomplete actions will be listed, you can click on View List & Add to complete the action, click Steps to Resolve to learn more about completing the action or click Ignore to abort the action.
Recommendations
1. User account verification mandated
Lists all unverified user accounts. Account verification is mandatory to receive alerts and reports over email, voice, and SMS. The tip is shown when user's email address and phone number are not verified.
2. Invite more users to your account
The tip is to notify the user about inviting sub-users to the account and assign them unique user roles for easy account management. Learn about User account management. The tip is shown only when a single user is available in the account.
3. Add your first monitor
Try adding a monitor to track the uptime and metrics related to your websites, server, network devices, applications or any component in your IT infrastructure. You can also examine the availability and various performance trends of your resources from a single console. Learn how to add a monitor.
4.Create a Monitor Group and organize your monitors
Organize your monitored resources by business application, geography, type, resource ownership, and more into monitor groups. Visualize the uptime and performance of your business applications, add Subgroups up to five levels under a group, and use monitor groups as filters for admin actions. Learn how to create monitor groups.
5. Create your first threshold profile
The tip lets users create unique threshold profiles with custom metric baselines for specific monitor attributes and associate them with monitors to trigger trouble and critical alerts during a threshold breach. Learn how to create a threshold profile. The tip is displayed when no attribute is defined in the threshold profile.
6. Create a notification profile for better alert management
Lets you fine-tune your alerting policy and mitigate false alerts by creating a new notification profile. Learn how to create a notification profile. The tip is displayed when you only have a default notification profile.
7. Create user alert groups for enhanced user management
Lets you easily club multiple users to set up a user alert group, whereby you can streamline alerting and reporting in Site24x7. Learn how to set up User Alert Group. The tip is displayed when you've only been using the default User Group for alerting and reporting.
8. Add tags for flexible management of monitors, alerts, and reports
Lets you discover Tags that offer an intelligent way to sort and manage your monitors, its related alerts, or reports by adding your custom metadata in simple name-value pairs and associating them to these resources. Learn how to create tags. The tip is shown when no tags or only system-generated tags are used in the account.
9. Create Custom Dashboard to have better control over your data
Lets you create unique Custom Dashboards that also serves as your NOC so that you can have a better operational strategy during outages. Learn how to create a custom dashboard. The tip is displayed when no custom dashboards are created in the account.
10. Integrate with third-party applications
Helps you find ways to smartly integrate your Site24x7 alerts with popular productivity and incident management software that you already use. Learn about all the third-party applications available for integration. The tip is shown when no integrations are found in the account.
11. Orchestrate automatic incident remediation with IT Automation
Helps you orchestrate and integrate tools, people, processes, and more through Run Book Automation (RBA) workflows and serves as a key to faster deployment, thus reducing downtime from manual processes and human error. Learn more about IT Automation. The tip is displayed when no IT automation profiles have been used in the account.
12. Keep your customers informed about potential outages with StatusIQ
Helps you keep your customers in the loop during service outages and planned maintenances. You can launch up to 10 status pages in StatusIQ and constantly notify customers about incidents via a public link or email, thereby, eventually win over their trust. Learn how to set up Signals.
13. Record significant events in your development life-cycle with Milestone Marker.
Helps you discover Milestone Marker that can be used to record significant events like build deployments, product updates, feature enhancements, and infrastructure upgrades. Learn how to use Milestone Marker.
14. Use incident parameters and custom parameters to send personalized alerts
Lets you customize your email alert templates or even the data passed over HTTP headers using incident parameters and global parameters. Once defined, these parameters pass meaningful status along with the body of the URL during an HTTP request invocation. Learn about these parameters.
15. Set up and install all your Windows servers in one go
Helps you with the bulk installation of discovered Windows servers using Remote Installation. With Remote Installation, you can bulk install the agent in minutes and start monitoring all your Windows servers. Learn about Remote Installation.
16. Resources discovered by On-Premise Poller for monitoring
Lets you preview the resources discovered by On-Premise Poller so you can add them for monitoring. On-Premise Poller discovers VMware infrastructure components, internet services, and network devices installed in your network. Learn about intranet deep discovery.
17. Gain deeper insight and take intelligent actions in Azure
Helps you start monitoring your Azure resources in just a single click. Learn about Azure Monitoring.
18. Make better decisions in the AWS cloud
Helps you use Site24x7's agent and CloudWatch integration together to gain a comprehensive view across all IaaS and PaaS services powering your AWS deployment. Learn how.
19. Add a phone number to set up SMS alerts
Helps you add and verify your phone number to receive monitor status alerts via SMS. Learn how to set up SMS alerts in Site24x7.
20.Take control of your AWS costs
You need much more than metrics and logs to gain complete visibility into self-provisioned public cloud platforms like Amazon Web Services (AWS). Join the beta program for CloudSpend, our new SaaS-based cost management solution, to understand when and where you're accruing costs in the AWS cloud.
21. Add an On-Premise Poller to monitor your internal network
Monitor your internal network and resources behind a firewall or virtual private network (VPN) using On-Premise Poller. Install On-Premise Poller in various branch offices within a distributed organization, and monitor the user experience from each of these offices. Learn how to add an On-Premise Poller.
22. Install Site24x7 Mobile App for Push Notifications
Frequently Asked Questions (FAQs)
1. What permission do I need to access the Advisor?
Only Super Admin and Admin users will have read and write permissions in Advisor. Additionaly, users with Operator and Read-only roles will have read access. For Operator and Read-only users, all the links and buttons will be hidden by default.
2. How frequently will the report update?
For Evaluation and Paid users, the Advisor report will be generated in different ways.
Evaluation Users: The report gets regenerated once every day.
Paid Users: The report gets regenerated biweekly.
Free Users: The report gets regenerated once every month.
3. Can I dismiss a recommendation from Advisor?
Yes. You can instantly dismiss a recommendation by accessing the link "Don't show this tip again > Ignore" shown against the Advisor recommendation. The recommendation will resurface again after a period of 90 days.
4. Can I get relevant recommendations based on my requirement?
Yes. Set your Job Title in the Add/Edit User form and Save your changes. Based on this, relevant recommendations would be populated and listed for you.
Note: This feature is available only for Paid users.

