NTP Server
A Network Time Protocol client typically uses three or more NTP servers to synchronize its clock. Three servers allow detection of up to one inaccurate server (called a falseticker). Only servers deemed to be accurate by the client (called truechimers) are used for synchronization. Users will have an option to provide an arbitrary drift threshold to detect a falseticker. Site24x7 lets you monitor the availability of the primary server alone, and also raise an alert if the secondary servers drift from the primary server. This Basic Monitor is available from Starter Pack.
How it works?
NTP Server monitors the availability of primary NTP server and captures the time in primary NTP server and all the secondary NTP servers. NTP Monitor continuously compares the time of each secondary NTP servers with the time of a primary NTP Server and calculates time drift. Alerts will be sent when;
- The primary NTP server is not available.
- The time drift of secondary NTP servers exceeds max drift.
Adding an NTP Server Monitor
- Login to Site24x7.
- Click Admin > Inventory > Monitors > Add Monitor.
- Select NTP Server to add a new NTP Server monitor.
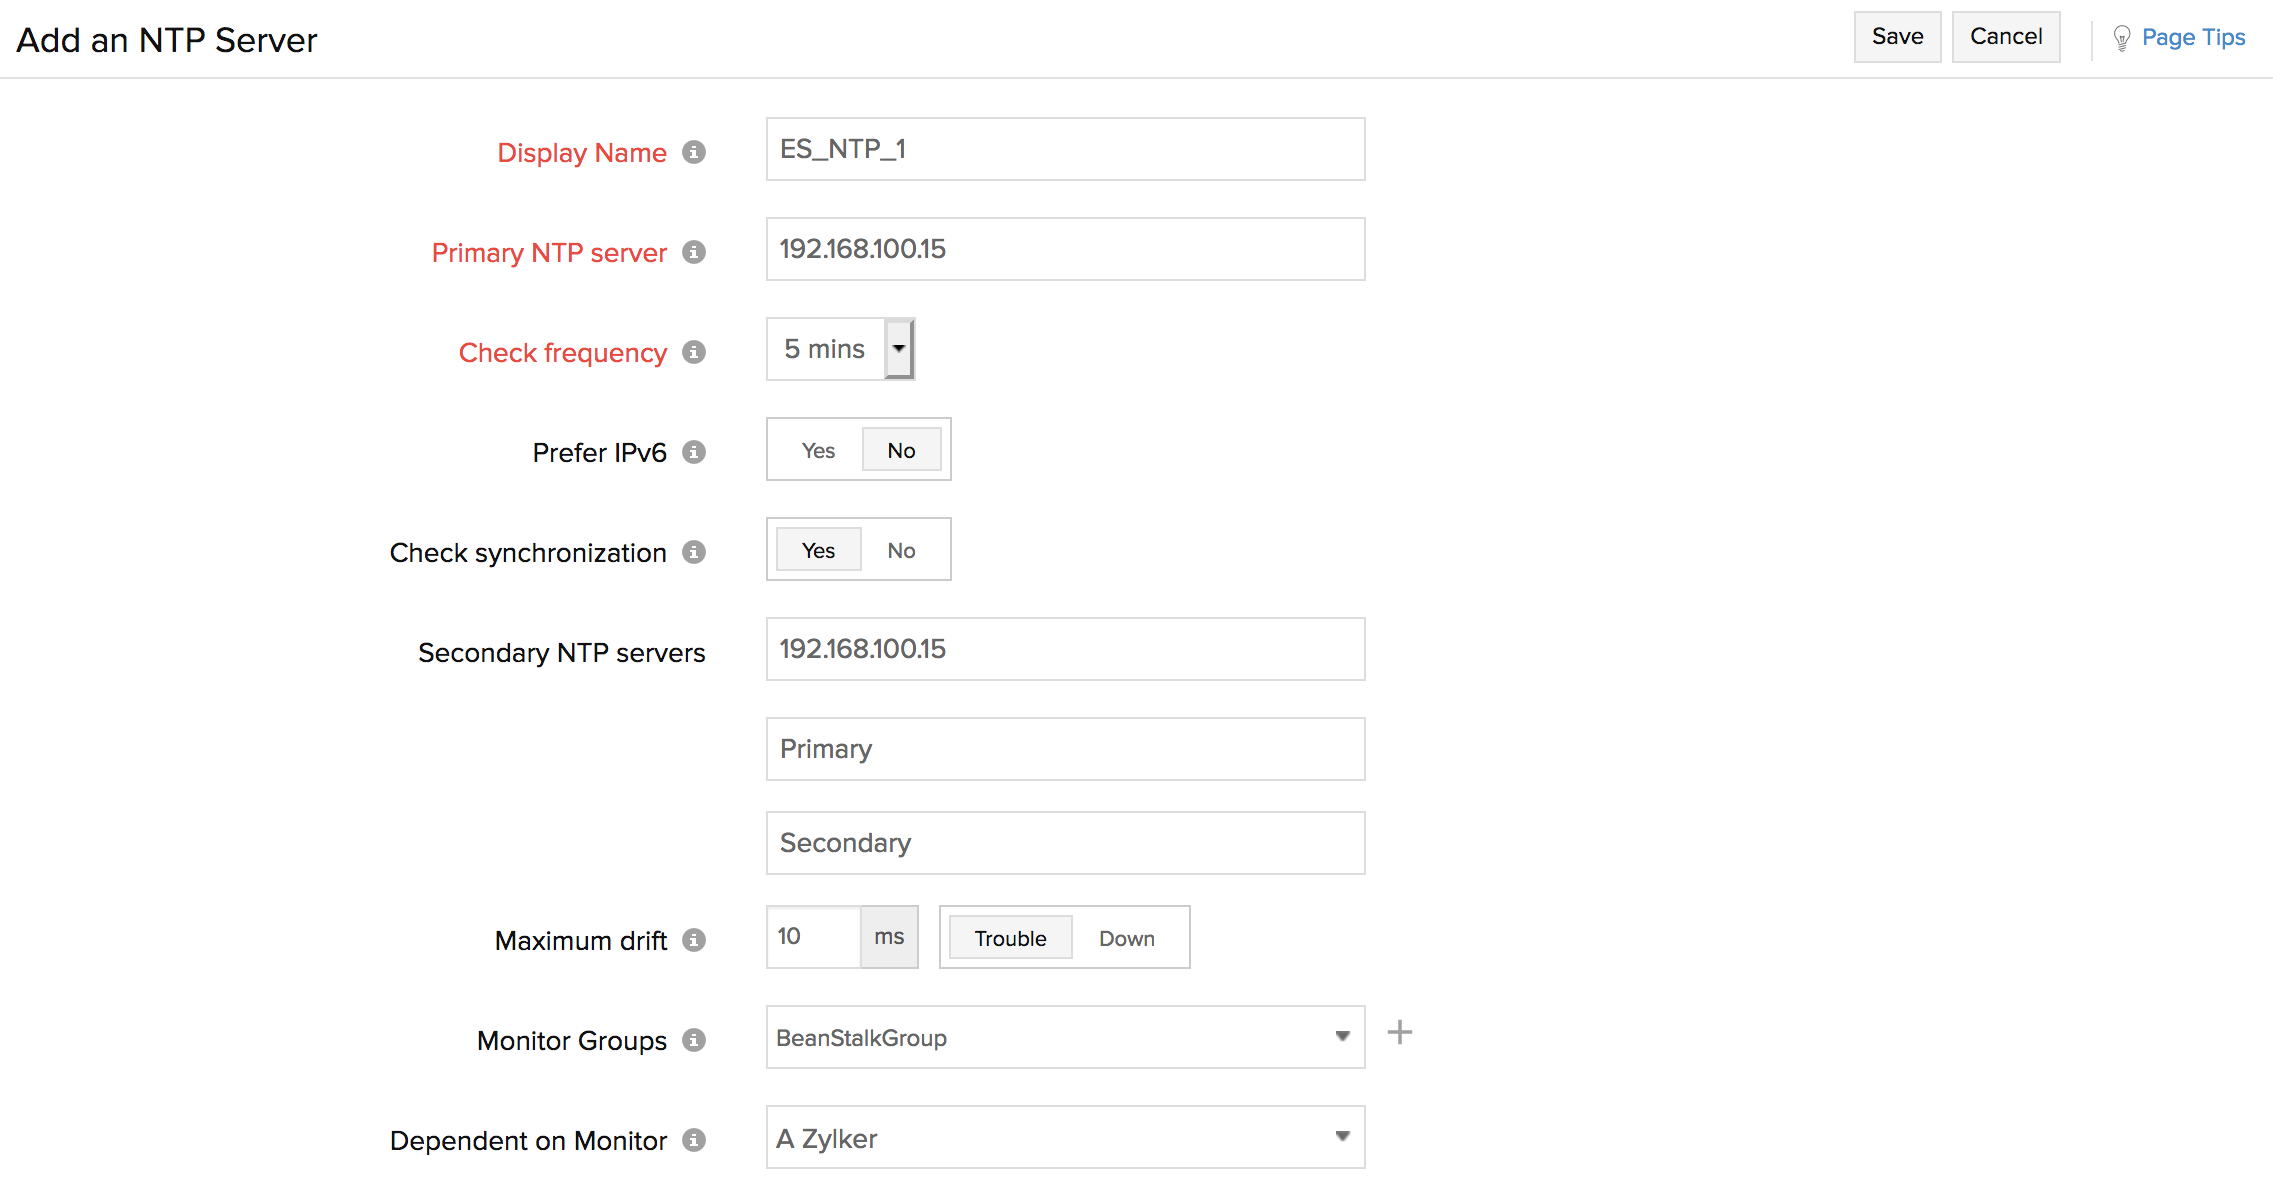
- Specify the following details to add the NTP Server monitor:
- Display name: Provide a name to identify this monitor in the dashboard.
- Primary NTP Server: Specify the IP address or domain name of the NTP server to connect to.
- Check frequency: Choose the required polling frequency. The frequency can be set from 1 minute to 1 day.
- Check synchronization: Check if the primary NTP server is synchronized with one or more secondary NTP servers.
- Secondary NTP Servers: Provide a maximum of three secondary servers for a fully redundant deployment.
- Maximum drift: Specify the allowable difference between the primary NTP server and each secondary NTP server. Exceeding this threshold should trigger a Trouble/Down alert.

- Monitor Groups: You can associate your monitor with multiple monitor groups by selecting the relevant monitor groups from the drop down list. This allows in logical grouping of your monitors.
To learn how to create a monitor group for your monitors, refer Monitor Groups. - Dependent on monitor: Select a monitor from the drop-down list to choose it as your dependent resource. Alerts to your monitor will be suppressed based on the DOWN status of your dependent resource.
NoteConfiguring a dependent resource and suppressing alerts based on the dependent resource's status is part of providing you with better false alerts protection. Learn more about alert suppression at monitor level.
NoteIf you select "None" in the dependent resource field, alerting will progress as per your normal configuration settings. No alerts will be suppressed in this case as the monitor doesn't have any dependent resource.
NoteMultiple monitor group support for monitors allow a monitor to be associated with multiple dependent resources in different monitor groups. If during a normal monitor status check, any one of these dependent resources' status is identified as DOWN, the alert for the monitor will be automatically suppressed. However, the dependency configuration at monitor level is always given the higher priority over any other monitor group level dependency configuration for suppressing alerts.
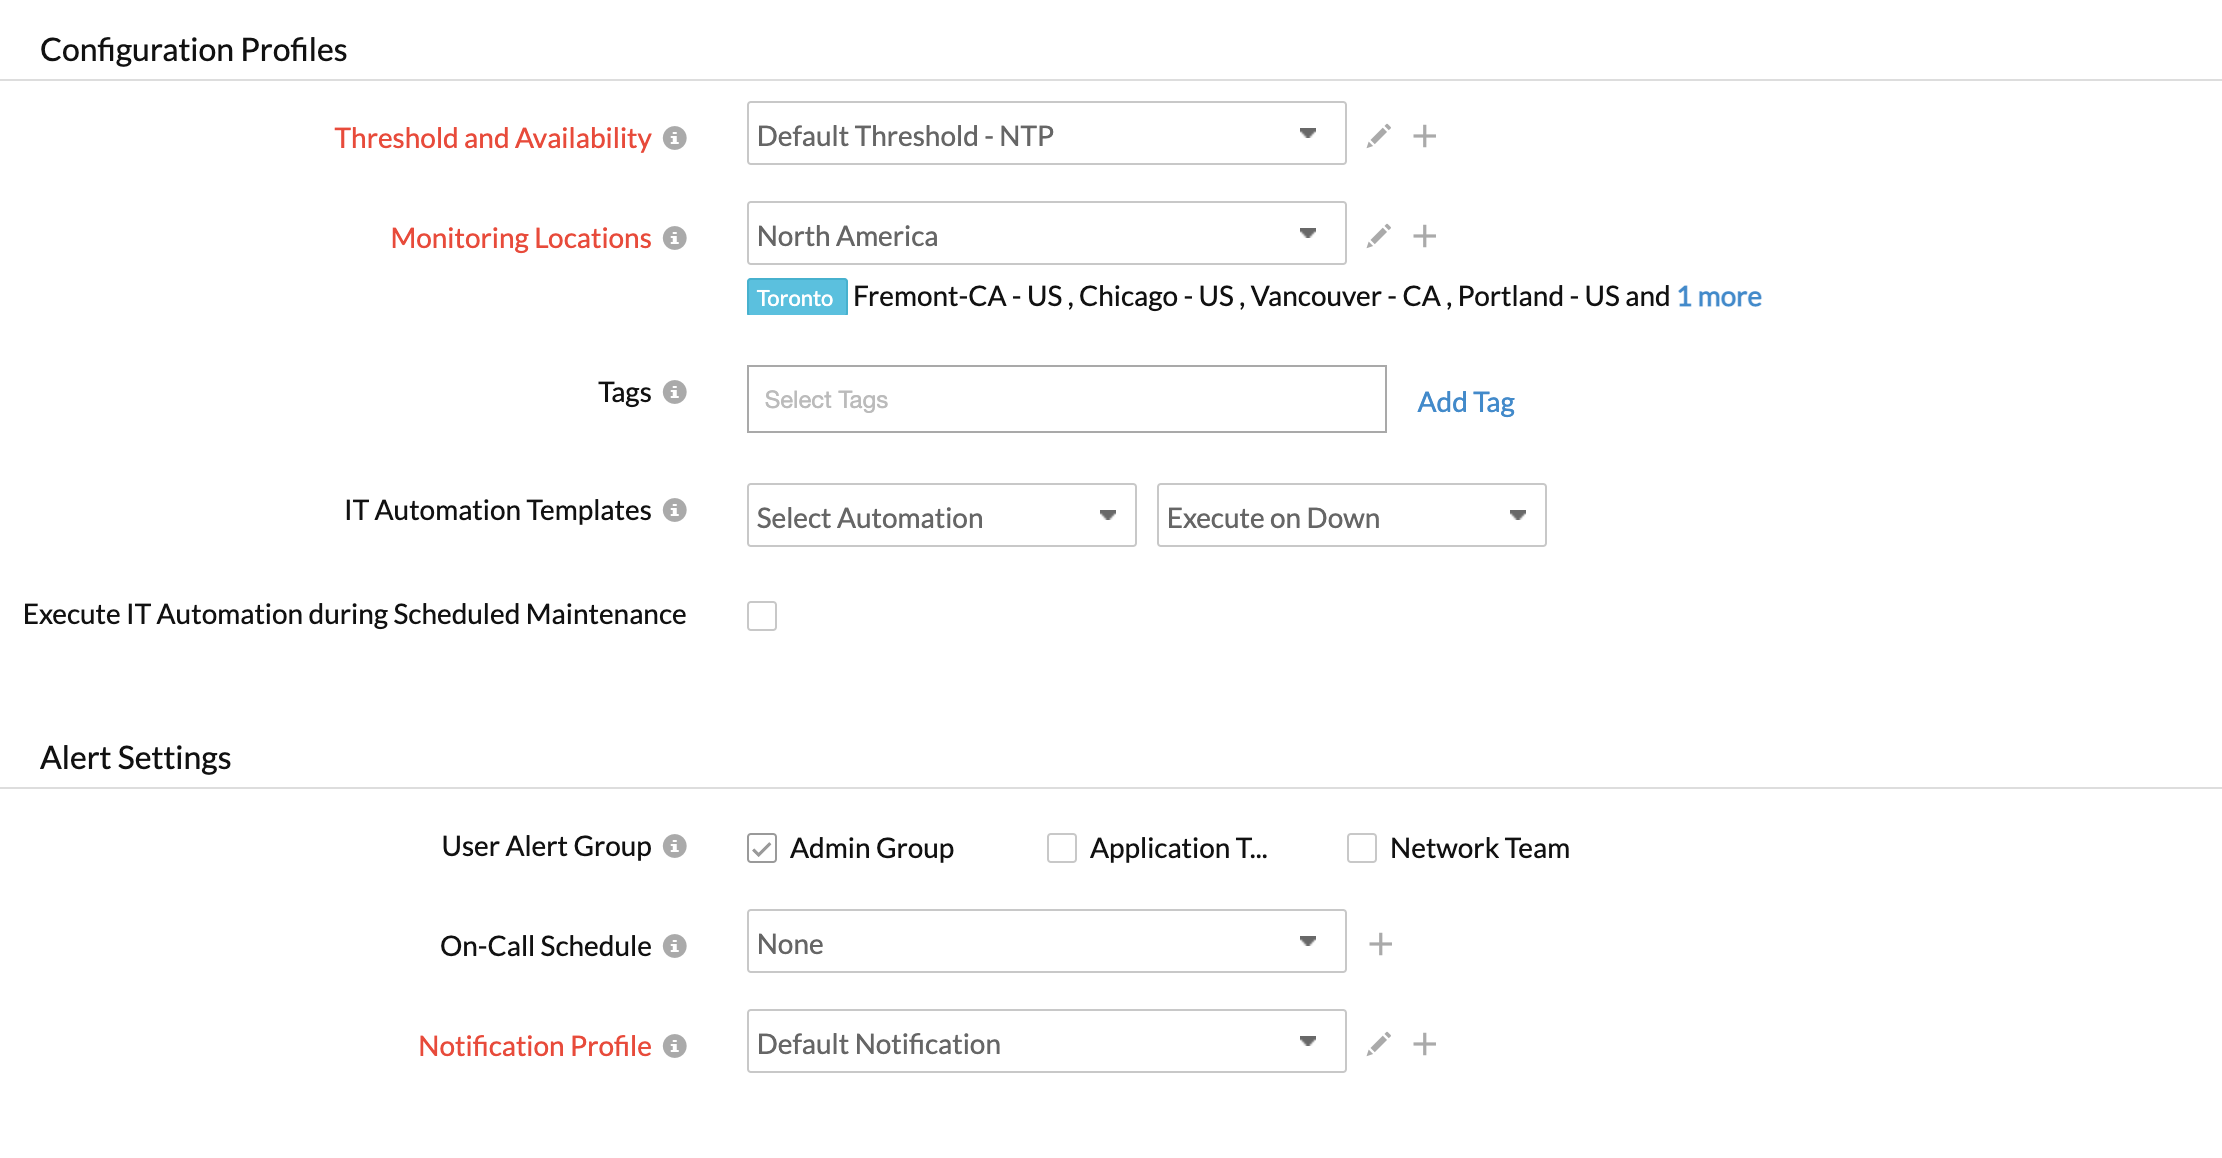
Configuration Profiles
- Threshold and Availability: Select a threshold profile from the drop down list or choose the default threshold set available and get notified when the resources cross the configured threshold and availability.
To create a customized profile, refer Threshold and Availability. - Monitoring locations: Select a location profile from the drop down list from where the NTP servers can be polled.
To know more, refer Location Profile. - Tags: Associate your monitor with predefined Tag(s) to help organize and manage your monitors creatively. Learn how to add Tags.
- IT Automation: Select an automation to be executed when the website is down/trouble/up/any status change/any attribute change. The defined action gets executed when there is a state change and selected user groups are alerted.
To automate corrective actions on failure, refer IT Automation.
- Threshold and Availability: Select a threshold profile from the drop down list or choose the default threshold set available and get notified when the resources cross the configured threshold and availability.

Alert Settings
- User Alert Group: Select the user group that need to be alerted during a outage. To add multiple users in a group, see User Alert Group.
- On-Call Schedule: The On-Call Schedule option helps you to ensure that the notifications are sent to assignees in specific shift hours helping them to quickly respond to alerts or incidents. Choose an On-Call of your preference from the drop-down.
- Notification Profile: Choose a notification profile from the drop down or select the default profile available. Notification profile helps to configure when and who needs to be alerted in case of downtime. Refer Notification Profile to create a customized notification profile.
You can receive alerts if the monitors are associated to user groups irrespective of the On-Call shift you've configured.
Third-Party Integration
- Services: Associate your monitor with a pre-configured third-party service. It lets you push your monitor alarms to selected services, and facilitate improved incident management.
If you haven't setup any integrations yet, navigate across to ”Admin > Third-Party Integration” to create one. Tell me more.
- Click Save.
