Location Profile
Location Profiles make it convenient to set monitoring locations consistently across many websites or monitors. Based on your IT infrastructure, you have the freedom to choose from a wide range of IPv4 and IPv6 supported monitoring locations around the world. Based on your monitor type, you can also choose your configured on-premise pollers and mobile network pollers to monitor your resources.
Add a Location Profile
- Click Admin > Configuration Profiles > Location Profile.
- Click (+) to Add Location Profile in Location Profile screen.
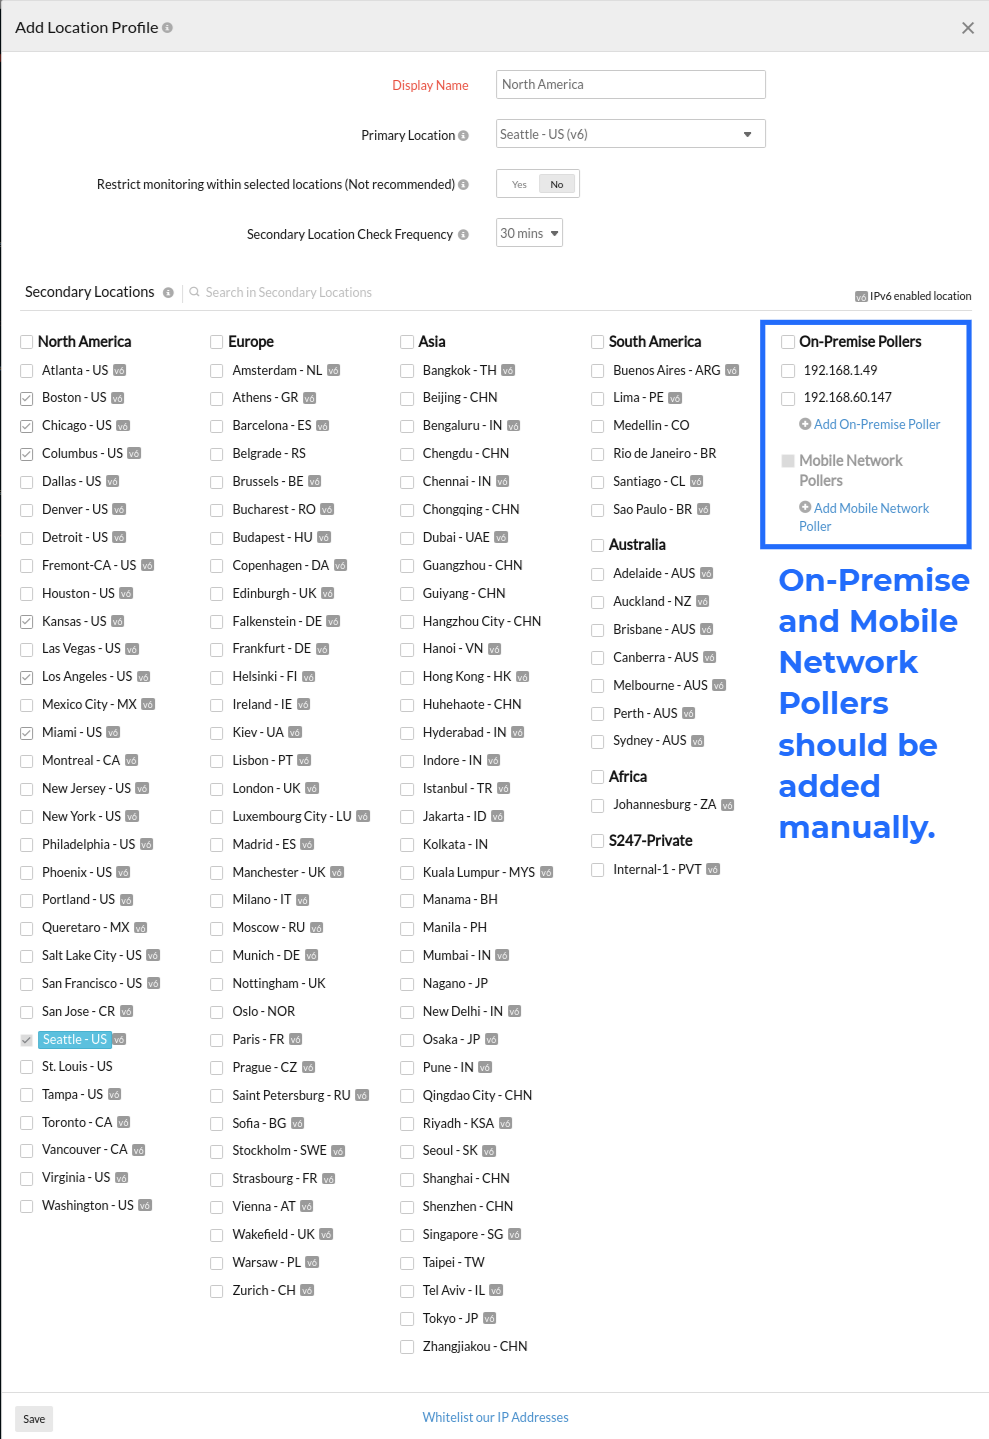
- Specify the following details to add the Location Profile:
- Display Name: Specify a name for the location profile.
- Primary Location: Select the primary location from the drop-down. This is the location from where registered resources like website, DNS, Web Page Analyzer etc will be polled according to the set poll interval. You may choose an IPv4/IPv6 supported primary location based on your monitoring needs. If you've already selected a location as the secondary location and then wishes to add the same location as a primary location, then please remove it from the list of secondary locations and try.
- Restrict monitoring within selected locations (Not recommended): By enabling this option, the monitoring will be solely restricted within the configured locations. When there is any downtime in the configured monitoring location, the monitoring from that location will be skipped until the location is available. While this option is disabled, we will make the best possible effort to complete the monitoring from the nearest monitoring location using the preferred recheck logic for your locations.
- Secondary Location Check Frequency: Choose the frequency at which you'd want to monitor from the secondary location. When the frequency for the secondary location is lower than that for the primary location, the value configured as the frequency for the secondary location will be taken as the primary location frequency.
- Secondary Locations: Select your secondary monitoring locations by marking the check boxes. When a particular resource is detected down from the primary location, Site24x7 servers will initiate rechecks from the chosen secondary locations and notify in case of any downtime.
- On-Premise Poller or a Mobile Network Poller
If you've configured an On-Premise Poller or a Mobile Network Poller in your account, the same would be added as a location under the Location Profile page. This will be added in the On-Premise and Mobile network Poller section on the right side. Adding On-Premise Pollers to Location Profile can help you in monitoring resources like network devices from private networks. Adding Mobile Network Poller can help you in monitoring local URLs, network devices etc.in your internal network. - Whitelist our IP addresses: Use the readable formats to add them to your firewall settings and add the necessary IP address to your Whitelist. The supported formats are Spreadsheet, PDF, RSS, JSON, CSV, TSV. Learn more about automating your IP whitelisting and receiving IP related updates from Site24x7. Site24x7's recheck logic facilitates restricted monitoring from location IPs configured in your location profiles. Hence, you've to whitelist only those location IPs that are configured in your location profile.
Site24x7 also lets you monitor your IPv4 and IPv6 infrastructure. Find the detailed list of Site24X7's global monitoring locations.
- Click Save.
- The location profile created will be automatically listed in Location Profile screen along with the other location profiles already created.
Monitoring locations are grouped under their continent names, viz., North America, Europe, South America, Asia, Australia and Africa.
For monitor types like Website, Web Page Analyzer, DNS, FTP etc., it's mandatory to associate the monitor to a location profile. Instead of customizing a location profile yourself, you can always choose to associate your monitor to a preset location profile.
If you wish to monitor from a location that is not currently supported by Site24x7, let us know about it by adding your comment under the Community forums and we will try to accomodate it based on the demand.
System Generated Profiles
System Generated Profiles will be generated for different monitor types. They are uneditable profiles created when an On- Premise Poller or a Mail RTT monitor is added.
When an On Premise Poller is installed, a single non-editable System Generated Location Profile will be generated. This Location Profile is created for the fact that there are a few monitor types that rely on being polled from only the On-Premise Poller. That is why they are uneditable and that Location Profile will only contain that Poller. Such a location profile will be used by Vmware and Network Montor types which are designed to poll from a single location.
In case of a Mail Delivery monitor also System Generated Location Profiles will be generated. If the customer opts to use the SMTP, POP ,IMAP servers provided by Site24x7, or such servers within an internal network, then System Generated Profiles will be generated(uneditable).
Edit a Location Profile
- Click the profile which you want to edit.
- Edit the parameters which needs to be change in Edit a Location Profile window.
- Click Save.
NoteAdmins with Group level access can not edit/ modify profiles created by other users, but will have read-only permission.
Delete a Location Profile
- Click the profile in the Location Profile screen which needs to be deleted.
- This will navigate to Edit a Location Profile window.
- Click Delete.
