Mail Delivery
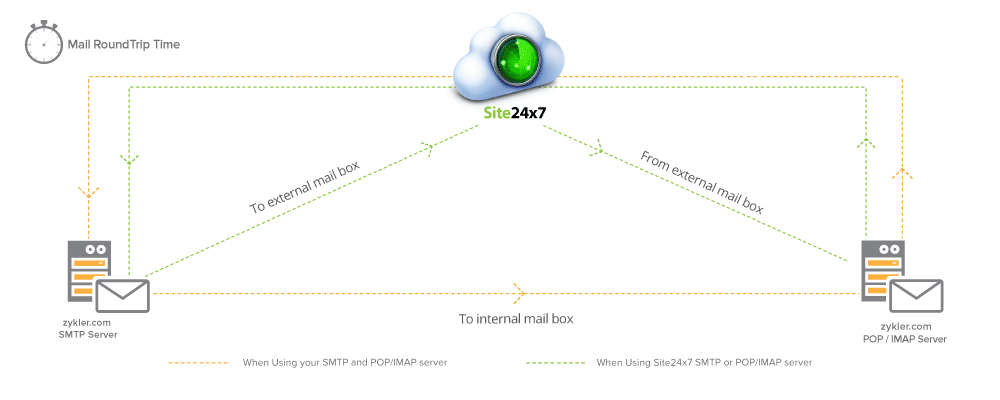
Mail Delivery monitor checks your inbound and outbound mail servers by verifying delivery to both internal and external mailboxes. It lets you know more about the mail-user experience by testing every aspect of email delivery process and capturing the email round-trip time from 120+ global locations. Mail Delivery monitor sends emails to a designated SMTP server (similar to an email client), retrieves the emails using IMAP and POP3 protocols, and measure the round-trip time (from sender to receiver.) For validating the mail round-trip time, you can either use Site24x7's SMTP and POP3/IMAP Server configurations or use your own Server configuration. Please note that monitoring for mail delivery is not supported via On-Premise Poller.
Our monitoring data offers deep insight into the health and performance of your mail server environment; further allowing you to troubleshoot issues sooner, thus, ensuring high availability of your mail server infrastructure.
Features
The core features of the Mail delivery monitor includes:
- Ability to monitor incoming and outgoing mail servers through secure authentication.
- Calculate the Email round-trip time (RTT) of your mail server.
- Monitor Microsoft Exchange Server performance along with Email Server.
Adding a Mail Delivery monitor
General Settings
- Login to Site24x7 web client.
- Click Admin > Inventory > Monitors > Add Monitor.
- Select Mail Delivery in Add Monitor screen.
- Specify the following general detailsto add the monitor:
- Display Name: Provide a name for the mail server for identification purpose.
- Check Frequency: Choose the required polling frequency. The polling frequency can be set as low as 5 minutes or up to 1 day.
- Connection Timeout: Specify the time in seconds for the connection to be established with the target server. The timeout should be between 0 to 30 seconds.
- Location Profile: Select a location profile from the drop down list from where server will be polled from the selected location.
To know more, refer Location Profile.
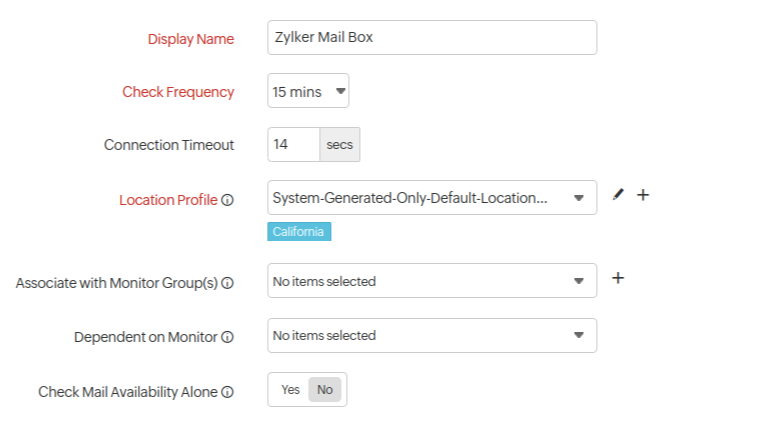
- Associate with Monitor Group(s): You can associate your monitor with multiple monitor groups by selecting the relevant monitor groups from the drop down list. This allows in logical grouping of your monitors.
To learn how to create a monitor group for your monitors, refer Monitor Groups. - Dependent on monitor: Select a monitor from the drop-down list to choose it as your dependent resource. You can add up to 5 monitors as dependent monitors. Alerts to your monitor will be suppressed based on the DOWN status of your dependent resource.
Note
- Configuring a dependent resource and suppressing alerts based on the dependent resource's status is part of providing you with better false alerts protection. Learn more about alert suppression at monitor level.
- If you select None in the dependent resource field, alerting will progress as per your normal configuration settings. No alerts will be suppressed in this case as the monitor doesn't have any dependent resource.
- Multiple monitor group support for monitors allow a monitor to be associated with multiple dependent resources in different monitor groups. If during a normal monitor status check, any one of these dependent resources' status is identified as DOWN, the alert for the monitor will be automatically suppressed. However, the dependency configuration at monitor level is always given the higher priority over any other monitor group level dependency configuration for suppressing alerts.
- Check Mail Availability Alone: Toggle to Yes if you wish to verify the existence of emails by searching for them based on the subject line. No emails will be sent to the recipient, and emails will not be deleted.
Toggle to No if you wish to send an email and search for it using the subject line after sending.
SMTP Configuration
SMTP Configuration can be used to test the email delivery.
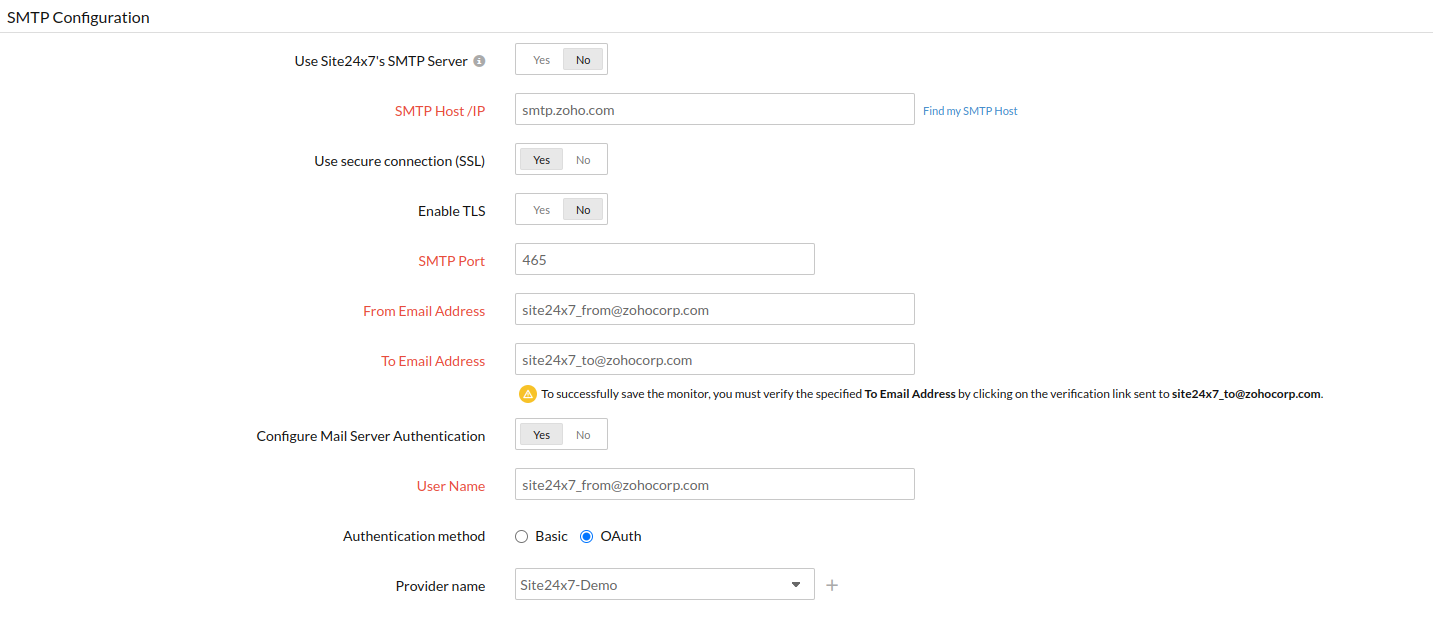
Use Site24x7's SMTP Server: Move the toggle button to Yes to select Site24x7's SMTP Server for testing email delivery. When you opt to use Site24x7 SMTP Server, the configured location profile will be overridden and Site24x7 default location will be used. Once selected, you'll be asked to enter the following fields:
- From Email Address: Email address from which the email will be triggered at the set check frequency.
- To Email Address: Specify the email address to which an email will be sent.
You should submit email addresses that belong to you, to ensure that the emails sent from Site24x7 aren't ending up in the spam folder. Once you submit the To and From email addresses, we'll be sending verification emails to both the addresses. The monitor will be added only you verify both the email addresses.

- If you've decided to use a custom SMTP Server to test the email delivery, move the toggle button to No. Then specify the following configuration details:
- SMTP Host/IP: Specify your SMTP Host/ IP address. You can also use Find my SMTP Host to find SMTP Host.
- Use Secure Connection (SSL): Use the toggle button to enable or disable a secure SSL connection.
- Enable TLS: Use the toggle button to enable or disable Transport Layer Security (TLS).
- SMTP Port: Specify your SMTP port. When SSL connection is enabled, the SMTP port is set to 465 automatically. The port number is set to 25 by default.
- From Email Address: Enter your email address from which an email will be sent to test the SMTP host's availability.
- To Email Address: Enter the Email address to which an email will be sent to test the SMTP host's availability.
NoteTo successfully save your monitor, you're first required to validate the email address by clicking the verfication link sent to your To Email Address.
- Configure Mail Server Authentication: Enable the toggle button to help the monitoring servers check the authenticated mail server. Provide the user name and password of your SMTP host.
- User Name: Provide the user name of the SMTP host.
- Authentication Method: Choose the authentication method of your preference by enabling the radio button next to the option.
- Provider Name: Choose the OAuth provider of your choice. Learn how to configure an OAuth provider.
POP/IMAP Configuration
- Enable Email fetching using POP/IMAP: Use the toggle button to enable or disable email fetching from mailbox. Enabling the POP/IMAP helps to check the availability of the incoming mail server. The following parameters need to be specified when POP/IMAP is enabled:
- Use Site24x7's POP/IMAP Server: Move the toggle button to Yes to use Site24x7's POP/IMAP Server. When you opt to use Site24x7 POP/IMAP Server, the configured location profile will be overridden and Site24x7 default location will be used. If you've decided to use Site24x7's POP/IMAP server, specify the following details:
- Mail Subject: Specify the subject field for fetching the mail. The mail subject by default will be "Site24x7-Testing Mail Server".
- File Attachment Name: Specify the file attachment name.

- If you've decided to use a custom POP/IMAP server, move the toggle button to No andspecify the following details additionally:
- Choose Mail Fetch Protocol: Use the slider button to enable POP Monitoring or IMAP monitoring.
- Use secure connection (SSL): Move the toggle button to enable or disable SSL connection for monitoring.
- Enable TLS: Move the toggle button to enable or disable TLS connection for monitoring.
- POP/IMAP Host IP: Enter the POP/IMAP Host name or IP.
- POP/IMAP Port: The POP/IMAP port number is set to the default values based on mail fetch protocol and SSL status. For POP protocol, the port number is set to 995 on enabling SSL and 110 on disabling SSL. For IMAP protocol, the port number is set to 993 on enabling SSL and 143 on disabling SSL.
- Fetch Folder: Specify the name of the folder from where the email needs to be fetched and deleted. By default, the fetch folder for POP will be Inbox.
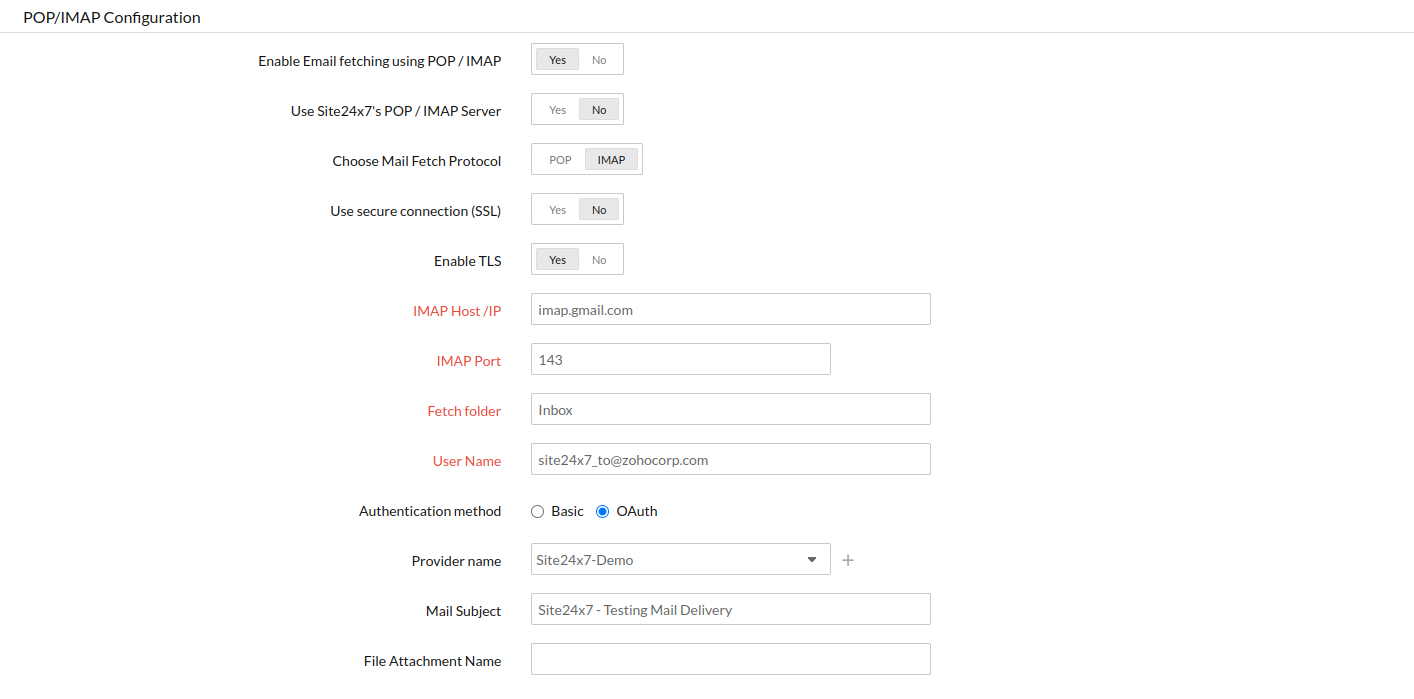
- User name: Enter the user name of POP/ IMAP host.
- Password: Enter the password for POP/IMAP host.
- Mail Subject: Specify the subject field for fetching the mail. The mail subject by default will be "Site24x7-Testing Mail Server."
- File Attachment Name: Specify the file attachment name.
NoteThe OAuth authentication is currently supported only for IMAP.
Configuration Profiles
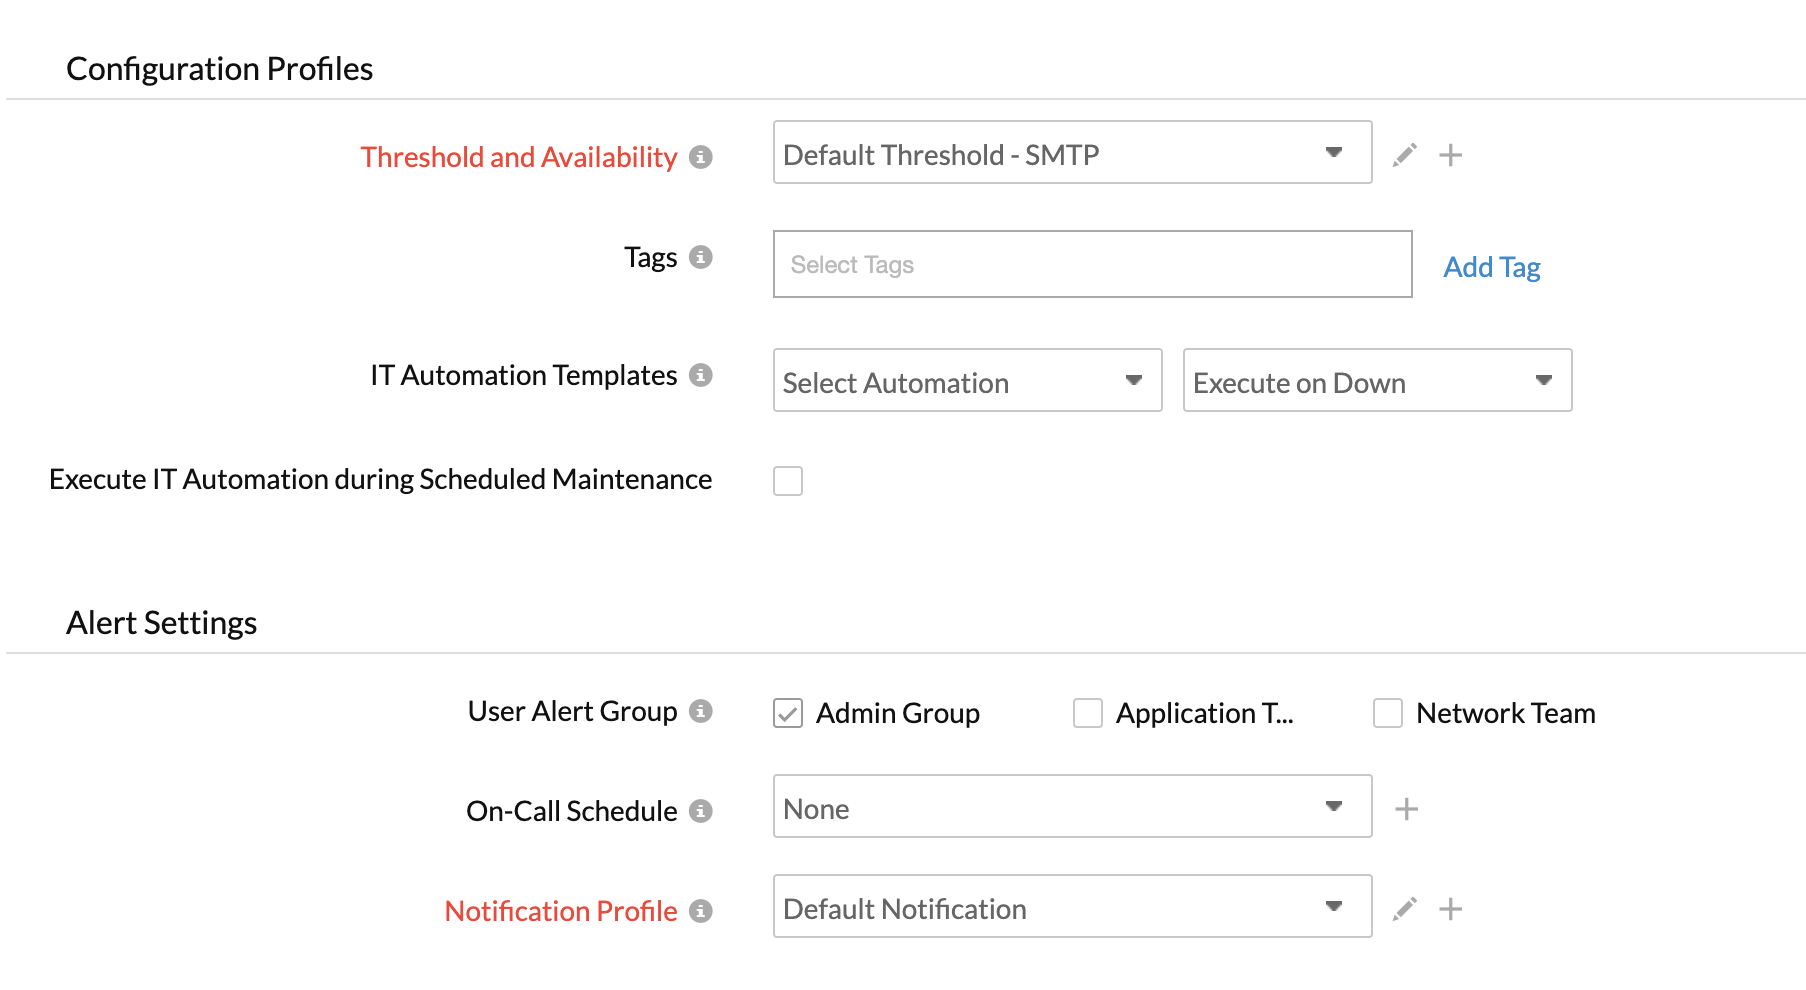
- Threshold and Availability: Select a threshold profile from the drop down list or choose the default threshold set available and get notified when the resources cross the configured threshold and availability.
To create a customized profile, refer Threshold and Availability. - Tags: Associate your monitor with predefined Tag(s) to help organize and manage your monitors creatively. Learn how to add Tags.
- IT Automation: Select an automation to be executed when the website is down/trouble/up/any status change/any attribute change. The defined action gets executed when there is a state change and selected user groups are alerted.
- To automate corrective actions on failure, refer IT Automation.
- Alert Settings:
- User Alert Group: Select the user group that need to be alerted during a outage. To add multiple users in a group, see User Alert Group.
- On-Call Schedule: The On-Call Schedule option helps you to ensure that the notifications are sent to assignees in specific shift hours helping them to quickly respond to alerts or incidents. Choose an On-Call of your preference from the drop-down.
- Notification Profile: Choose a notification profile from the drop down or select the default profile available. Notification profile helps to configure when and who needs to be alerted in case of downtime. Refer Notification Profile to create a customized notification profile.
NoteYou can receive alerts if the monitors are associated to user groups irrespective of the On-Call shift you've configured.
- Third-Party Integrations: Associate your monitor with a pre-configured third-party service. It lets you push your monitor alarms to selected services and facilitate improved incident management.
If you haven't setup any integrations yet, navigate across to ”Admin > Third Party Integration” to create one. Tell me more.
- Click Save to start monitoring.
Learn more about the various performance metrics of a Mail Delivery Monitor.
