Web Transaction (Browser) - Selenium WebDriver
Web Transaction (Browser) - Selenium WebDriver
Web Transaction (Browser) - Selenium WebDriver measures and provides real-time end-user experience of a web application. Site24x7 uses a Web Transaction (Browser) Recorder to record all user interactions in the exact sequence and stores them as webscripts. At regular intervals of time, the transactions are mimiced similar to a user's interaction with the website using a real browser such as, Firefox and Chrome; and monitored periodically to obtain performance metrics such as the availability, response time, and transaction time. Notifications will be sent when errors are detected. Playback of these transactions is supported from 130 global locations around the world. You can also choose to monitor your web application from a private location using a Linux flavour based On-Premises Poller. You can either record and update a user transaction using the Web Transaction (Browser) recorder or import the Selenium based test cases into the Web Transaction (Browser) recorder tool.
How does the Web Transaction (Browser) - Selenium WebDriver Work?
Download the latest version of Web Transaction (Browser) Recorder, which records all the user interaction in your web application in their exact sequence and notifies when any error is detected. This monitoring feature will use an actual browser, Firefox or Chrome to play-back the captured web transaction. Typical user transactions like login checks, form filling, AJAX requests, search in a page etc. can be captured and recorded. Site24x7 will then keep simulating these actions continuously, scanning for any sign of trouble. You can also modify or edit your transactions at a later point of time inside the monitor form or add/delete/modify steps using the Web Transaction (Browser) recorder. You can also import the Selenium based Test Cases in .side/HTML format into your Web Transaction (Browser) recorder.
Install Web Transaction (Browser) Recorder
- Login to Site24x7.
- Navigate to Admin > Inventory > Add Monitor > Web Transaction (Browser) - Selenium WebDriver.
- Download and the Web Transaction (Browser) Recorder 3.5.1. This Web Transaction (Browser) Recorder can be installed in Windows and Mac platforms.
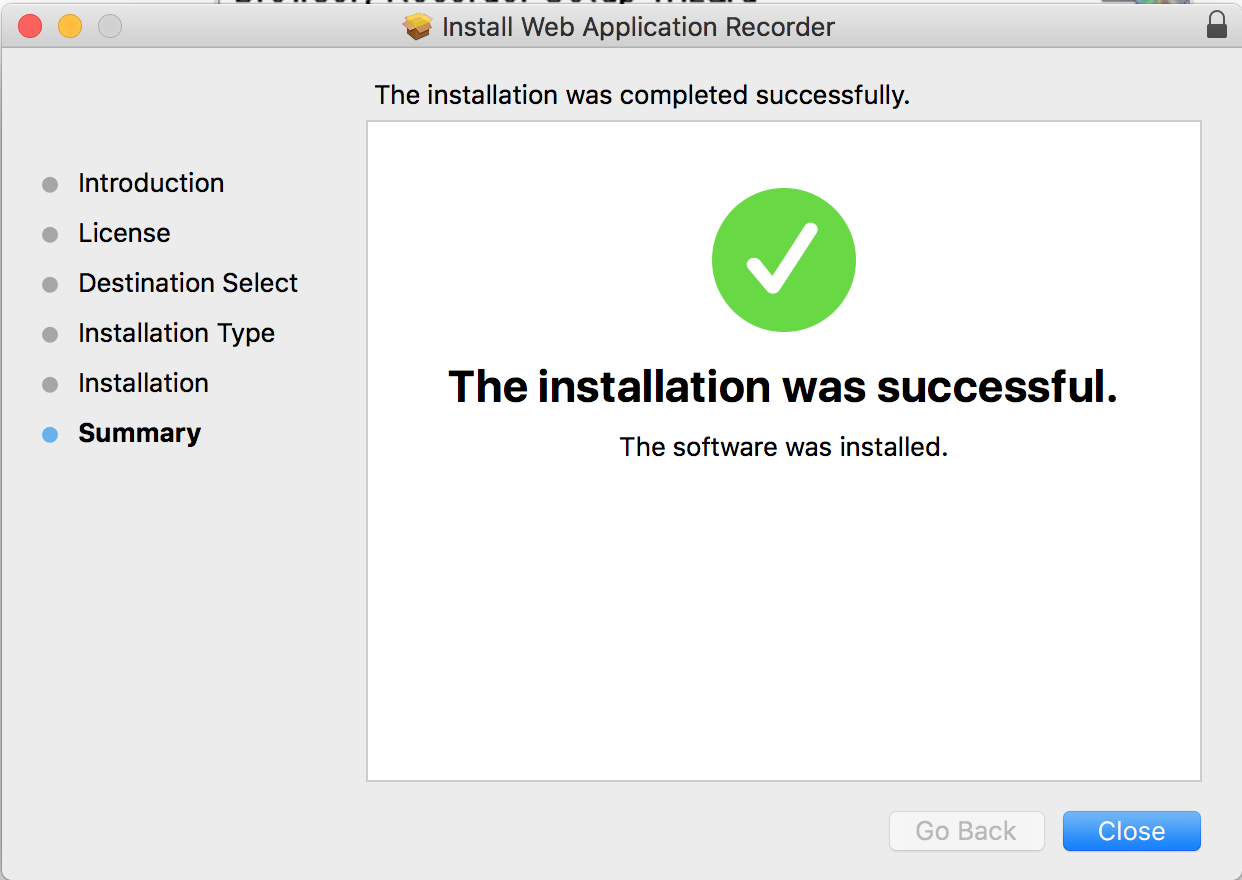
- After the download, click the Web Transaction (Browser) recorder link and select Next to run the file in your system.
- To access the Site24x7 Web Transaction (Browser) Recorder tool, follow the steps below:
- Windows Machine: Click Start Menu > All Programs > Site24x7 Web Transaction (Browser) Recorder.
- Mac Machine: Click Launchpad > Click the Site24x7 Web Transaction (Browser) Recorder icon.
Import Selenium IDE Test Cases in Web Transaction (Browser) Recorder
The Selenium-IDE (Integrated Development Environment) is a tool used to create Selenium based test cases/transactions. Its simple Firefox plug-in is an efficient way to develop test cases in .side format. You can import previously recorded .side/HTML test cases from the Selenium IDE into the Web Transaction (Browser) recorder. Once imported, you can set up Web Transaction (Browser) - Selenium WebDriver monitors automatically instead of recording them all over again. Follow the steps below to import a Selenium test case into Web Transaction (Browser) - Selenium WebDriver:
- Use Site24x7 login credentials to access the recorder tool.
- Once logged into the Web Transaction (Browser) recorder, click the "Import Selenium Script" button.
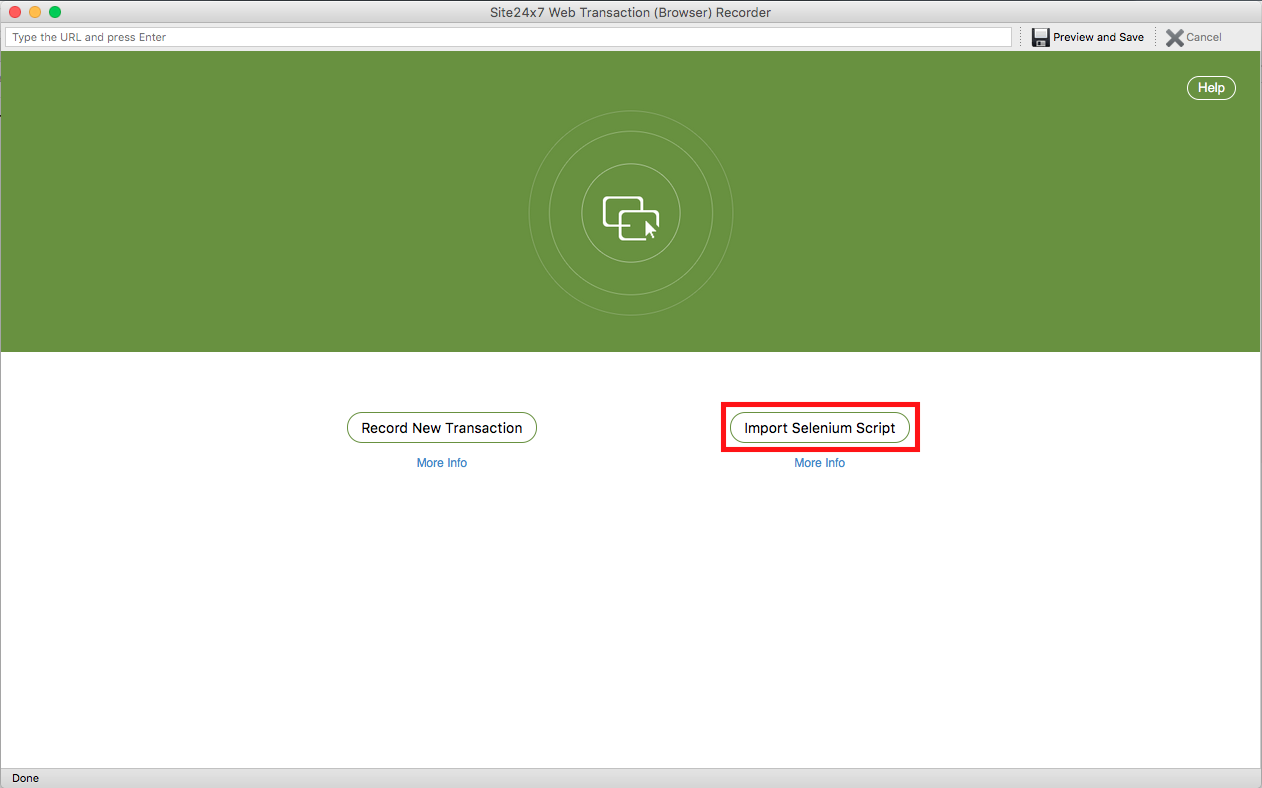
- Browse your local machine to import a Selenium IDE .side/HTML Script to the Web Transaction (Browser) recorder.
- Once the script has been successfully imported to the Web Transaction (Browser) recorder–verify all the imported steps, list of actions and their respective response times in milliseconds under the Recorded Transactions in Preview and Save screen.
NoteIf the Recorded script has captcha fields, you'll be notified about this as a warning/information just before the actual Test playback starts. You can always skip this and proceed with the Test Playback.
- You can perform the following actions in the Preview and Save transaction screen:
- Step Name: Modify the step name. Verify the commands listed under each step.
NoteHere is an exhaustive list of Selenium commands supported in Web Transaction (Browser) - Selenium WebDriver.
- Generate alert if the following keyword is NOT present: Select a particular step and enter the keywords which needs to be present in that action selected. Get alerted if the keyword is NOT present in that web page.
- Generate alert if the following keyword is present: Select a particular step and enter the keywords which need not be present in that action selected. Get alerted if the keyword is present in that web page.
NoteYou must adhere to the following conditions while adding keywords in the given field:
- A single string or keyword can be configured with/without any double quotes (ex: HTML).
- If there are two strings, which comprise a single keyword–add a space in between the two strings and enclose it with double quotes. (ex: "HTML response").
- In case you have more than a couple of individual keywords configured, you will have to separate them with a space and also use double quotes for each of them. ("monitor" "HTML").
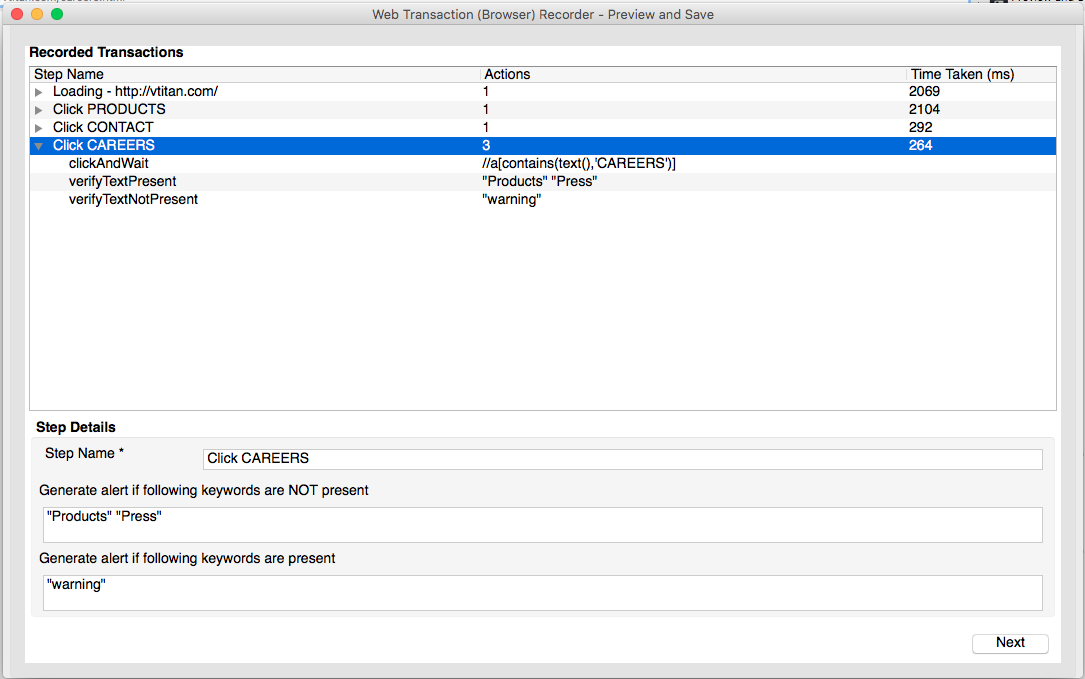
- Step Name: Modify the step name. Verify the commands listed under each step.
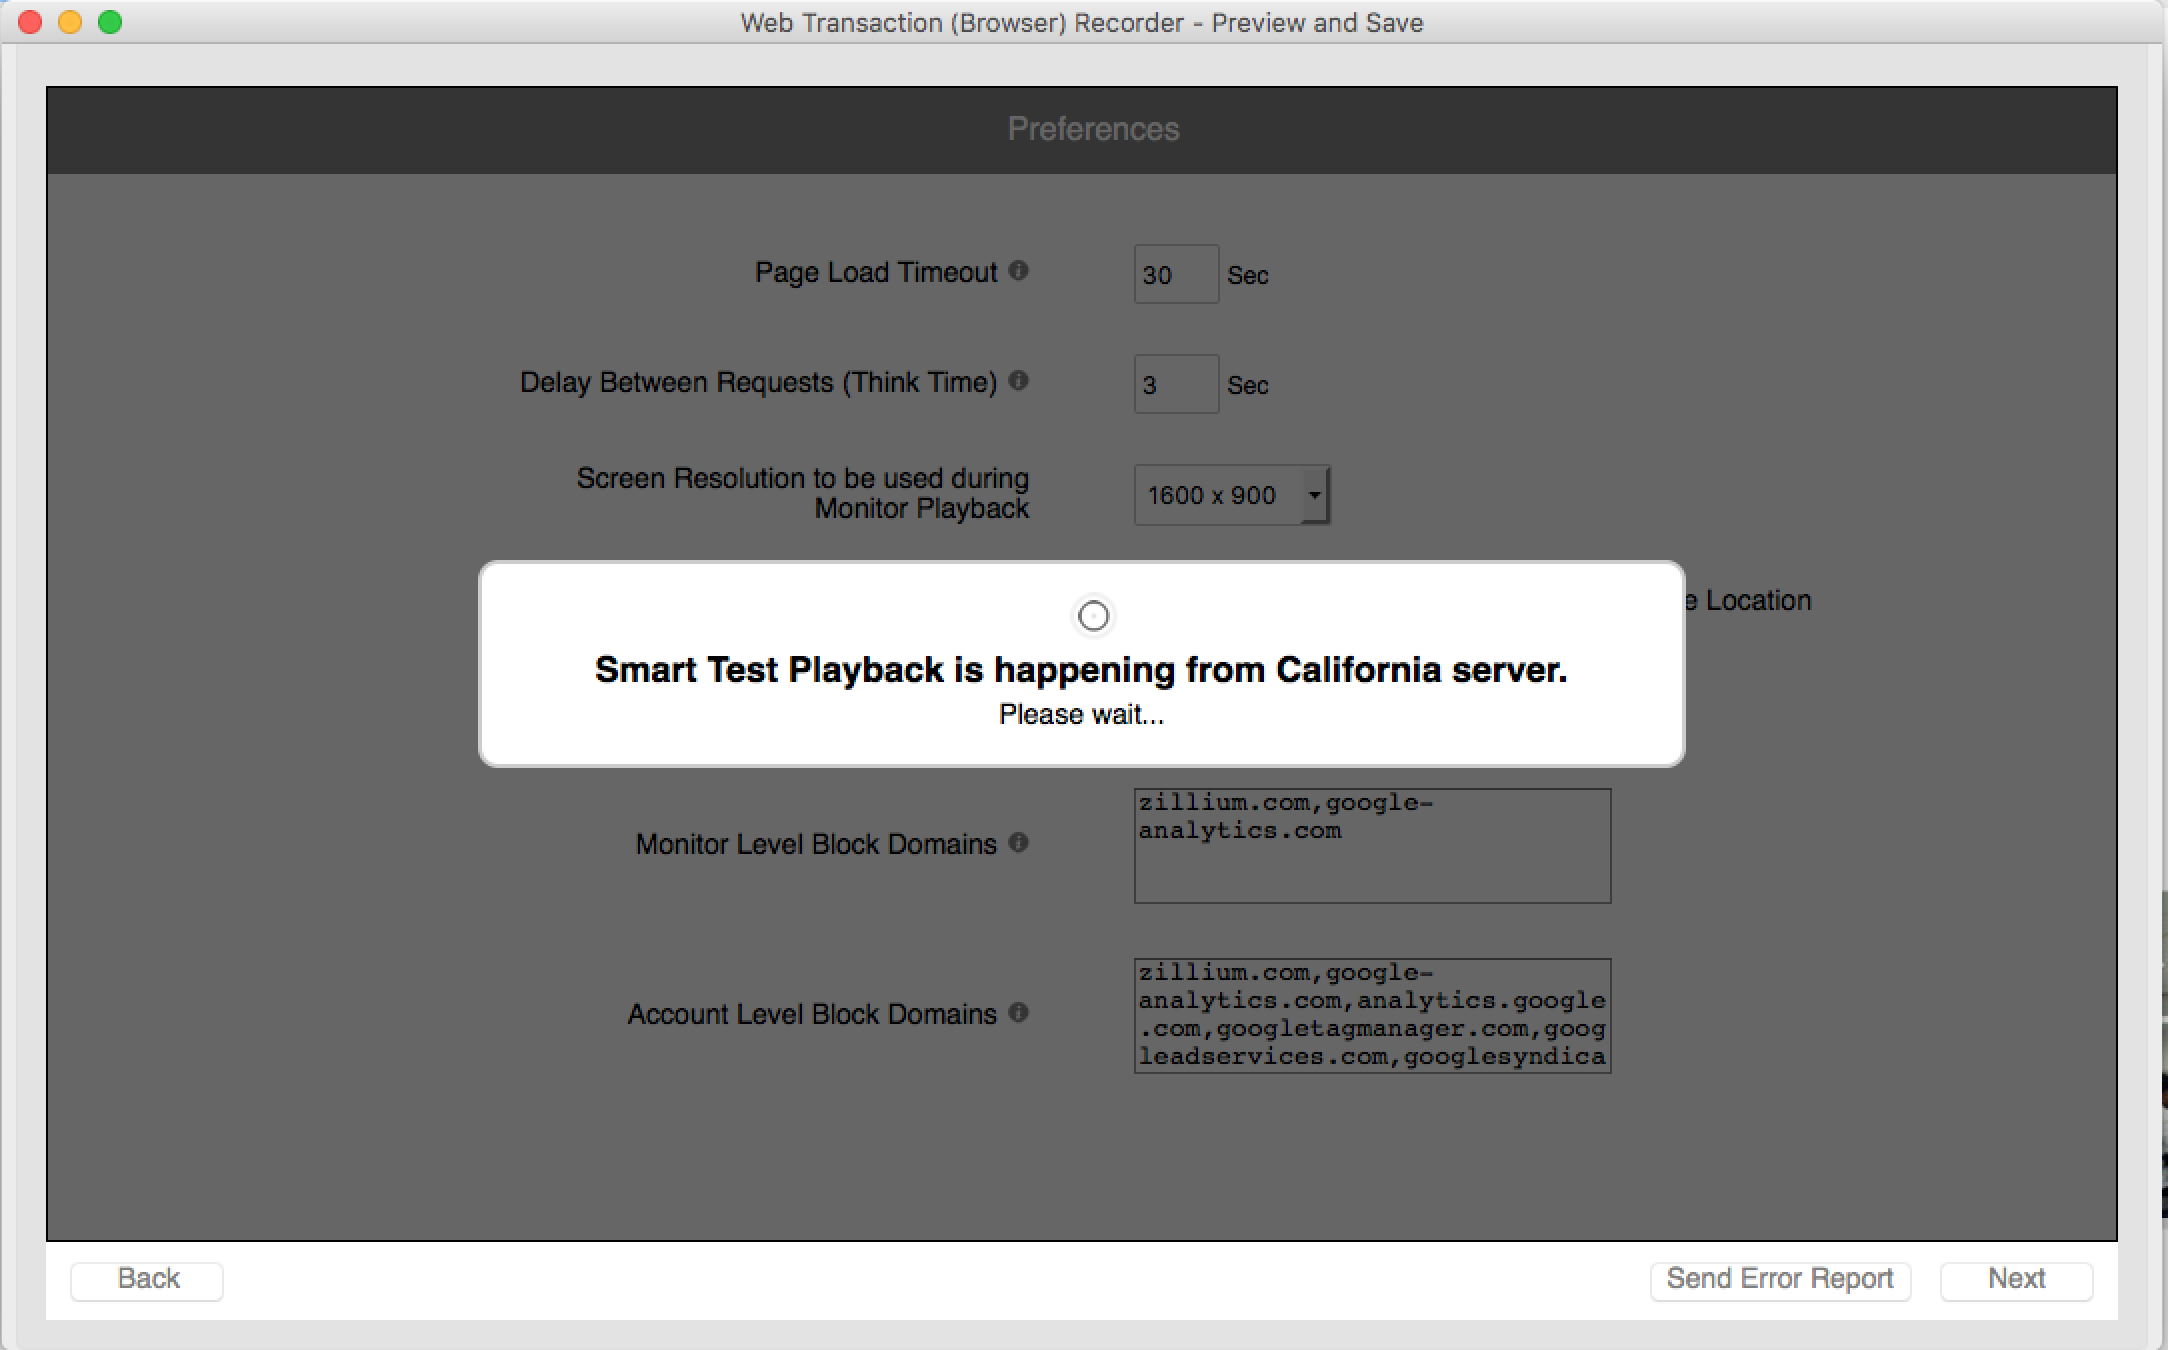
- Click Next to update your Test Preferences:
- Page Load Timeout: The total estimated time taken to load the HTML and all its associated components including JavaScript and images. This time can be specified between 1 and 30 seconds.
- Delay Between Requests (Think Time): It's the time to wait before initiating the next step in the transaction, while running the test. This is useful when your webpage needs additional time to load all components correctly (mainly AJAX components). Value can be set between 0 and 10 seconds.
NoteThink time is set as 3 seconds by default.
- Screen Resolution to be used for Monitor Playback: Pick your preferred screen resolution that yields best results during a playback by Site24x7.
NoteThe following screen resolutions are supported in Site24x7:
- 1024x768
- 1366x768
- 1600x900
- 1920x1080
- Select Browser for Monitoring: Choose either Firefox or Chrome browser for test playback.
- Geographical Location to Test Playback: Select the radio button to choose the location from where the test playback should be performed.
NoteYou can press the radio button to choose an appropriate global location or Private location for monitoring your website.
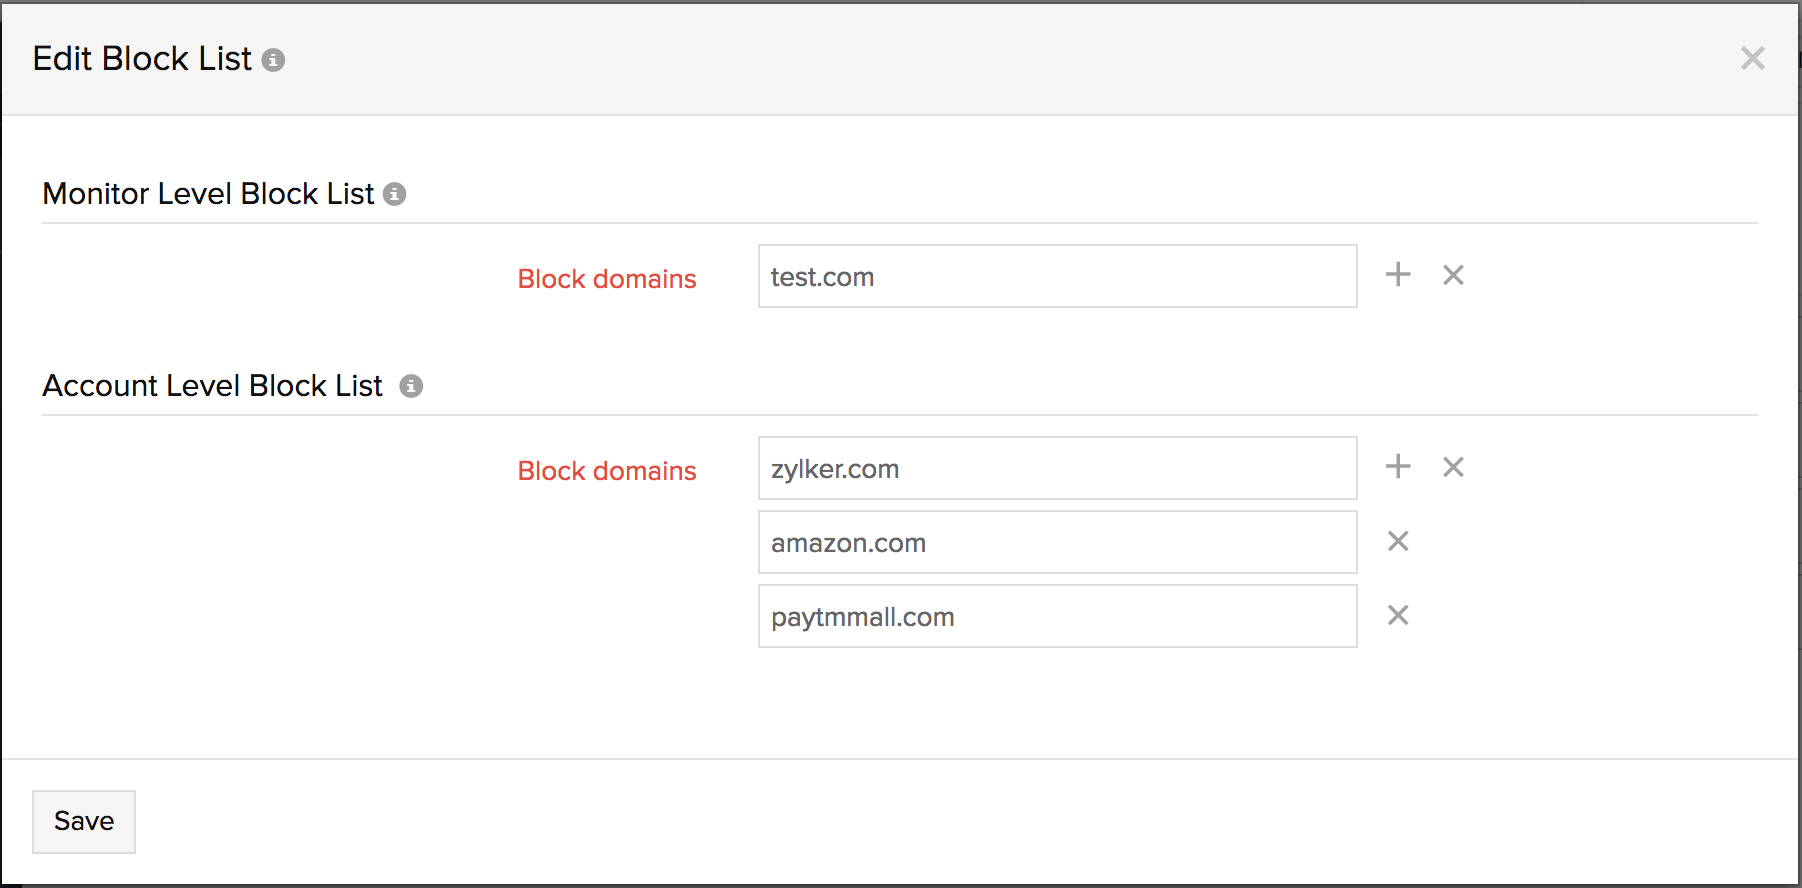
- Monitor Level Block Domains: If you want to exclude the traffic from a domain(s) while monitoring your web application, add those domains as comma separated domain names. This list is valid only for this monitor configuration.
- Account Level Block Domains: Add domain names that need to be ignored at a global account level, during monitoring. Learn how to block domains, while tracking user activity in google analytics.
NoteUse a comma separated domain list to block multiple domains names.
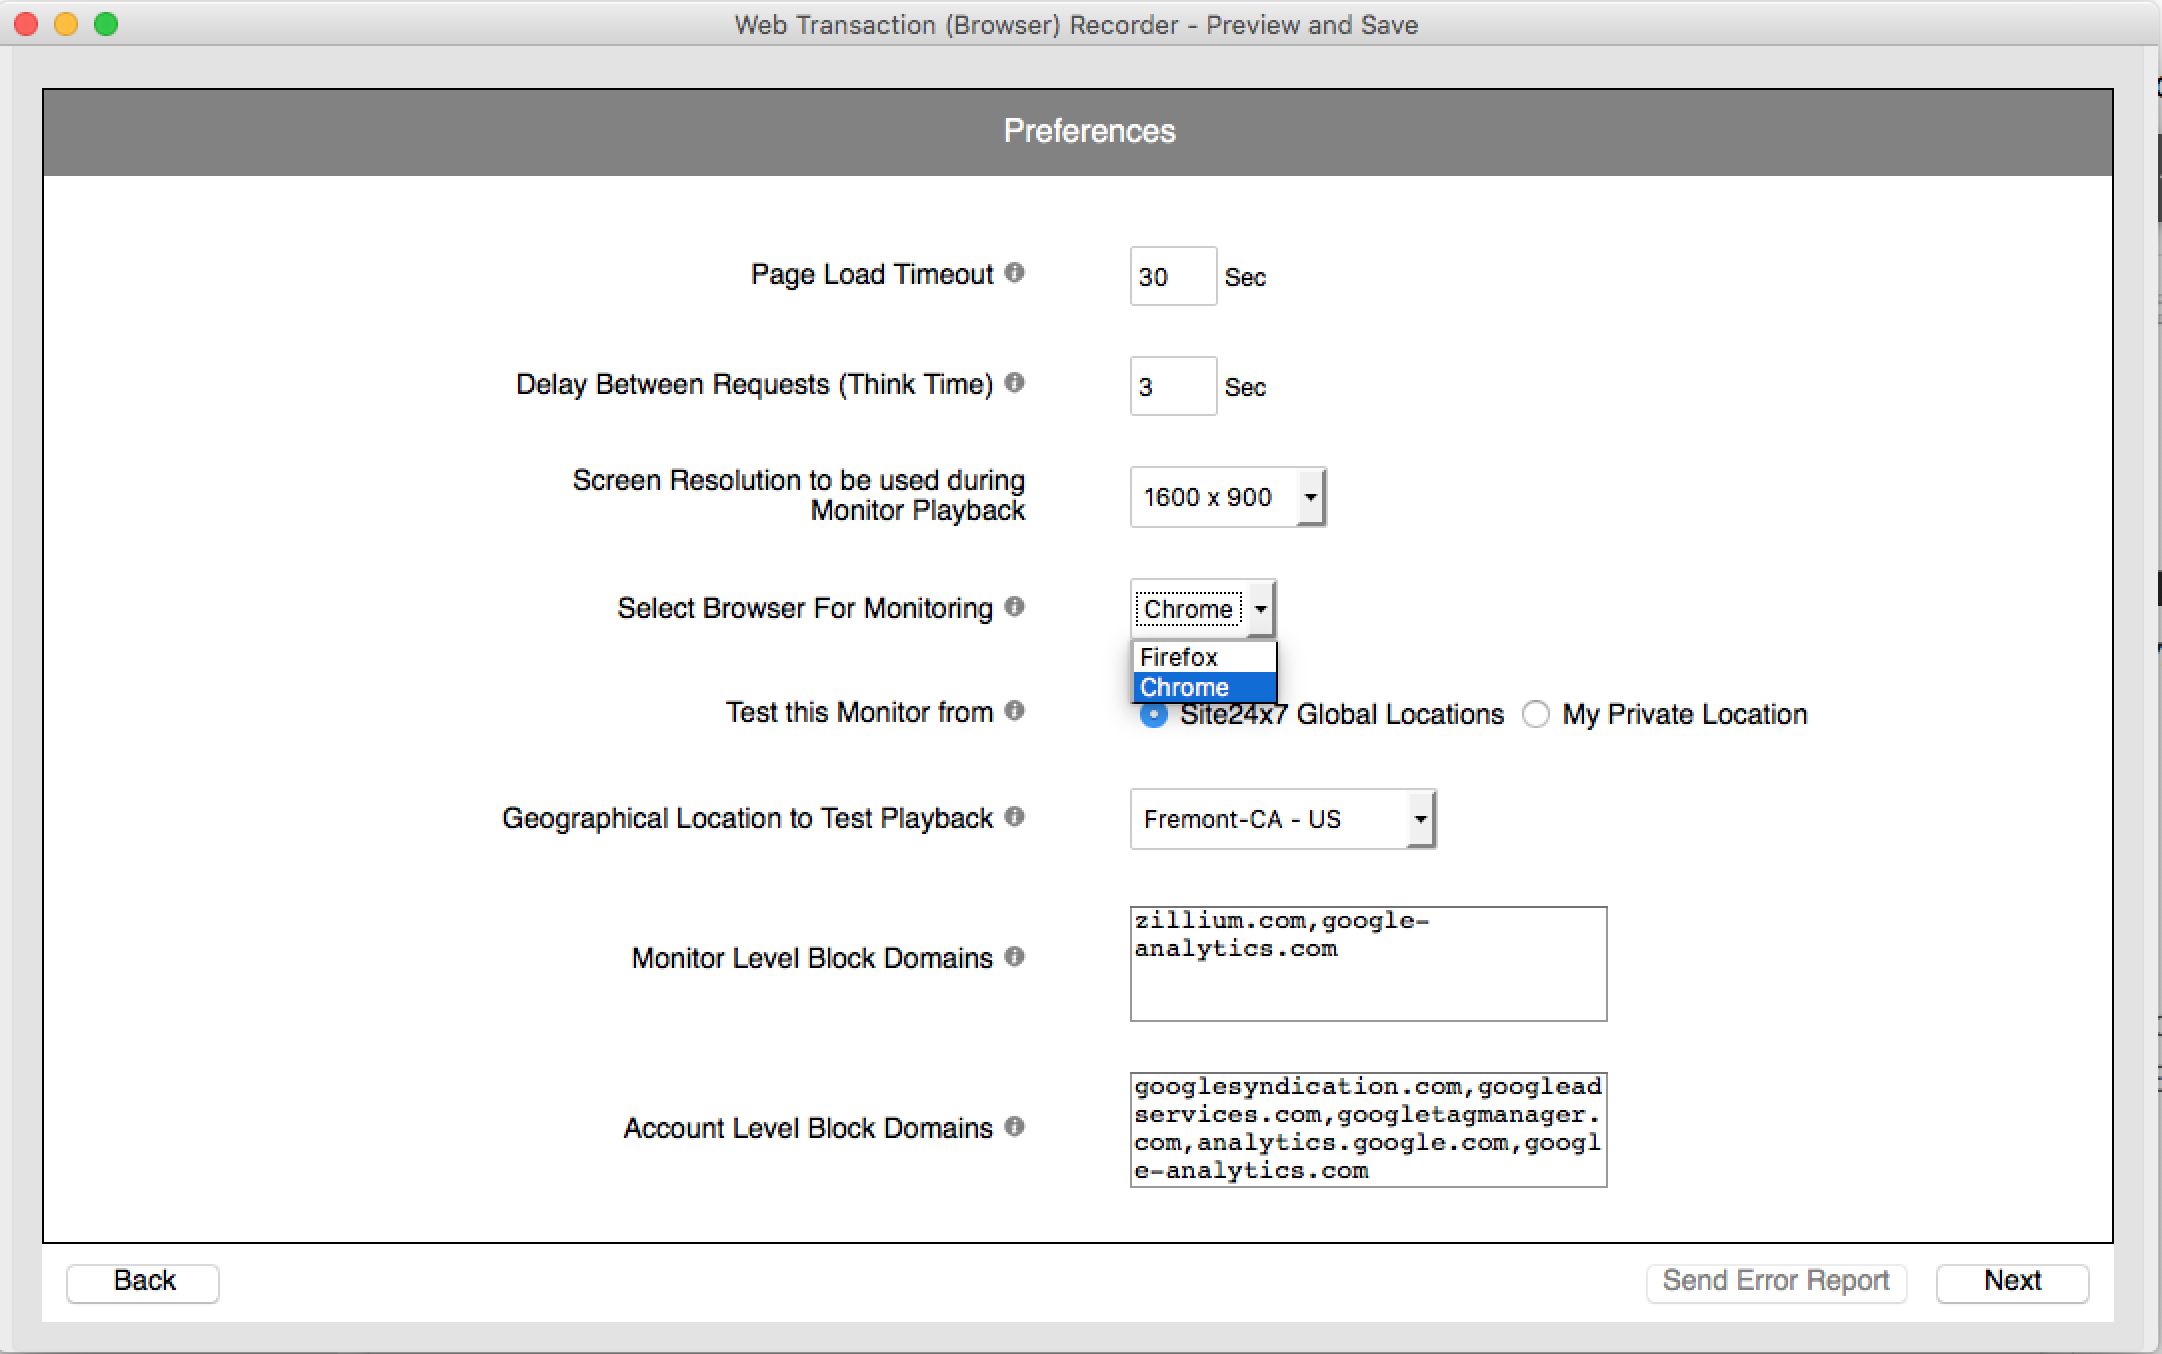
- Click Next to initiate a trial playback of the imported script from the chosen location.
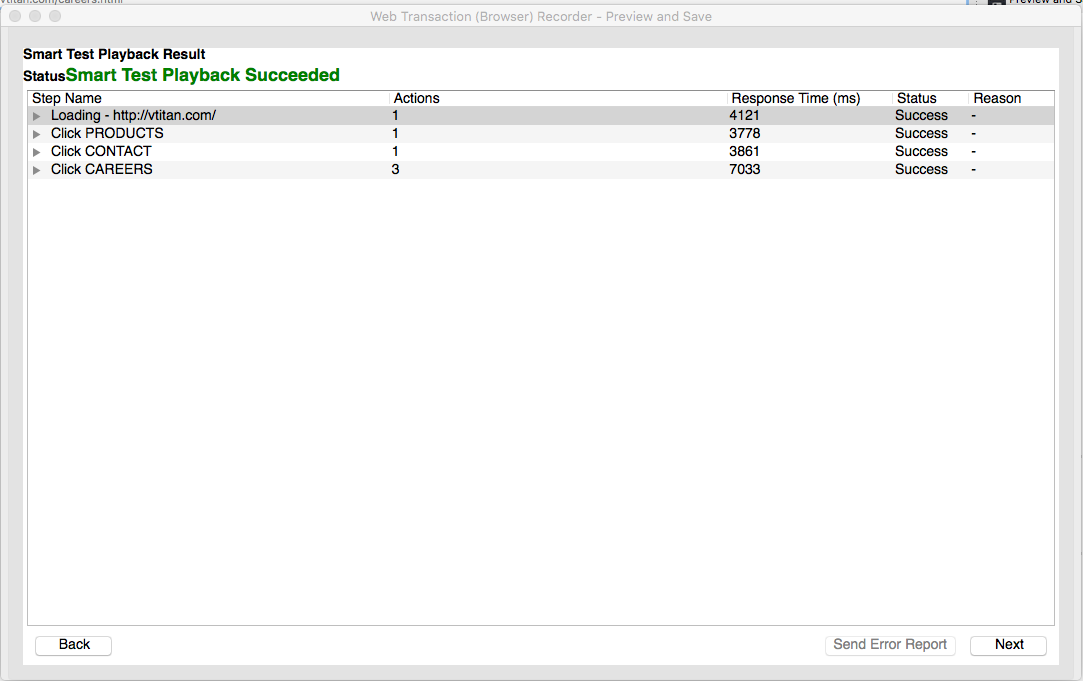
- After the Test Playback Result, Click Next.
NoteOn playback result, if there is a keyword failure, the trouble message (\"Keyword check failed\") will be displayed on the recorder screen.
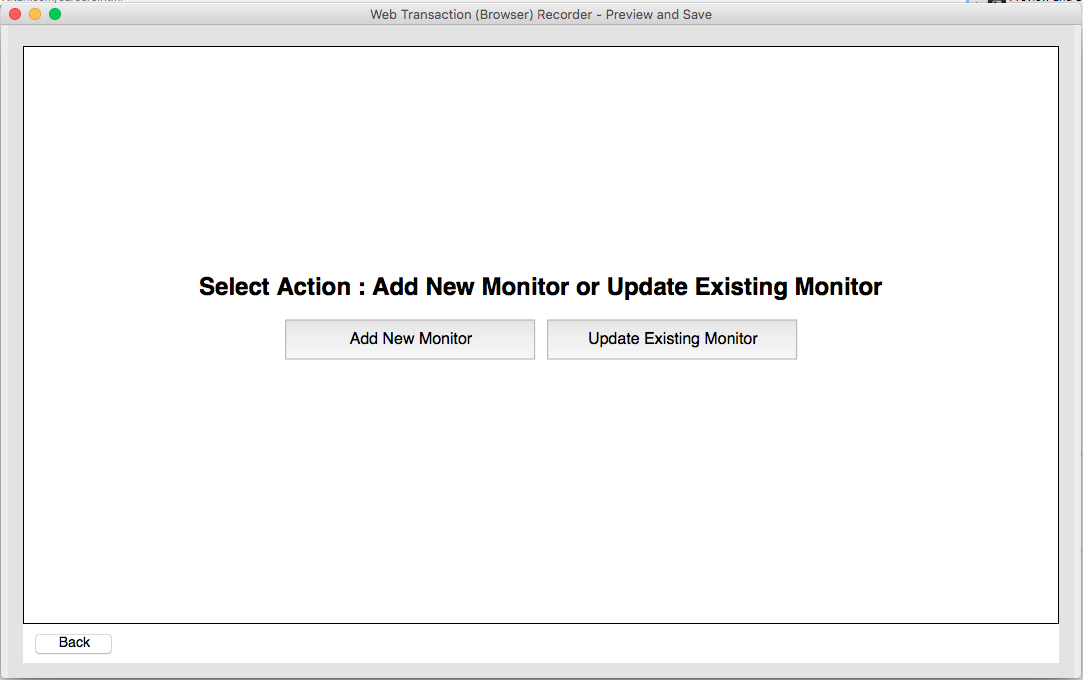
- You might want to add a new monitor or update the existing monitor configuration. Click the relevant button as per your requirement.
NoteYou'll be able to view the below window with the Update Existing Monitor button, only when there is a pre-existing Web Transaction (Browser) - Selenium WebDriver configured in your Site24x7 account. If you don't have any Web Transaction (Browser) - Selenium WebDriver setup in your account, you'll be directly asked to "Add New Monitor".
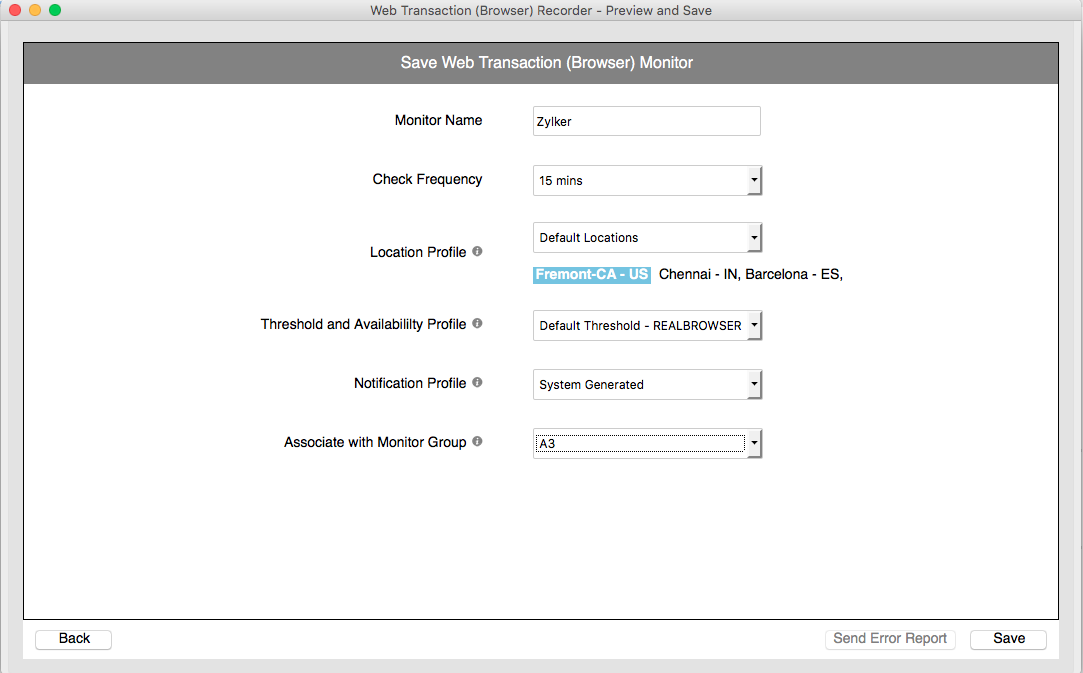
- If you wish to add a new monitor, then specify the following parameters to set up the Web Transaction (Browser) - Selenium WebDriver:
- Monitor Name: Enter the name of your monitor.
- Check Frequency: Choose the required polling frequency. The frequency can be set from 5 minutes to 1 day.
- Location Profile: Choose a global location or Private location from the dropdown list to setup monitoring of your website from this location. Choose your Linux flavor based On-Premise Poller from the drop down to customize your Private location. Additionally, customize and create location profiles based on your requirements.
To know more, refer Location Profile. - Threshold and Availability Profile: Select a threshold profile from the drop down list or choose the default threshold set available and get notified when the resources cross the configured threshold and availability.
To create a customized threshold and availability profile, refer Threshold and Availability. - Notification Profile: Choose a notification profile from the drop down or select the default profile available. Notification profile helps to configure when and who needs to be notifed in case of downtime.
Refer Notification Profile to create a customized notification profile. - Associate with Monitor Group: Select a monitor group from the drop down list to logically group your monitors.
To learn how to create a group for your monitors, refer Monitor Groups.
- Click Save.
- Now that the web script is saved–the Web Transaction (Browser) - Selenium WebDriver will be created in your Site24x7 account.
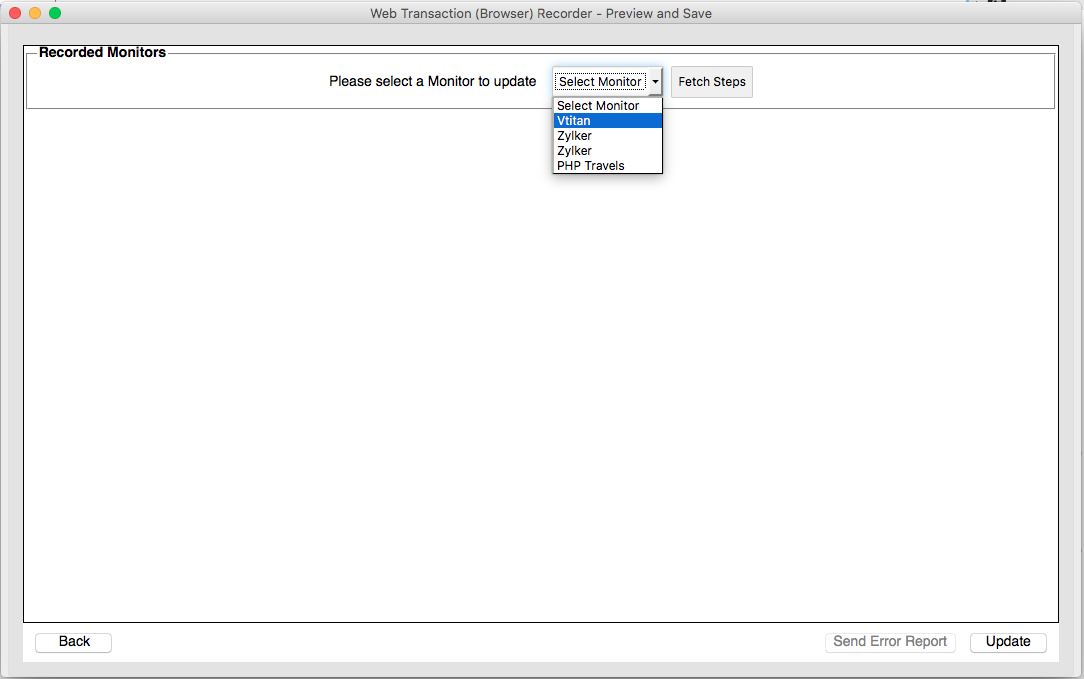
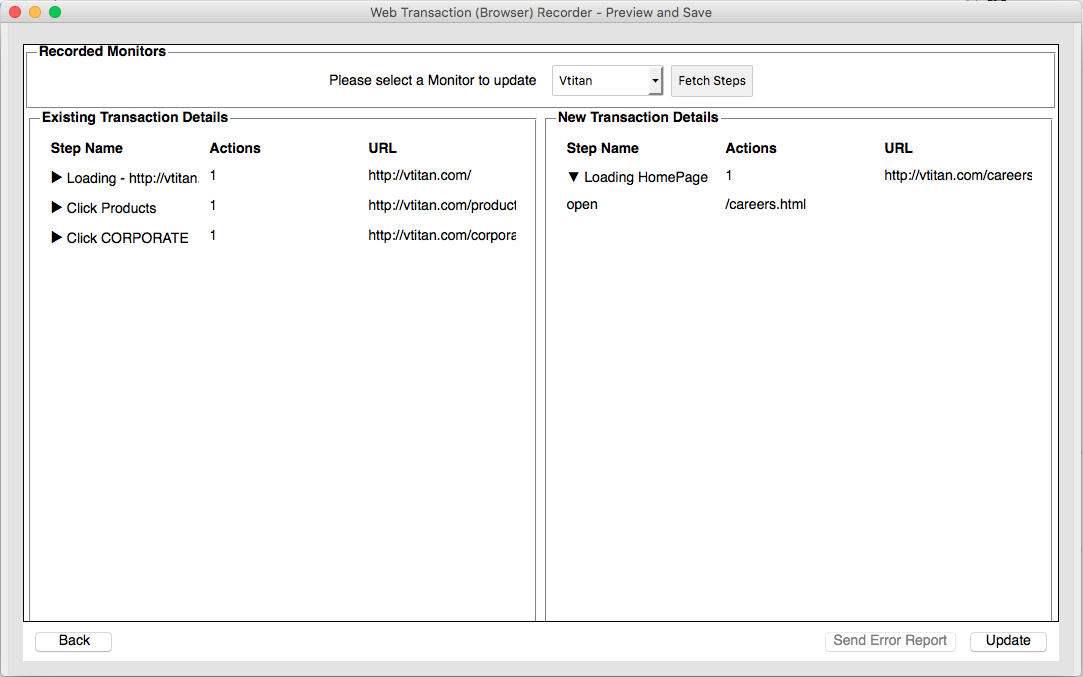
- If you wish to update an existing monitor configured in your account, then you may choose the relevant monitor from the drop down box; Click the Fetch Steps button to view the steps for the chosen monitor.
- Click Update to modify the existing monitor.
NoteThe Update Existing Monitor step will be available only when there is a pre-configured Web Transaction (Browser) - Selenium WebDriver setup in your account.
Edit/Modify Web Transaction (Browser) - Selenium WebDriver in Web Client
- Enter an appropriate display name for the added monitor.
- You can also build a block domain list to restrict monitoring of these domains. Click the Block domains link. When you click the link, you'll be prompted with a pop up window, where you'd be asked to add the domain(s) at the Monitor level or Account level.
NoteYou can also build a block domain list to restrict monitoring of these domains. Click the Block domains link. When you click the link, you'll be prompted with a pop up window, where you'd be asked to add the domain(s) at the Monitor level or Account level.
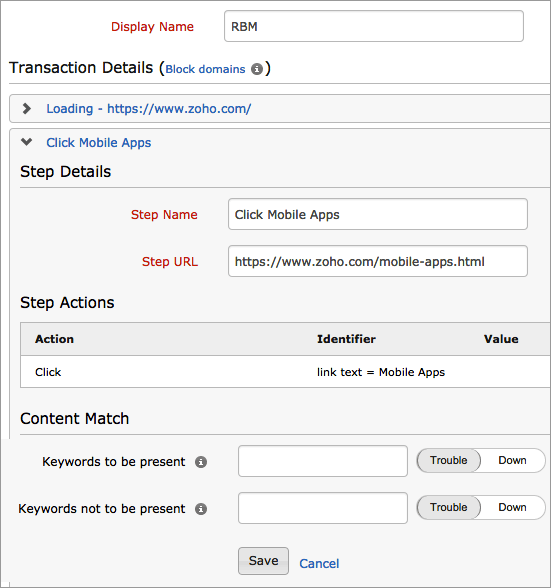
- Keywords to be present: Get alerted when the specified keywords are not present in the website. Mention the keywords in the check box and use the slider button to trigger the required kind of alert.
- Keywords not to be present: Get alerted when the specified keywords are present in the website content. Mention the keywords in the check box and use the slider button to trigger the required kind of alert.
NoteYou must adhere to the following conditions while adding keywords in the given field:
- A single string or keyword can be configured with/without any double quotes (ex: HTML).
- If there are two strings, which comprise a single keyword–add a space in between the two strings and enclose it with double quotes. (ex: "HTML response").
- In case you have more than a couple of individual keywords configured, you will have to separate them with a space and also use double quotes for each of them. ("monitor" "HTML").
- Learn more about Content Checks.
- Specify the following details to edit the web application:
- Page Load Timeout: The total estimated time taken to load the HTML and all its associated components including javascript and images. This time can be specified between 1 and 30 seconds.
- Delay Between Requests (Think Time): It's the time to wait before initiating the next step in the transaction, while running the test. This is useful when your webpage needs additional time to load all components correctly (mainly AJAX components). Value can be set between 0 and 10 seconds.
NoteThink time is set as 3 seconds by default.
- Set User Agent: Specify a custom user agent (web browser) to simulate different browser versions. You can customize this by specifying a relevant browser version.
Note
By default, Site24x7 Web Transaction (Browser) - Selenium WebDriver uses Firefox browser version 45 (Firefox version 63 for a few locations) or Chrome browser version 64 to monitor your recorded web transactions. Read more.
- Screen Resolution to be used for Monitor Playback: Pick your preferred screen resolution that yields best results during a playback by Site24x7.
NoteThe following screen resolutions are supported in Site24x7:
- 1024x768
- 1366x768
- 1600x900
- 1920x1080
- Select Browser for Monitoring: Choose either Firefox or Chrome browser for test playback.
- Check Frequency: Choose the required polling frequency. The frequency can be set from 5 minutes to 1 day.
- Global Locations: Choose a global location or Private location from the dropdown list to setup monitoring of your website from this location. Choose your Linux flavor based On-Premise Poller from the drop down to customize your Private location. Additionally, customize and create location profiles based on your requirements.
To know more, refer Location Profile.
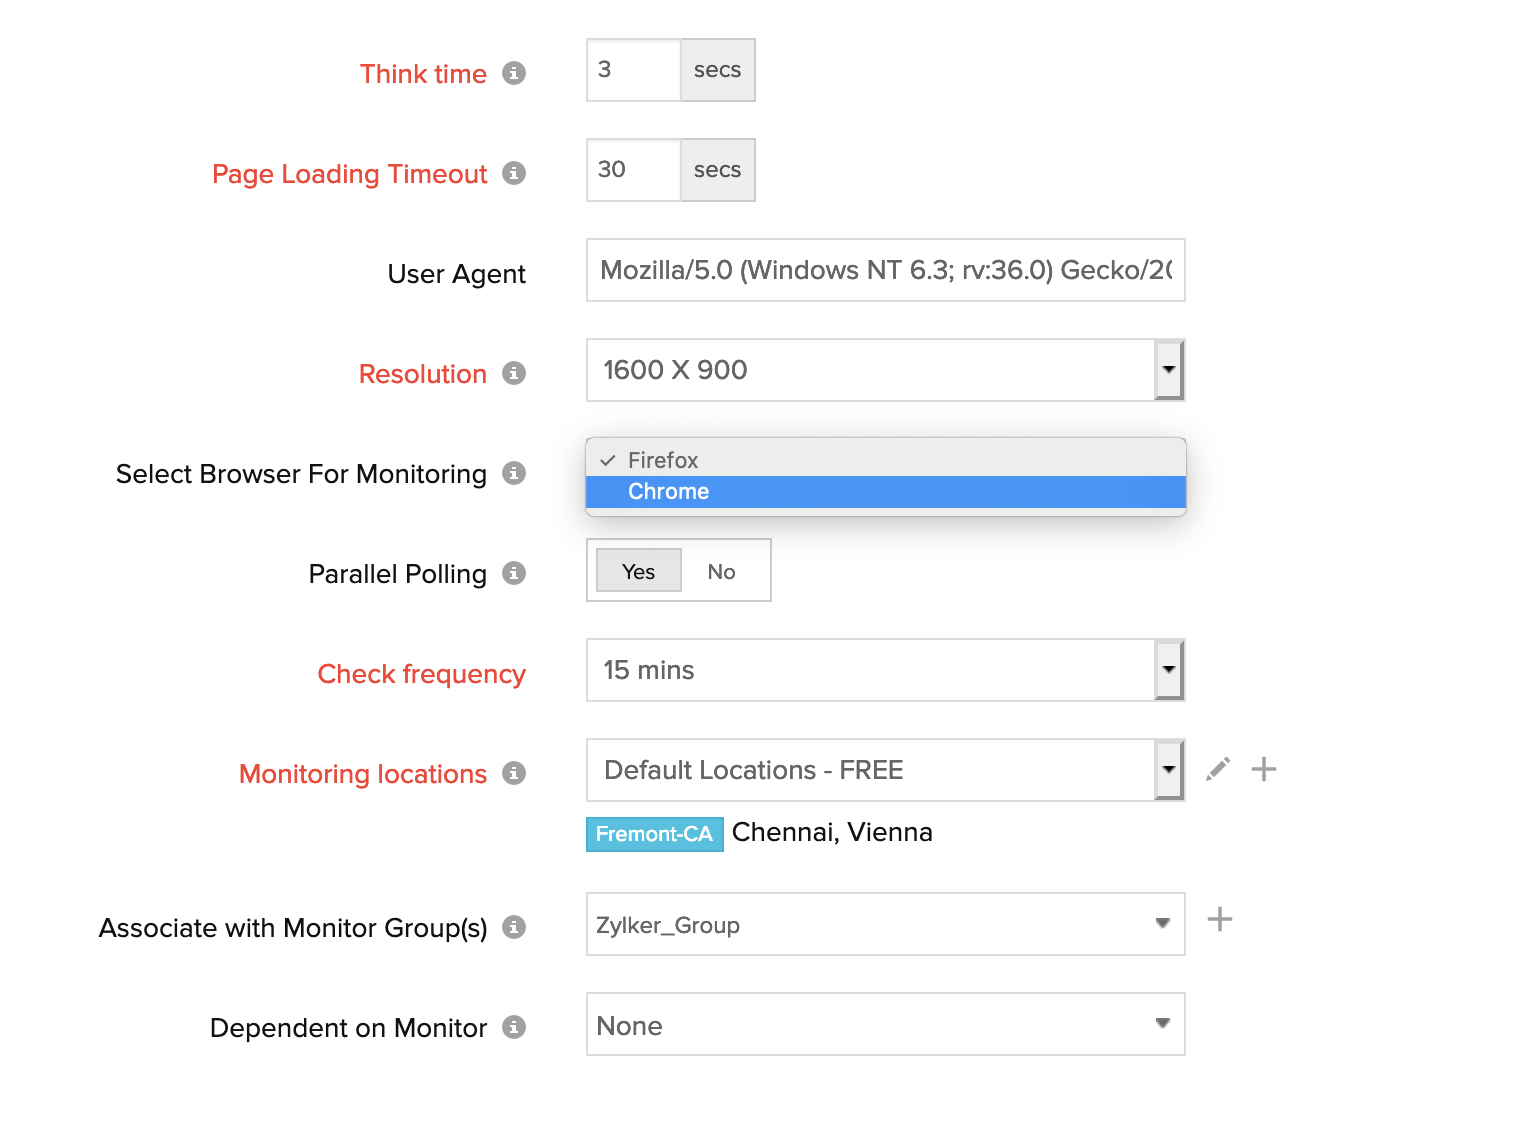
- Associate with Monitor Group: You can associate your monitor with multiple monitor groups by selecting the relevant monitor groups from the drop down list. This allows in logical grouping of your monitors.
To learn how to create a monitor group for your monitors, refer Monitor Groups. - Dependent Resource: Select a monitor from the drop-down list to choose it as your dependent resource. Alerts to your monitor will be suppressed based on the DOWN status of your dependent resource.
NoteConfiguring a dependent resource and suppressing alerts based on the dependent resource's status is part of providing you with better false alerts protection. Learn more about alert suppression at monitor level.
NoteIf you select "None" in the dependent resource field, alerting will progress as per your normal configuration settings. No alerts will be suppressed in this case as the monitor doesn't have any dependent resource.
NoteMultiple monitor group support for monitors allow a monitor to be associated with multiple dependent resources in different monitor groups. If during a normal monitor status check, any one of these dependent resources' status is identified as DOWN, the alert for the monitor will be automatically suppressed. However, the dependency configuration at monitor level is always given the higher priority over any other monitor group level dependency configuration for suppressing alerts.
- Specify the following details for Configuration Profiles:
- Threshold and Availability: Select a threshold profile from the drop down list or choose the default threshold set available and get notified when the resources cross the configured threshold and availability.
To create a customized threshold and availability profile, refer Threshold and Availability. - Notification Profile: Choose a notification profile from the drop down or select the default profile available. Notification profile helps to configure when and who needs to be notifed in case of downtime.
Refer Notification Profile to create a customized notification profile. - User Alert Group: Select the user group that need to be alerted during a outage.
To add multiple users in a group, see User Alert Group. - Tags: Associate your monitor with predefined Tag(s) to help organize and manage your monitors creatively. Learn how to add Tags.
- IT Automation: Select an automation to be executed when the website is down/trouble/up/any status change/any attribute change. The defined action gets executed when there is a state change and selected user groups are alerted.
To automate corrective actions on failure, refer IT Automation.
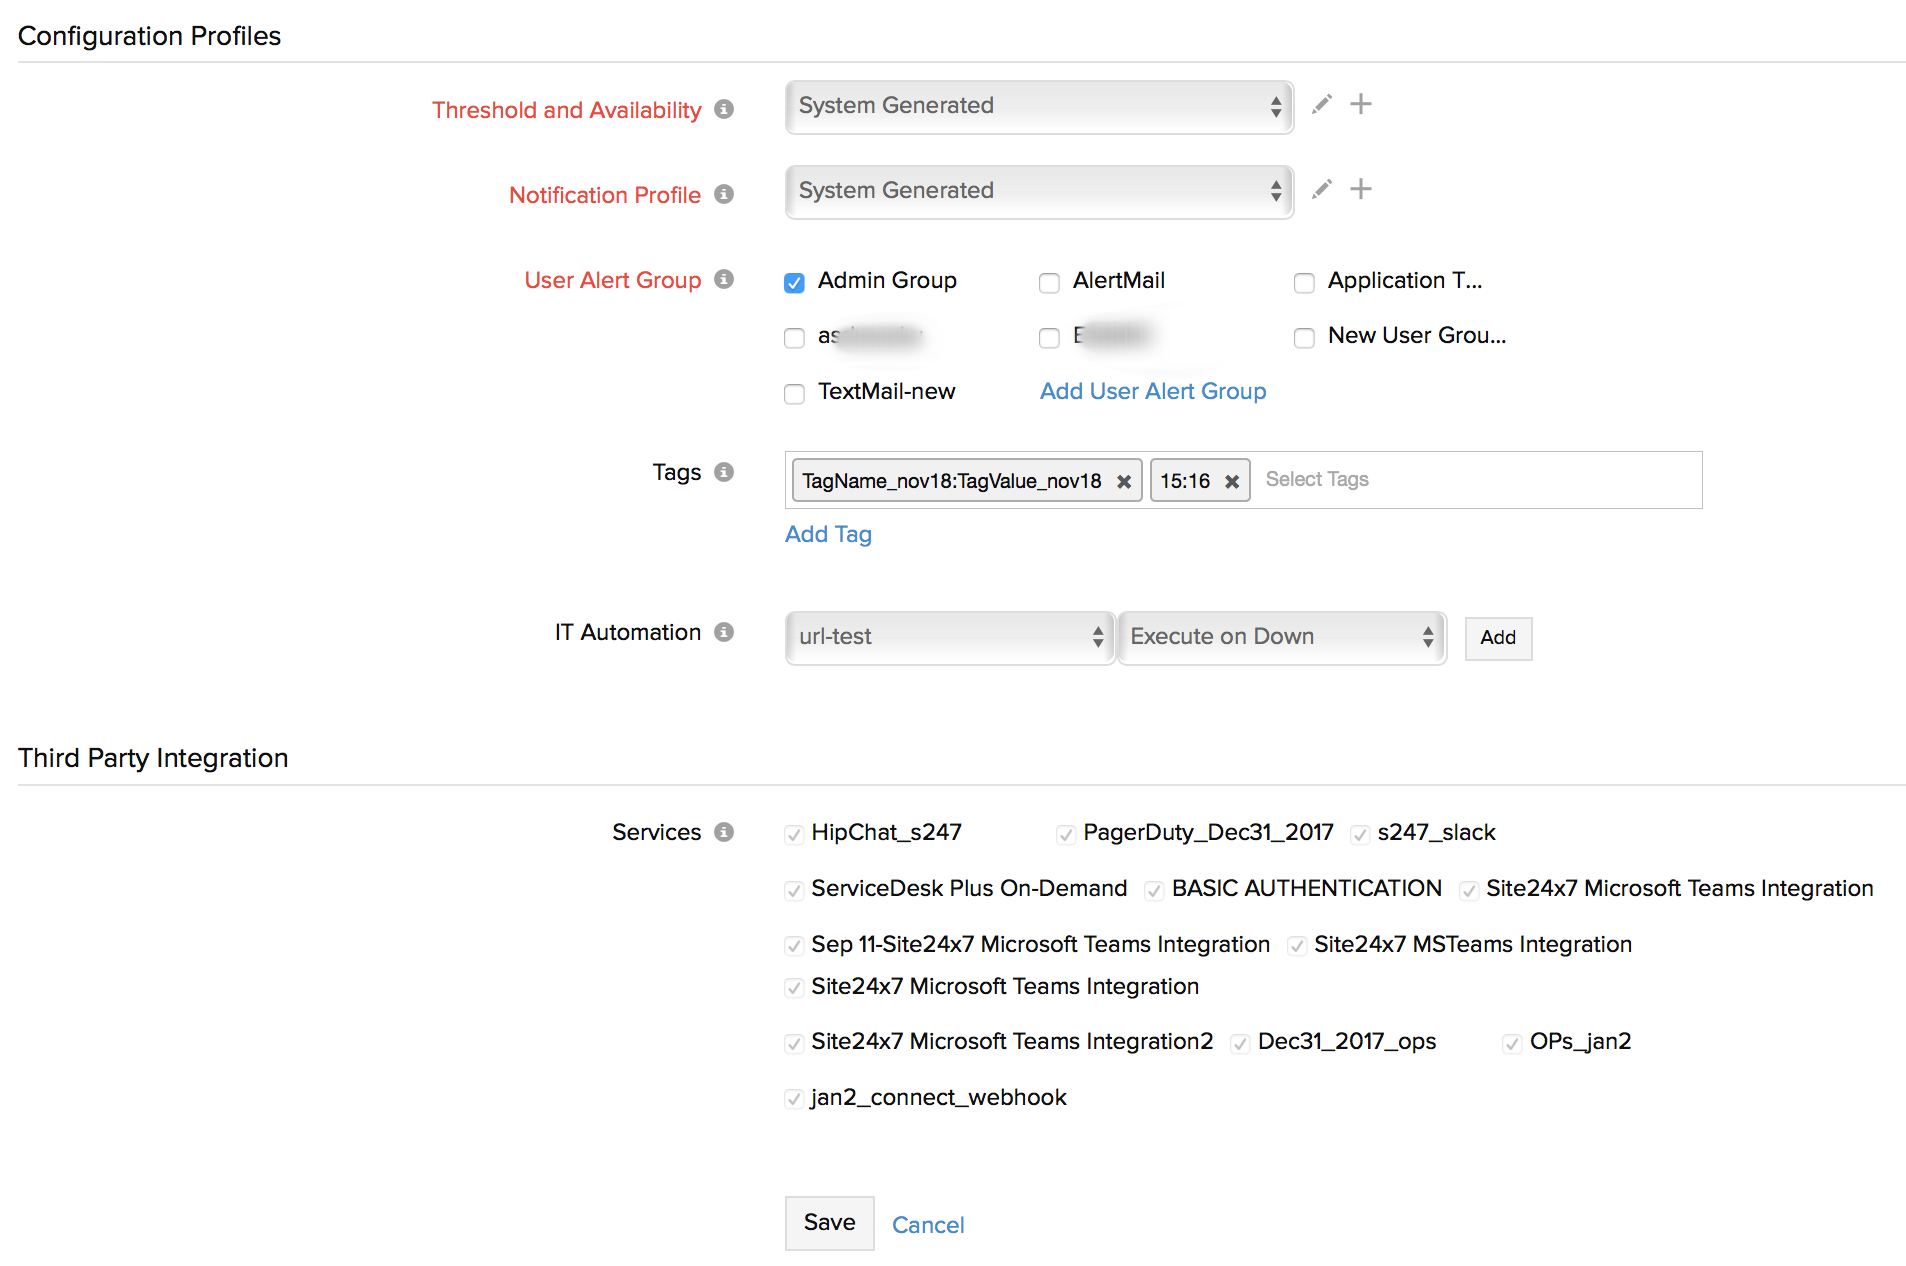
- Threshold and Availability: Select a threshold profile from the drop down list or choose the default threshold set available and get notified when the resources cross the configured threshold and availability.
- Third Party Integrations: Associate your monitor with a pre-configured third-party service. It lets you push your monitor alarms to selected services and facilitate improved incident management.
NoteIf you haven't setup any integrations yet, navigate across to ”Admin > Third Party Integration” to create one. Tell me more.
- Click Save.
Advanced Webscript Editing
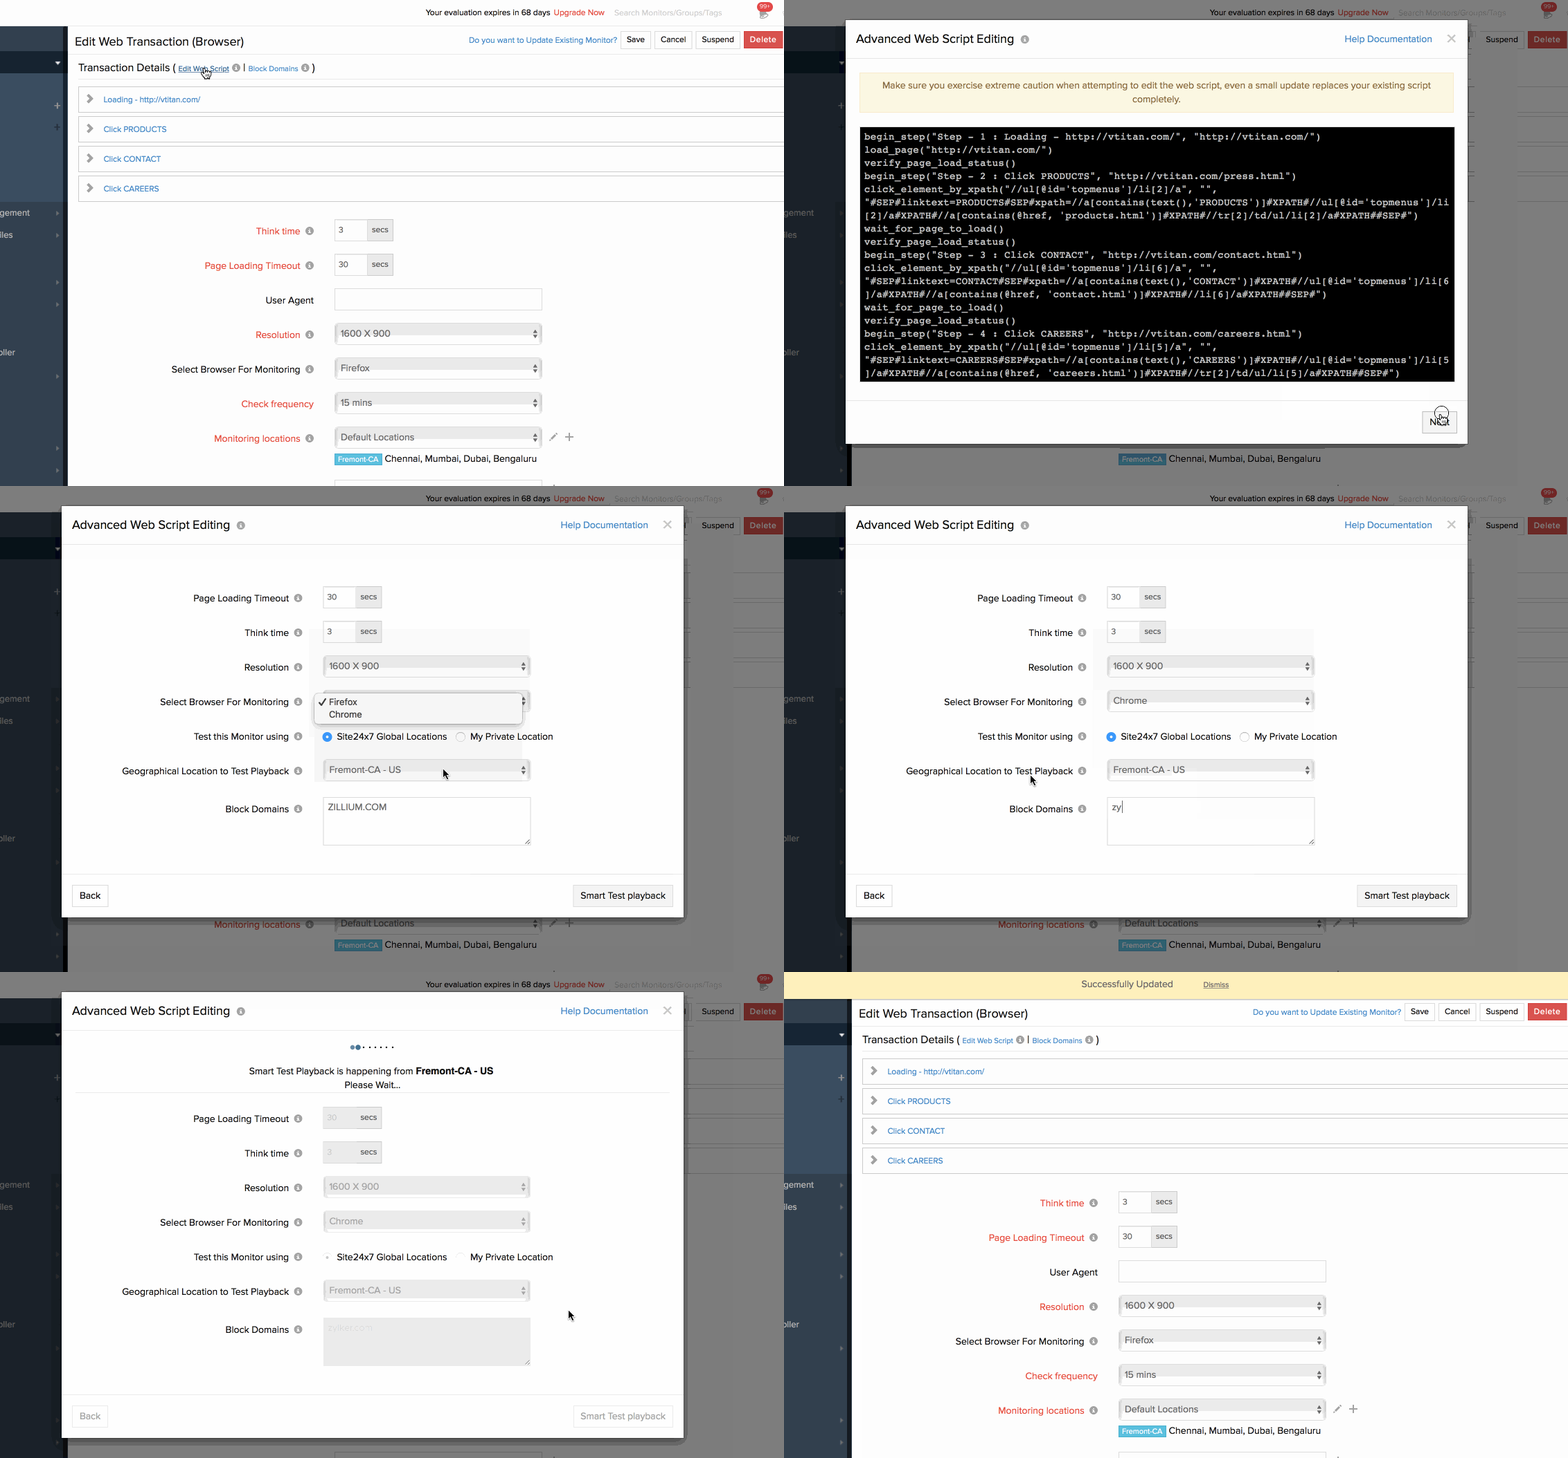
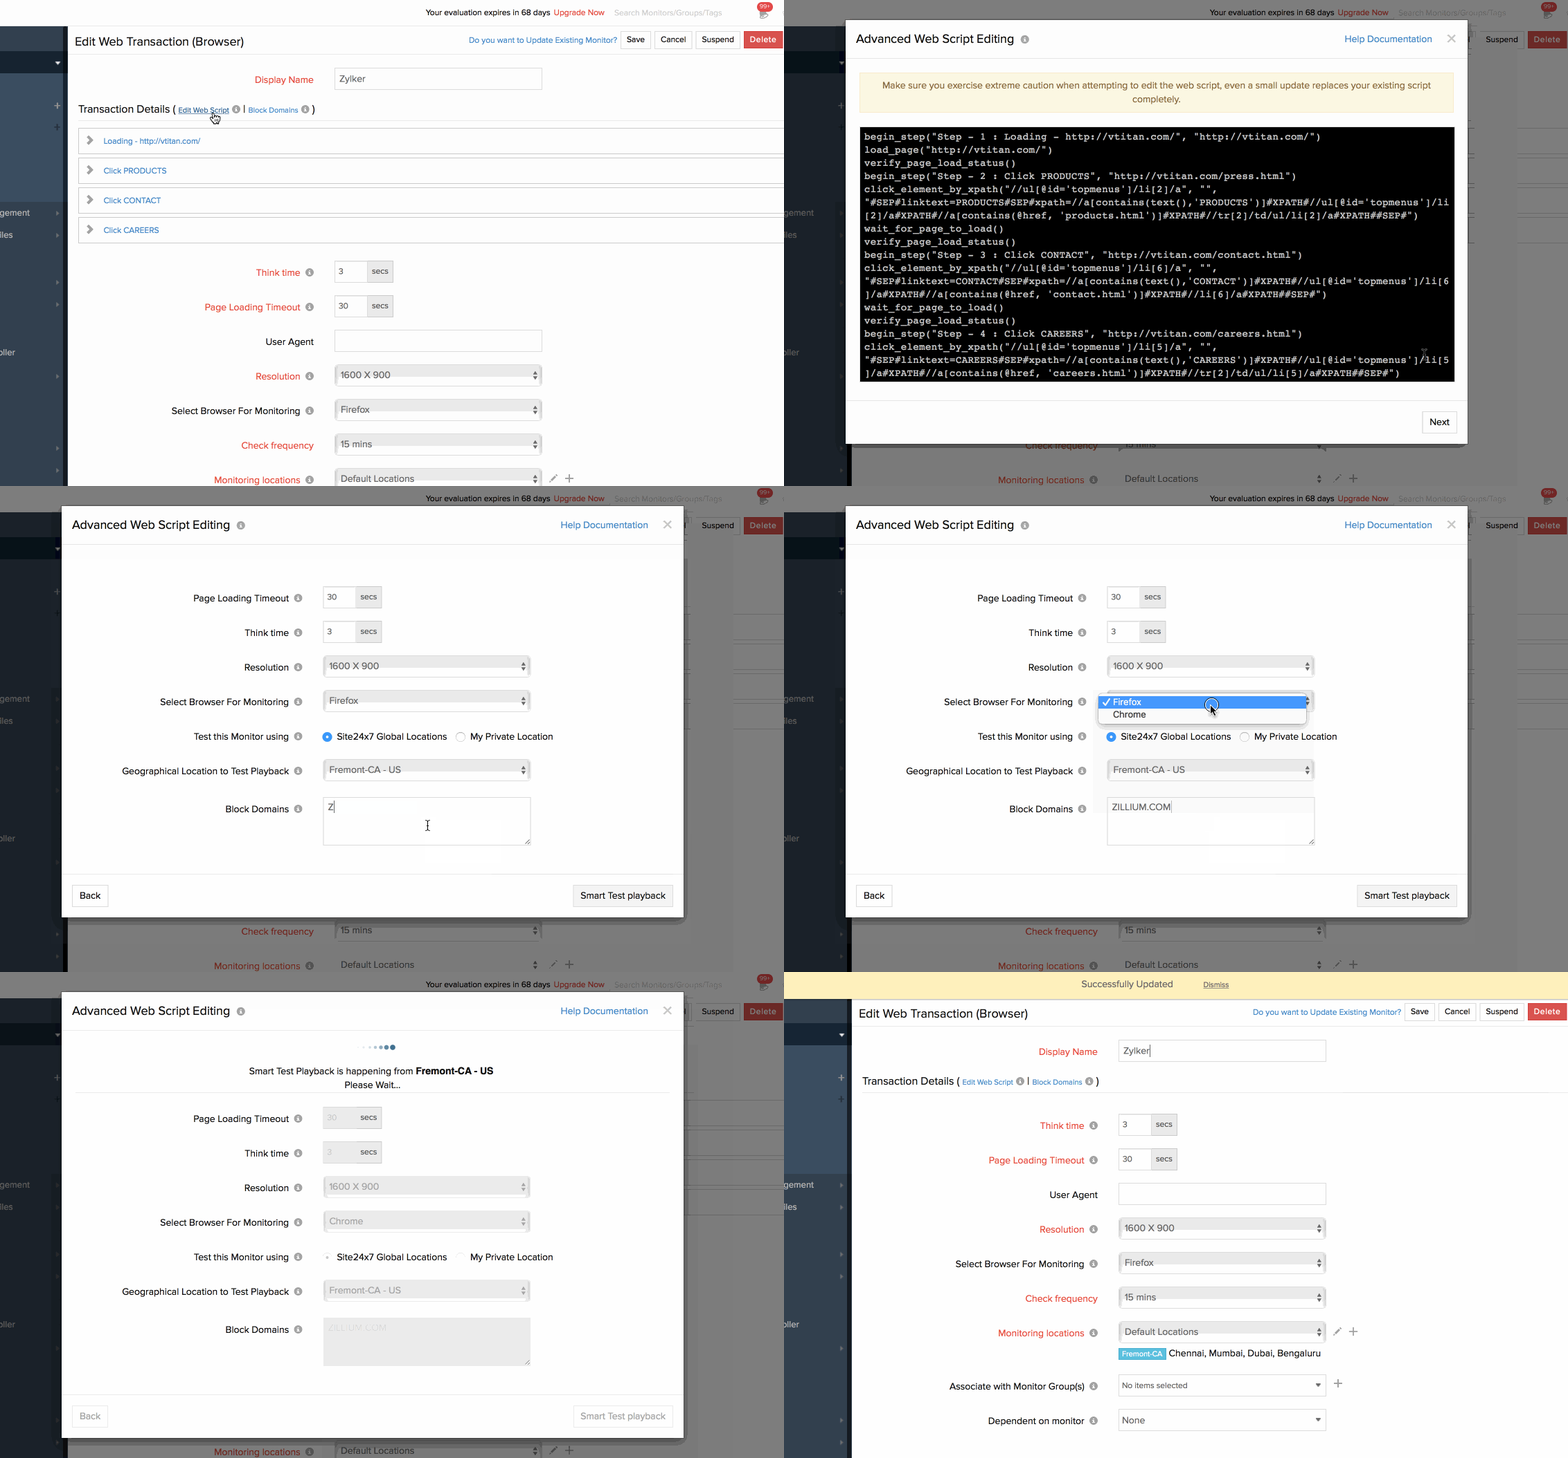
Advanced Web Script Editing lets you edit your existing web script, perform test playback and modify the existing script with an inline editor-all without having to use the Web Transaction (Browser) recorder. Read this document to learn how to edit Webscript.
Follow the steps below to initiate Advanced Webscript Edit:
- Login to Site24x7.
- Identify the monitor from the Monitor dashboard and open the relevant details page.
- Click Edit Web Script option.

- Alternatively, you can also open the edit monitor form and click Edit Web Script option given there.

- Edit the properties using the inline editor and initiate test playback after modifying the configuration settings. Once completed, the edited version replaces the previous script completely and the monitor configuration is also updated.
Clone Web Transaction (Browser):
You can replicate an existing Web Transaction (Browser) monitor using the Clone Web Transaction (Browser) option in Site24x7 web client. Using the Edit Webscript option in the web client, you can additionally make necessary step changes before cloning your monitor.
Follow the instructions below to successfully clone a Web Transaction (Browser) Monitor:
- Login to Site24x7
- Acess Admin > Inventory > Monitors
- Select the Web Transaction (Browser) Monitor that you wish to clone from the Monitor List. Now, hover over the
 icon and click Clone.
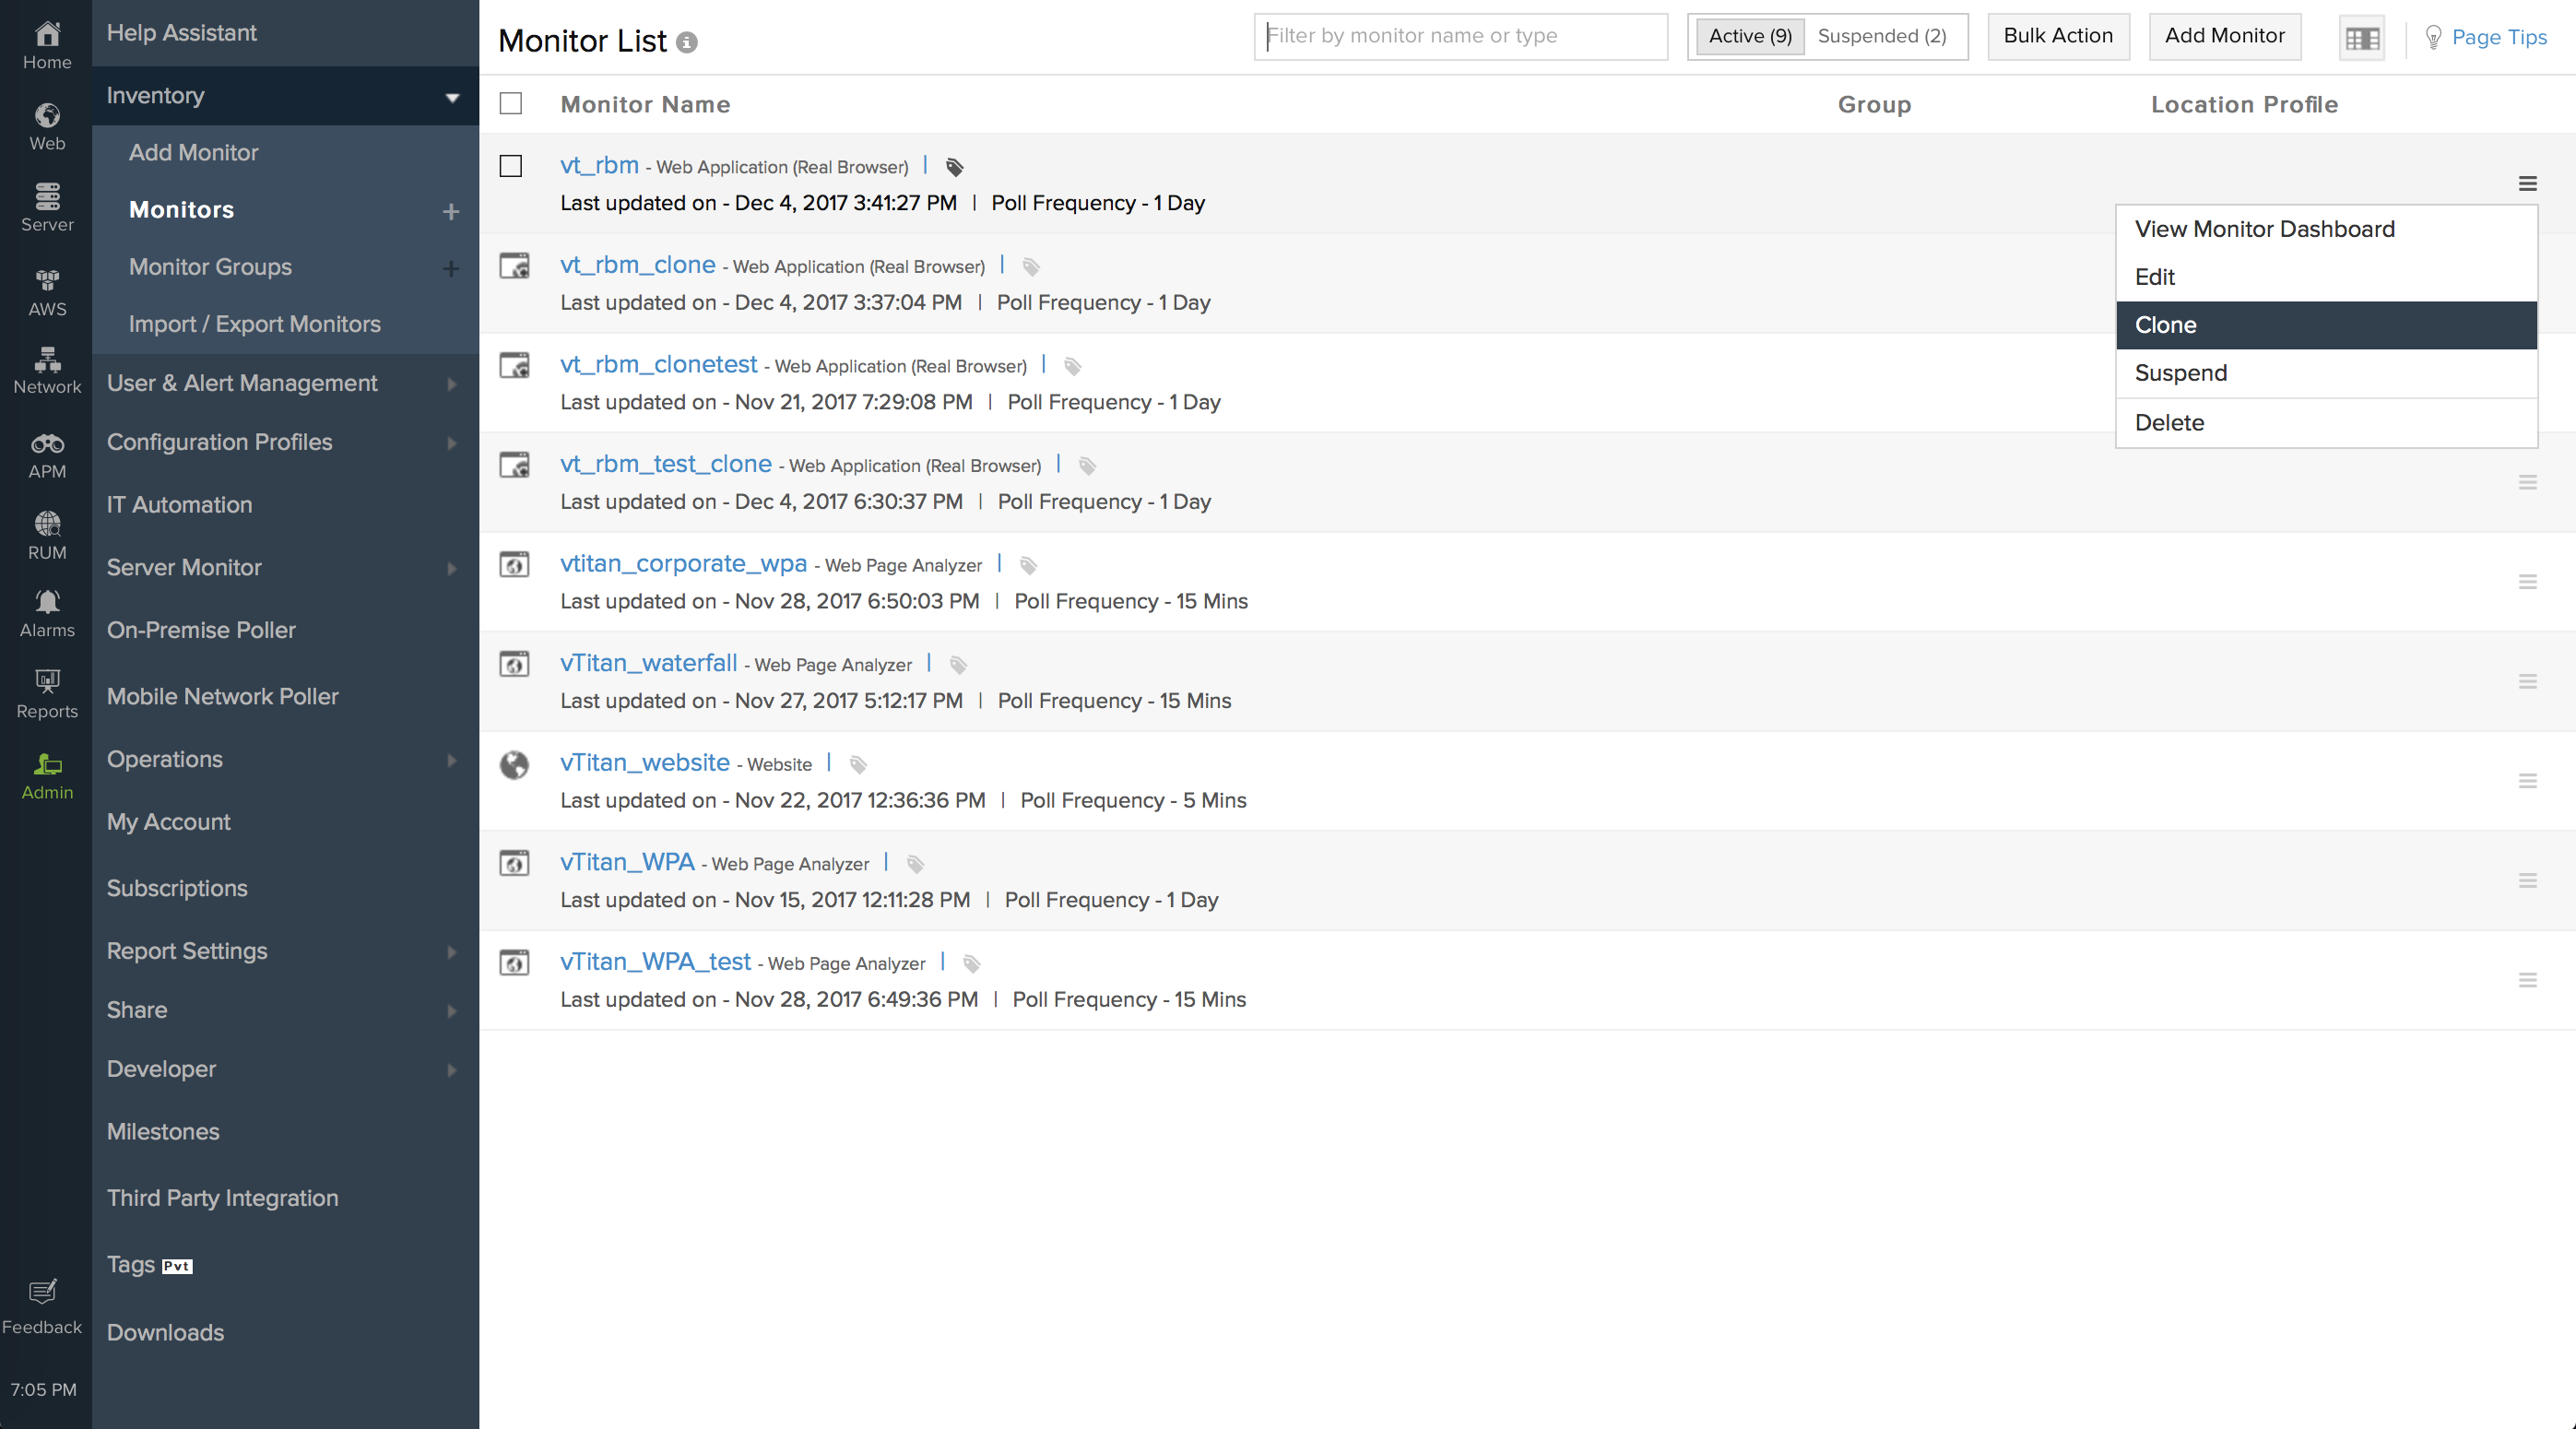
- Now you will be redirected to the Add Web Transaction (Browser) page. You can make necessary changes to the Base URL under Step Actions of a Transaction step, before proceeding further.
NoteYou must use the Advanced Web Script Editing option, if you wish to make necessary step changes during the Web Transaction (Browser) clone operation.
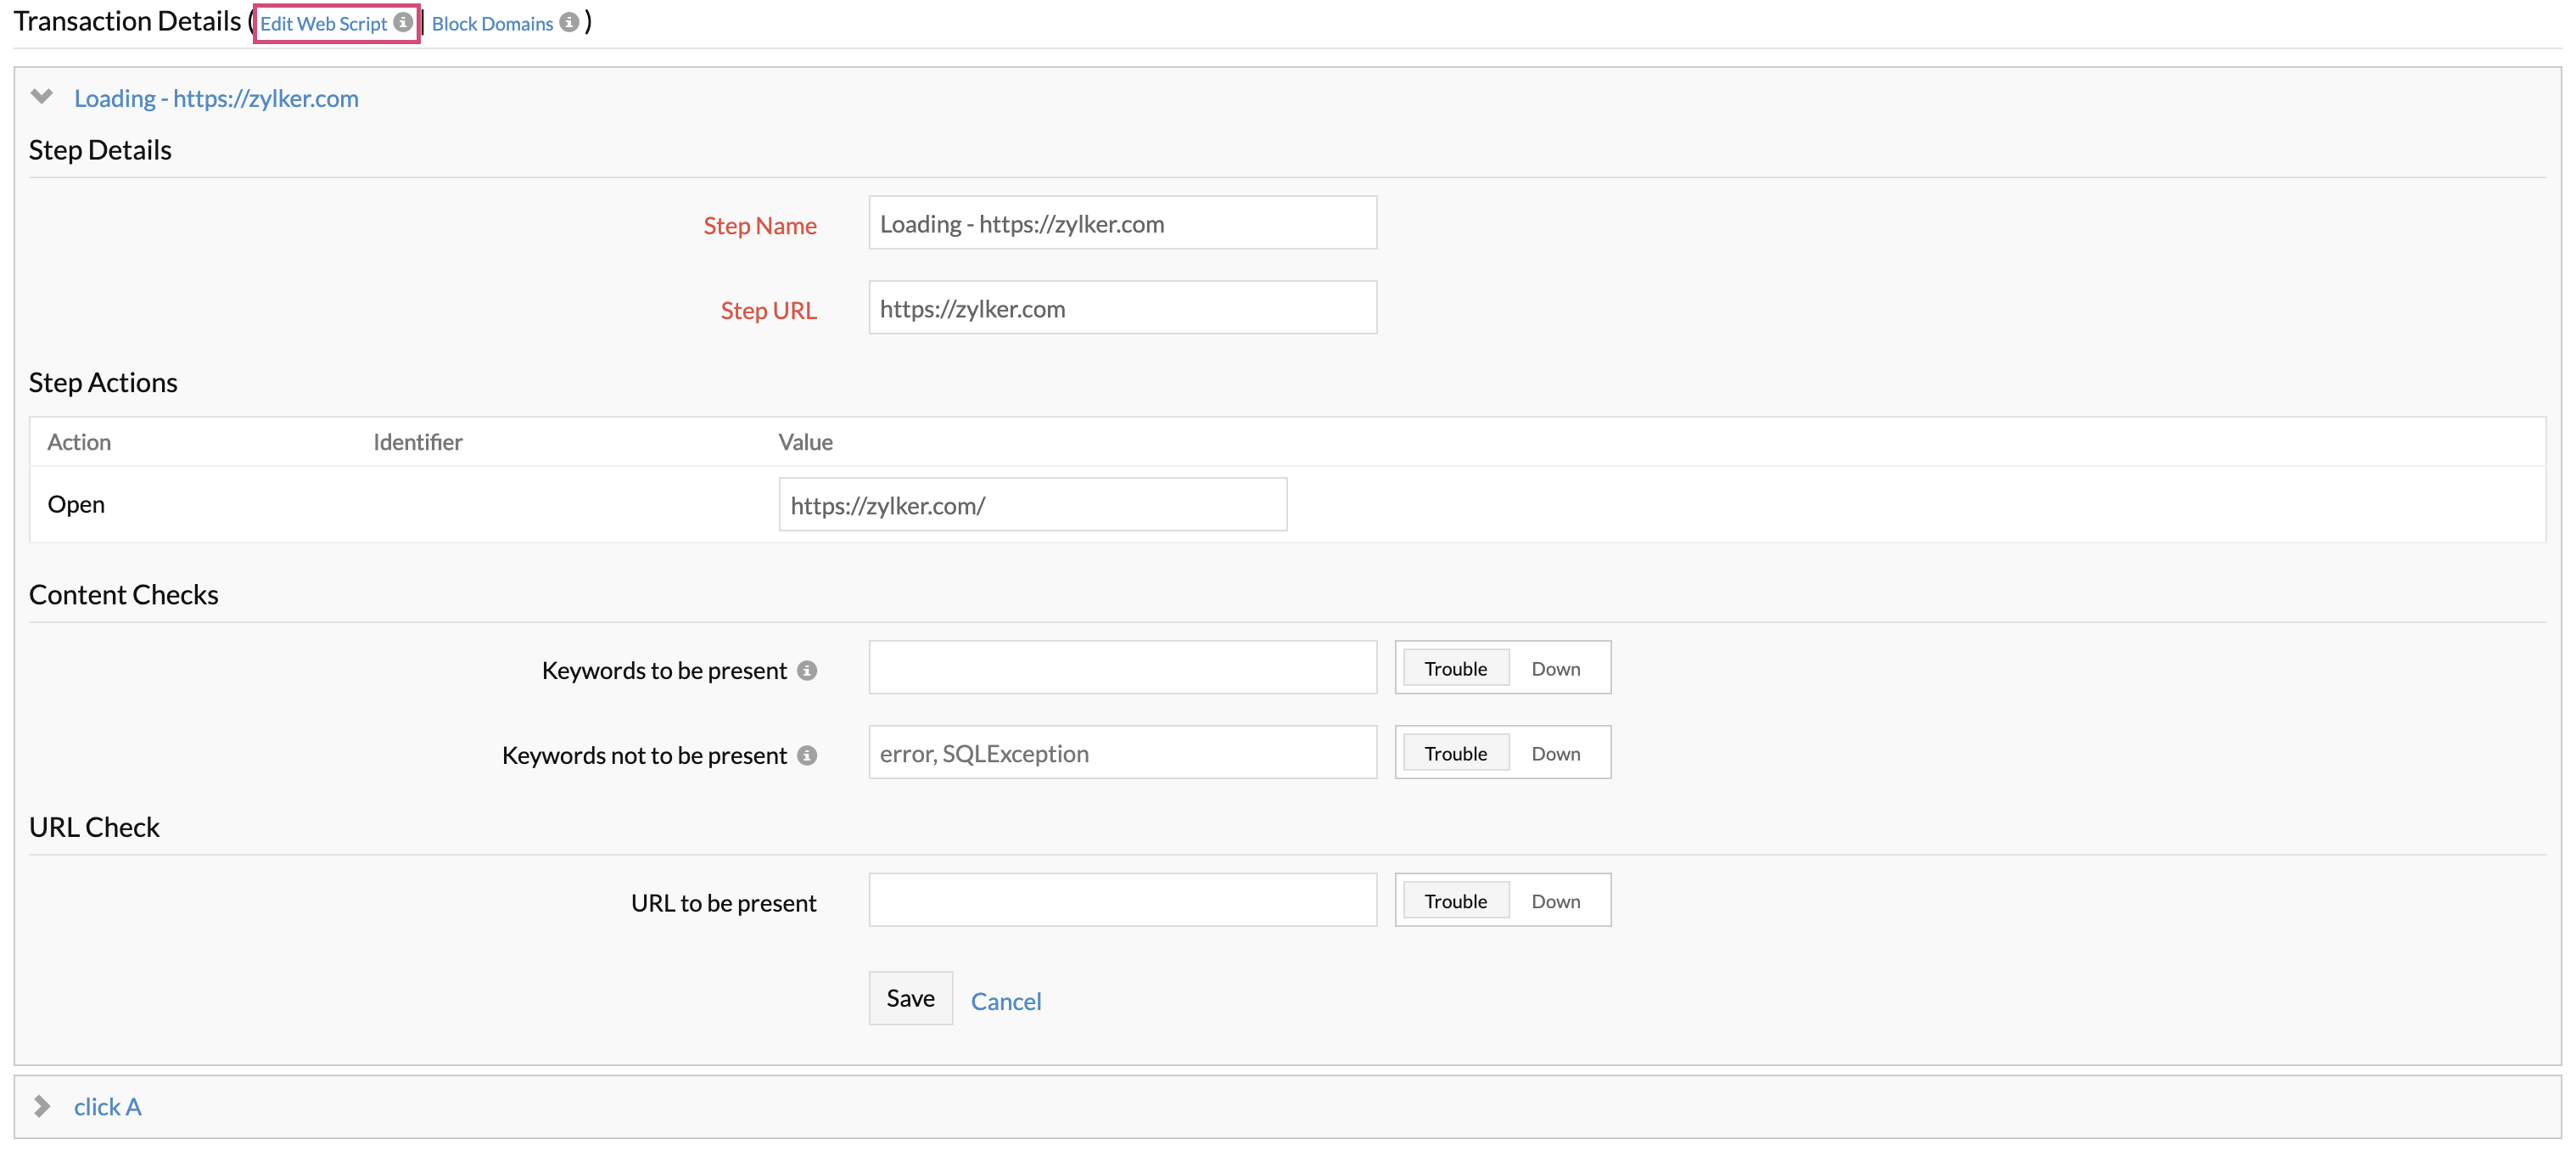
- If you have chosen to modify the step details of the Web Transaction (Browser) monitor, click the Edit Web Script link and update the script in the Web Script Editor.
NoteClicking the Save button in the Web Script Editor doesn't clone your monitor configuration, instead it just saves the web script temporarily. Once you save the script, you must submit the Add Monitor Form to successfully clone the Monitor configuration.
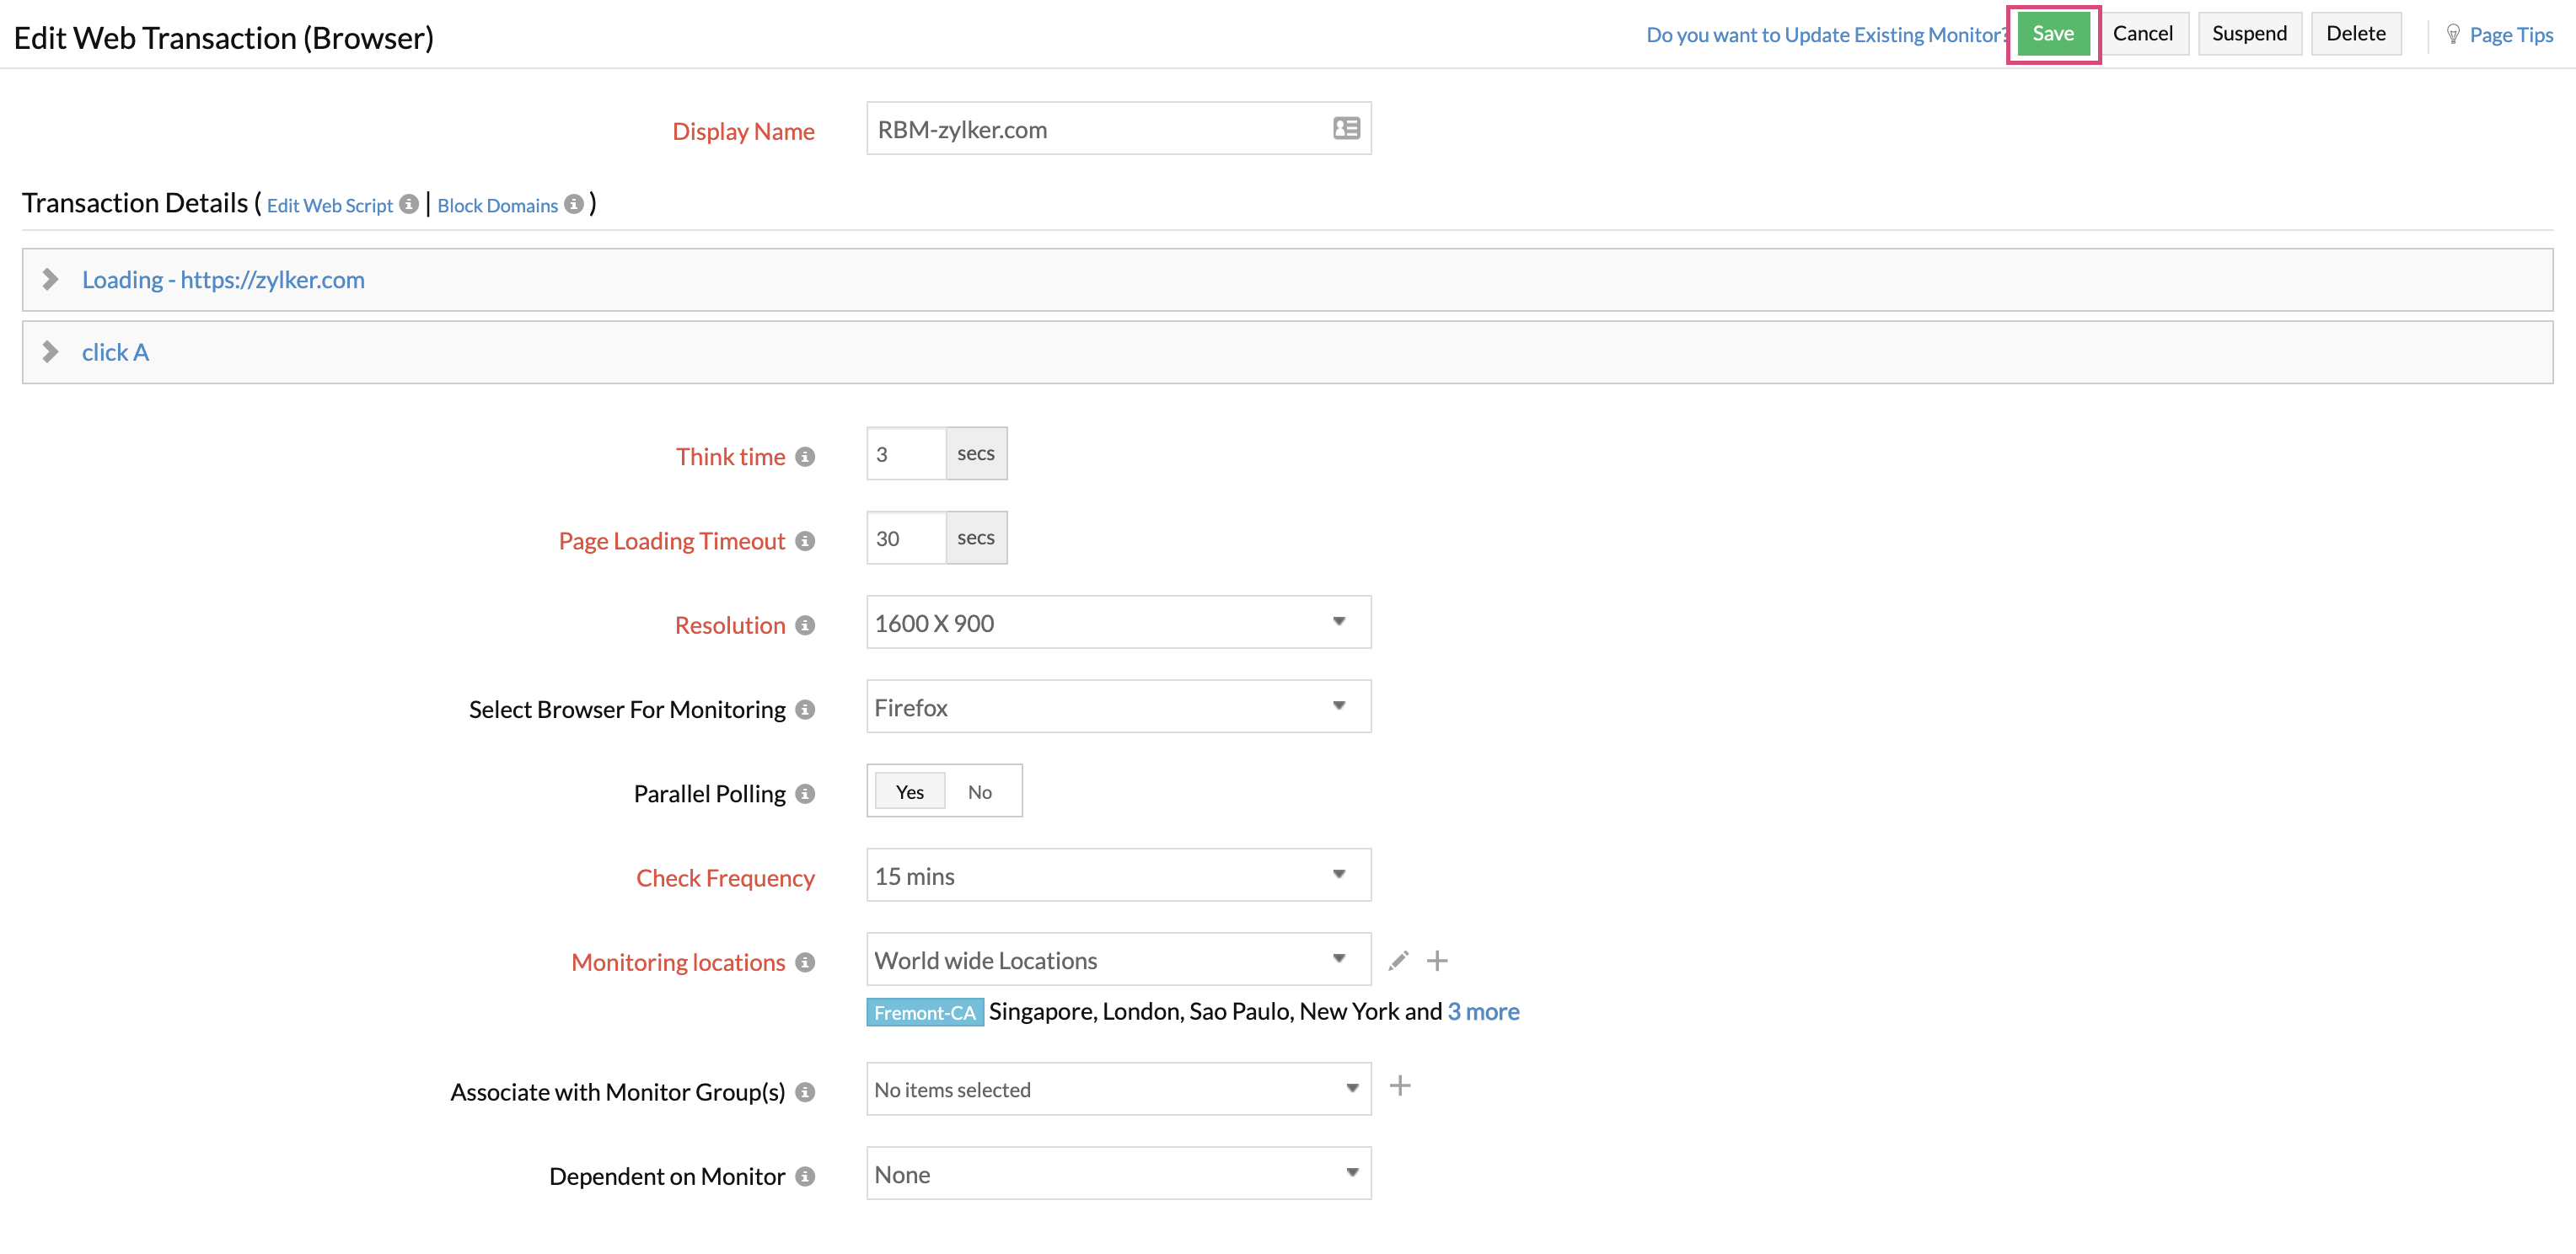
- Once the web script is saved, you can make necessary Configuration and Threshold changes if needed. Click the Save button to create a Clone of the Web Transaction (Browser) Monitor.
-
On this page
- How Does the Web Transaction (Browser) - Selenium WebDriver Work?
- Install the Web Transaction (Browser) Recorder
- Import Selenium IDE Test Cases in Web Transaction (Browser) Recorder
- Edit/Modify Web Transaction (Browser) - Selenium WebDriver in the Web Client
- Advanced Webscript Editing
- Clone Web Transaction (Browser)
