Domain Expiry
Domain Expiry Monitor is a Basic monitor in Site24x7's monitoring suite that lets you monitor your Domain Name and notifies you at a preset time period prior to the domain's expiry.Domain names help in guiding users to a website and it is a part of your identity. Monitoring a domain can help to stay ahead of security issues like domain hijacking, phising attacks etc. With all the data and alerting that you receive from Site24x7, you can easily renew your domain address and maintain ownership of the same. The expiry notification threshold can be configured as per your need.
Add Domain Expiry Monitor
- Log in to Site24x7.
- Click Admin > Add Monitor > Domain Expiry.
- Provide the details to setup a domain expiry monitor for your domain:
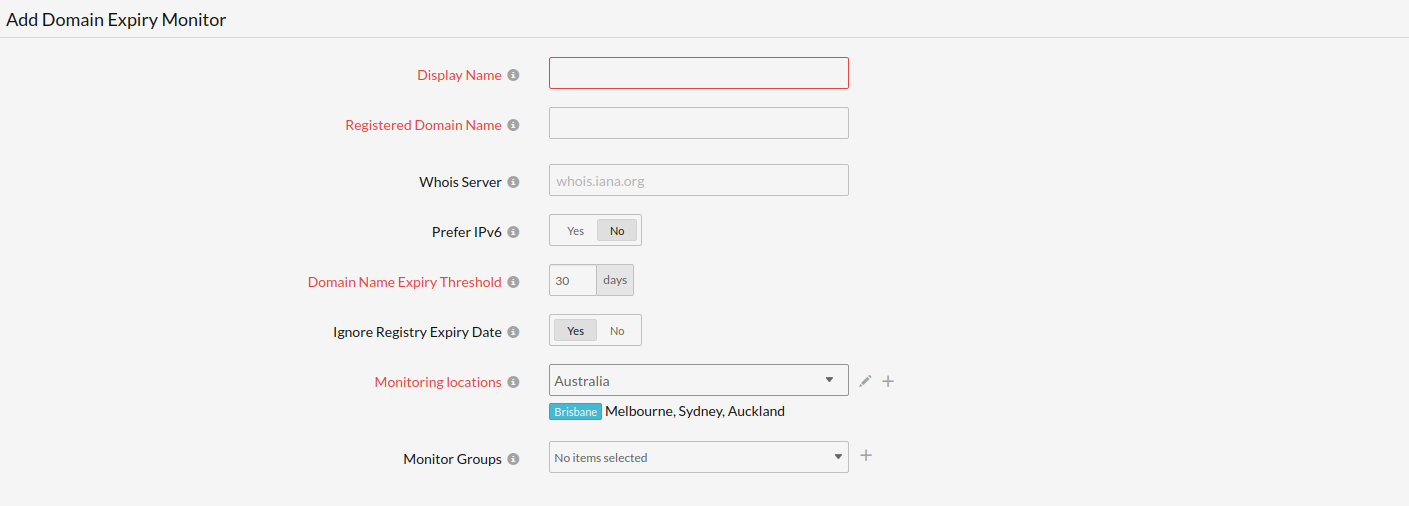
- Display Name: Provide a name to identify the domain expiry monitor in the control panel.
- Registered Domain Name: Specify the domain name to be monitored. Enter only the registered domain name without subdomains.
- Whois Server: Specify the name of the Whois server from where you wish to query the domain data. Else, the domain data will be queried by default from whois.iana.org.
- Domain Name Expiry Threshold: A notification is triggered this many days before the domain name's expiry.
NoteThe Domain Expiry Threshold is set as 30 days, by default.
- Ignore Registry Expiry Date: If both the registrar and registry report an expiry date, only the former is monitored. The registry expiry date is ignored even if it's earlier than the registrar expiry date.
Note
- Ignore Registry Expiration Date works only when it's a THIN lookup (i.e, the WHOIS query to Registrar Server fetches and returns the complete domain record information, including expiry details). For a THICK lookup, the complete domain records are handled by the THICK Registry. Learn more about Thick and Thin lookups.
- Even if a customer has wrongly indicated Ignore Registry Expiration Date as TRUE, when it's actually a THICK lookup, we still consider the Thick Registry Expiration date (as there will be no Registrar records for the domain.)
- Monitoring locations: Choose an existing Location Profile or create a new one. Domain expiry checks will be performed from the primary configured location alone. Additionally, no poller-based monitoring is enabled for this monitor.
- Monitor Groups: You can associate your monitor with multiple monitor groups by selecting the relevant monitor groups from the drop down list. This allows in logical grouping of your monitors.

- Content checks:
- Should contain string(s): Get alerted when the specified keywords are not present in the website content. Mention the keywords in the field and use the slider button to trigger the required kind of alert.
- Should not contain string(s): Get alerted when the specified keywords are present in the website content. Mention the keywords in the and use the slider button to trigger the required kind of alert.
Note
You must adhere to the following conditions while adding keywords in the given field:
- A single string or keyword can be configured with/without any double quotes (ex: HTML).
- If there are two strings, which comprise a single keyword–add a space in between the two strings and enclose it with double quotes. (ex: "HTML response").
- In case you have more than a couple of individual keywords configured, you will have to separate them with a space and also use double quotes for each of them ("monitor" "HTML").
- Case sensitive: Enable the toggle button for this option
- Should match regular expression: Configure your alert based on whether a particular pattern matches with the website content. For example when you consider the expression ^[a-z0-9_-]{3,15}$, your website content should contain alphabets from a to z,numbers from 0 to 9 , underscore and a hyphen. Also there should be minimum length of 3 characters and maximum length of 15 characters. When it is not matched, your website will be reported as "Regular expression"^[a-z0-9_-]{3,15}$" does not match" as a reason. Learn more about Content Checks.

- Configuration Profiles: Specify the following details to configure the user profiles for the monitor:
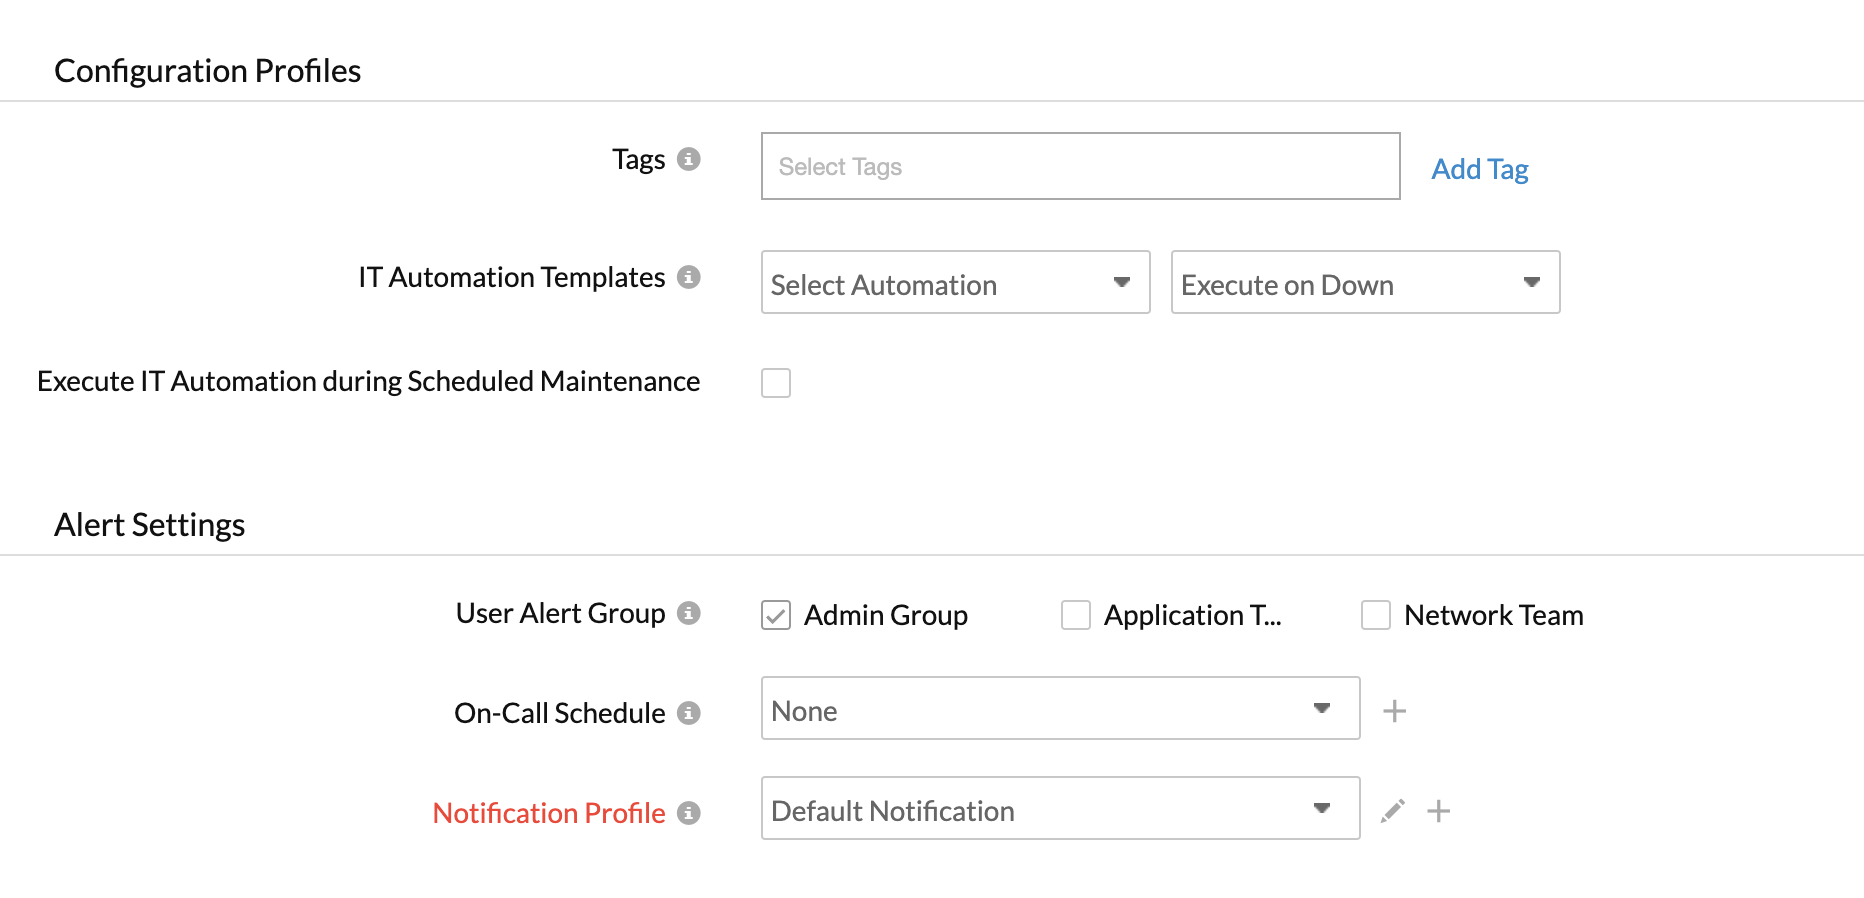
- Tags: Associate your monitor with predefined Tag(s) to help organize and manage your monitors creatively. Learn how to add Tags.
- IT Automation: Select an automation to be executed when the website is down/trouble/up/any status change/any attribute change. The defined action gets executed when there is a state change and selected user groups are alerted.
To automate corrective actions on failure, refer IT Automation.
- Alert Settings:
- User Alert Group: Select the user group that need to be alerted during an outage. Learn how to add multiple users in a group, read our User Groups documentation.
- On-Call Schedule: The On-Call Schedule option helps you to ensure that the notifications are sent to assignees in specific shift hours helping them to quickly respond to alerts or incidents. Choose an On-Call of your preference from the drop-down.
- Notification profile: Choose a notification profile from the drop-down or select the default profile available. Notification profile helps to configure when and who needs to be notified in case of downtime. In the Notification Profile form, you can only customize email templates for down/trouble alerting. Other parameters will be disabled, by default.
Note- You can receive alerts if the monitors are associated to user groups irrespective of the On-Call shift you've configured.
- Domain Expiry monitors are polled once every 24 hours by default, as their configurations rarely change. However, you can trigger an on-demand poll anytime using the Poll Now option for instant results.
- Third-Party Integrations: Associate your monitor with a pre-configured third-party NOC service. It let's you push your monitor alarms to selected NOCs and facilitate improved incident management.
Note
If you haven't setup any integrations yet, navigate across to "Admin > Third Party Integration" to create one. Tell me more.
- Click Save.
Note
Once the monitor setup is completed, Site24x7 deep discovery wizard scans your domain and auto detects all related internet resources for your domain that can be added to your account for a comprehensive internet services monitoring. Explore more about internet services deep discovery.
Related Reading:
- Learn about domain expiry metrics.
- Compare various internet service monitoring products.
