Site24x7 Network Configuration Manager
Our Network Configuration Management (NCM) tool is a multi-vendor network device change and configuration management solution that helps continuously track and alert on configuration changes, compare configuration versions, perform audits, restore configurations, and automate device configuration backups.
When device configurations are changed, you can get instant alerts via email, SMS, voice calls, or third-party integrations like Jira, Zapier, Slack, Microsoft Teams, ServiceNow, and more.
Prerequisites
Ensure you have On-Premise Poller version 5.2.0 or above. You can manually upgrade to the latest version if you haven't already.
The SSH credentials must have appropriate read-write permissions to execute all commands specified on device templates successfully. Site24x7 encrypts and stores all credentials to maintain security.
System Requirements
Explore the system requirements for installing the On-Premise Poller to start using Network Configuration Manager.
How it works
When a device wakes up, the startup configuration runs. For every change in the running configuration of the device, the changes must be copied to the startup configuration of the device. When a network device is added for monitoring, Network Configuration Manager tracks configuration changes and stores a backup in the cloud for up to one year. Network Configuration Manager also notes the differences between the configuration changes and triggers an alert to the end user about the change.
Enabling Network Configuration Manager
- Log in to your Site24x7 account.
- Navigate to Network > NCM > Settings.
- On the Manage NCM page, choose an On-Premise Poller from the drop-down.
- Toggle to Enable. NCM will be enabled within five to 10 minutes.
- Navigate to Admin> On-Premise Poller and ensure that the On-Premise Poller and the network module are running.
NoteIf you select SSH - SCP, SSH - TFTP, or TELNET - TFTP protocols, verify if the appropriate server is running before trying to add an NCM monitor.
Adding devices to Network Configuration Manager
- Navigate to Network > NCM > NCM Devices(+). Alternatively, navigate to Admin > Add Monitor > Network > NCM Device.
- Enter the following fields:
- Display Name: Provide a display name to identify the Network Configuration Manager monitor.
- Host Name/IP Address: Enter the hostname or IP address of the device.
- Vendor: Select the device vendor from the drop-down.
- Device Template: Select the device template from the drop-down. Device Templates define the set of commands to connect, back up, restore, or perform other operations on a device. It is essential to select the correct Device Template for all operations to run properly.
- Protocol: Select SSH, SSH-SCP, SSH-TFTP, Telnet, or Telnet-TFTP from the drop-down to connect to the device. We use these protocols to fetch the device configuration.
- Primary Credential: Select the primary credential for device authentication or add one by clicking +. Select the Test Credential check box beside the Primary Credential field to test the credential before saving the NCM device.
NoteNot selecting this option will allow the device to be saved, even if the credentials are incorrect. However, in that case, the device details may not be fetched. - SNMP Credential: Select the SNMP credential of the device from the drop-down or add one by clicking +.
- Check Frequency: Select the frequency of configuration backups. This determines the frequency at which a backup is taken for a device configuration.
- Monitoring Locations: Select an On-Premise Poller to serve as a monitoring location.
- Monitor Groups (Optional parameter): Associate the NCM device with a monitor group. Select a monitor group if needed or add one by clicking +.
- Dependent on Monitor (Optional parameter): Select a dependent monitor of your choice from the drop-down list. Site24x7 will suppress alerts for the configured NCM monitor if the dependent monitor is already down. You can add up to five monitors as dependents.
- Compliance:
- Policies (Optional parameter): Select the required policies containing the necessary configuration requirements.
NoteFor Cisco devices, Cisco IOS policy will be auto-selected.
- Policies (Optional parameter): Select the required policies containing the necessary configuration requirements.
- Configuration Profiles:
- Threshold and Availability: Select a threshold profile for the device from the drop-down list. You can use the default threshold profile available, or create a new one, and get notified when the resources breach the configured threshold and availability.
- Tags (Optional parameter): Associate your device with a predefined tag or multiple tags to help organize and manage your monitors creatively.
- IT Automation: Select the automation type and specify the action for automatically addressing routine tasks.
- Alert Settings:
- User Alert Group (Optional parameter): Select the user group that needs to be alerted during an outage, or add multiple users to a group.
- On-Call Schedule (Optional parameter): Opt to receive alerts during selected shifts or business hours using On-Call Schedule.
- Notification Profile: The Notification Profile helps to configure when and who gets notified in case of downtime. Choose a Notification Profile from the drop-down list, use the default profile available, or create a custom notification profile.
- Third-Party Integrations (Optional parameter): Select a third-party service to receive alarm notifications through from the available options.
- Click Save.
Viewing devices added to the Network Configuration Manager
You can view the devices being monitored by Network Configuration Manager from the Network Configuration Manager devices dashboard.
To view this page:
- Navigate to Network > NCM > NCM Devices.
- Click the device for which you wish to view the summary.
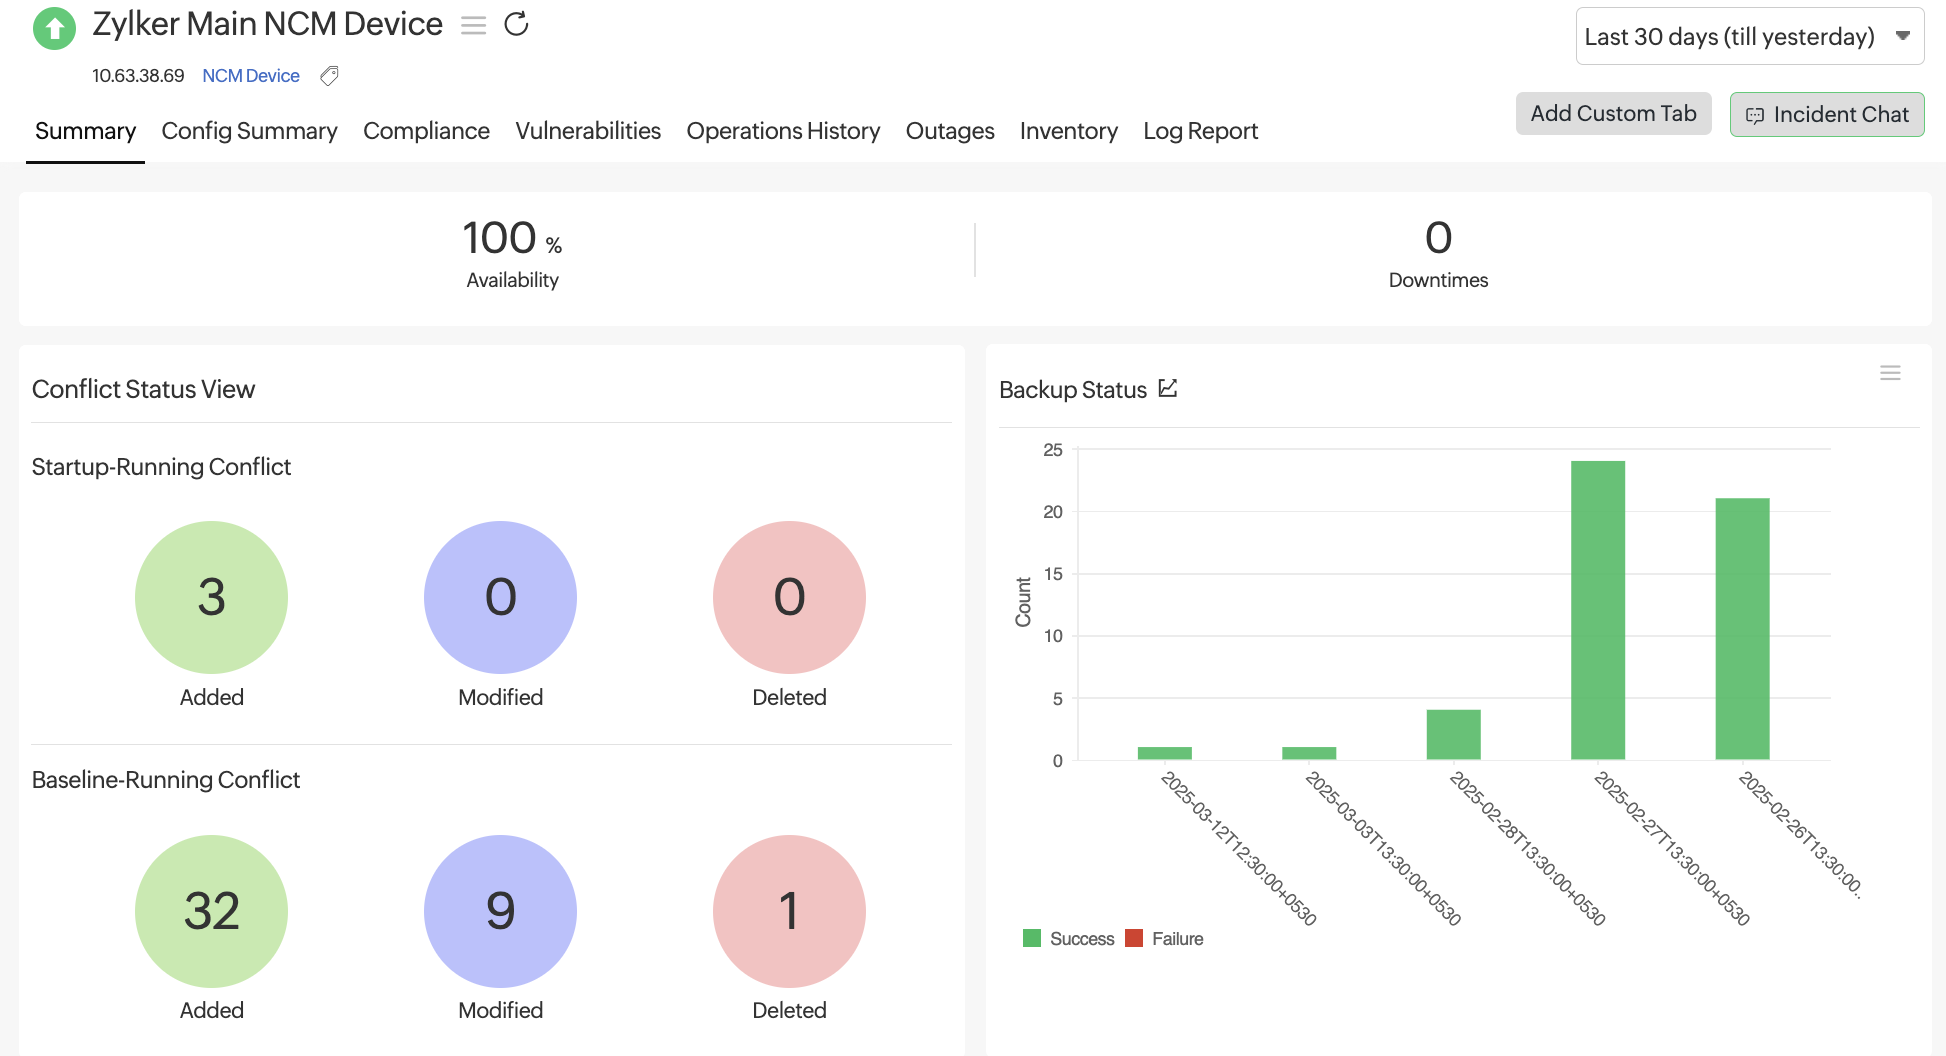
- View details like Availability, Downtimes, Conflict Status View, Backup Status, Events Timeline, Updates, Device Details, and Hardware Details.
- You can also view the Startup-Running Conflict and the Baseline-Running Conflict in Conflict Status View. Click any number to compare the appropriate configurations and view the differences in the Compare Configurations view.

Figure 1. NCM Device Summary View.
Network Configuration Manager credentials
The NCM Credentials section provides an overview of various credentials associated with your networks or devices. The supported credentials are SSH, Telnet, TFTP, SCP, and SNMP v1, v2, and v3. You can view, edit, or delete the associated credentials from the network devices.
Perform the following actions in this section:
- Add credential.
- To edit the already associated credential, click the pencil icon
 for the respective network device under the Action column. Make the necessary changes and click Save Credential.
 - To delete the already associated credential, click the garbage bin icon
 for the respective network device under the Action column. Click Delete in the Delete Network Credential pop-up.

Figure 2. NCM Credentials view
Current Configurations
The device configurations section lets you view the current device configuration information, like the running and startup configurations discovered by the Network Configuration Manager. Major details displayed include the Monitor Name, Type, Version, configuration capture date (Captured On), and Change Type of each device configuration in your network.
The Actioncolumn lets you perform various actions on each device configuration, including Set as Baseline, Mark as Authorized/Mark as Unauthorized, Edit Description, Compare with Baseline, Compare with Startup/Compare with Running, Compare with Previous, Compare with Any, or Upload Configuration. Click the hamburger ![]() icon in the Action column to view these options. This way, you can track your device configurations and take necessary actions if any discrepancy is found.
icon in the Action column to view these options. This way, you can track your device configurations and take necessary actions if any discrepancy is found.
- The Baseline configuration version is a reference configuration that works correctly according to your organizational requirements. It can be used as a benchmark to compare other versions of the configuration.
- Unauthorized configuration versions are those where the exact source of change is unidentifiable.
- If the changes have been made by an authorized source or the network administrator within your organization, you can mark the configuration version as authorized.
- You can also mark a configuration version as unauthorized if an unauthorized person or activity within your organization makes changes to the device configuration.

Figure 3. Current Configurations view
All Configuration Changes
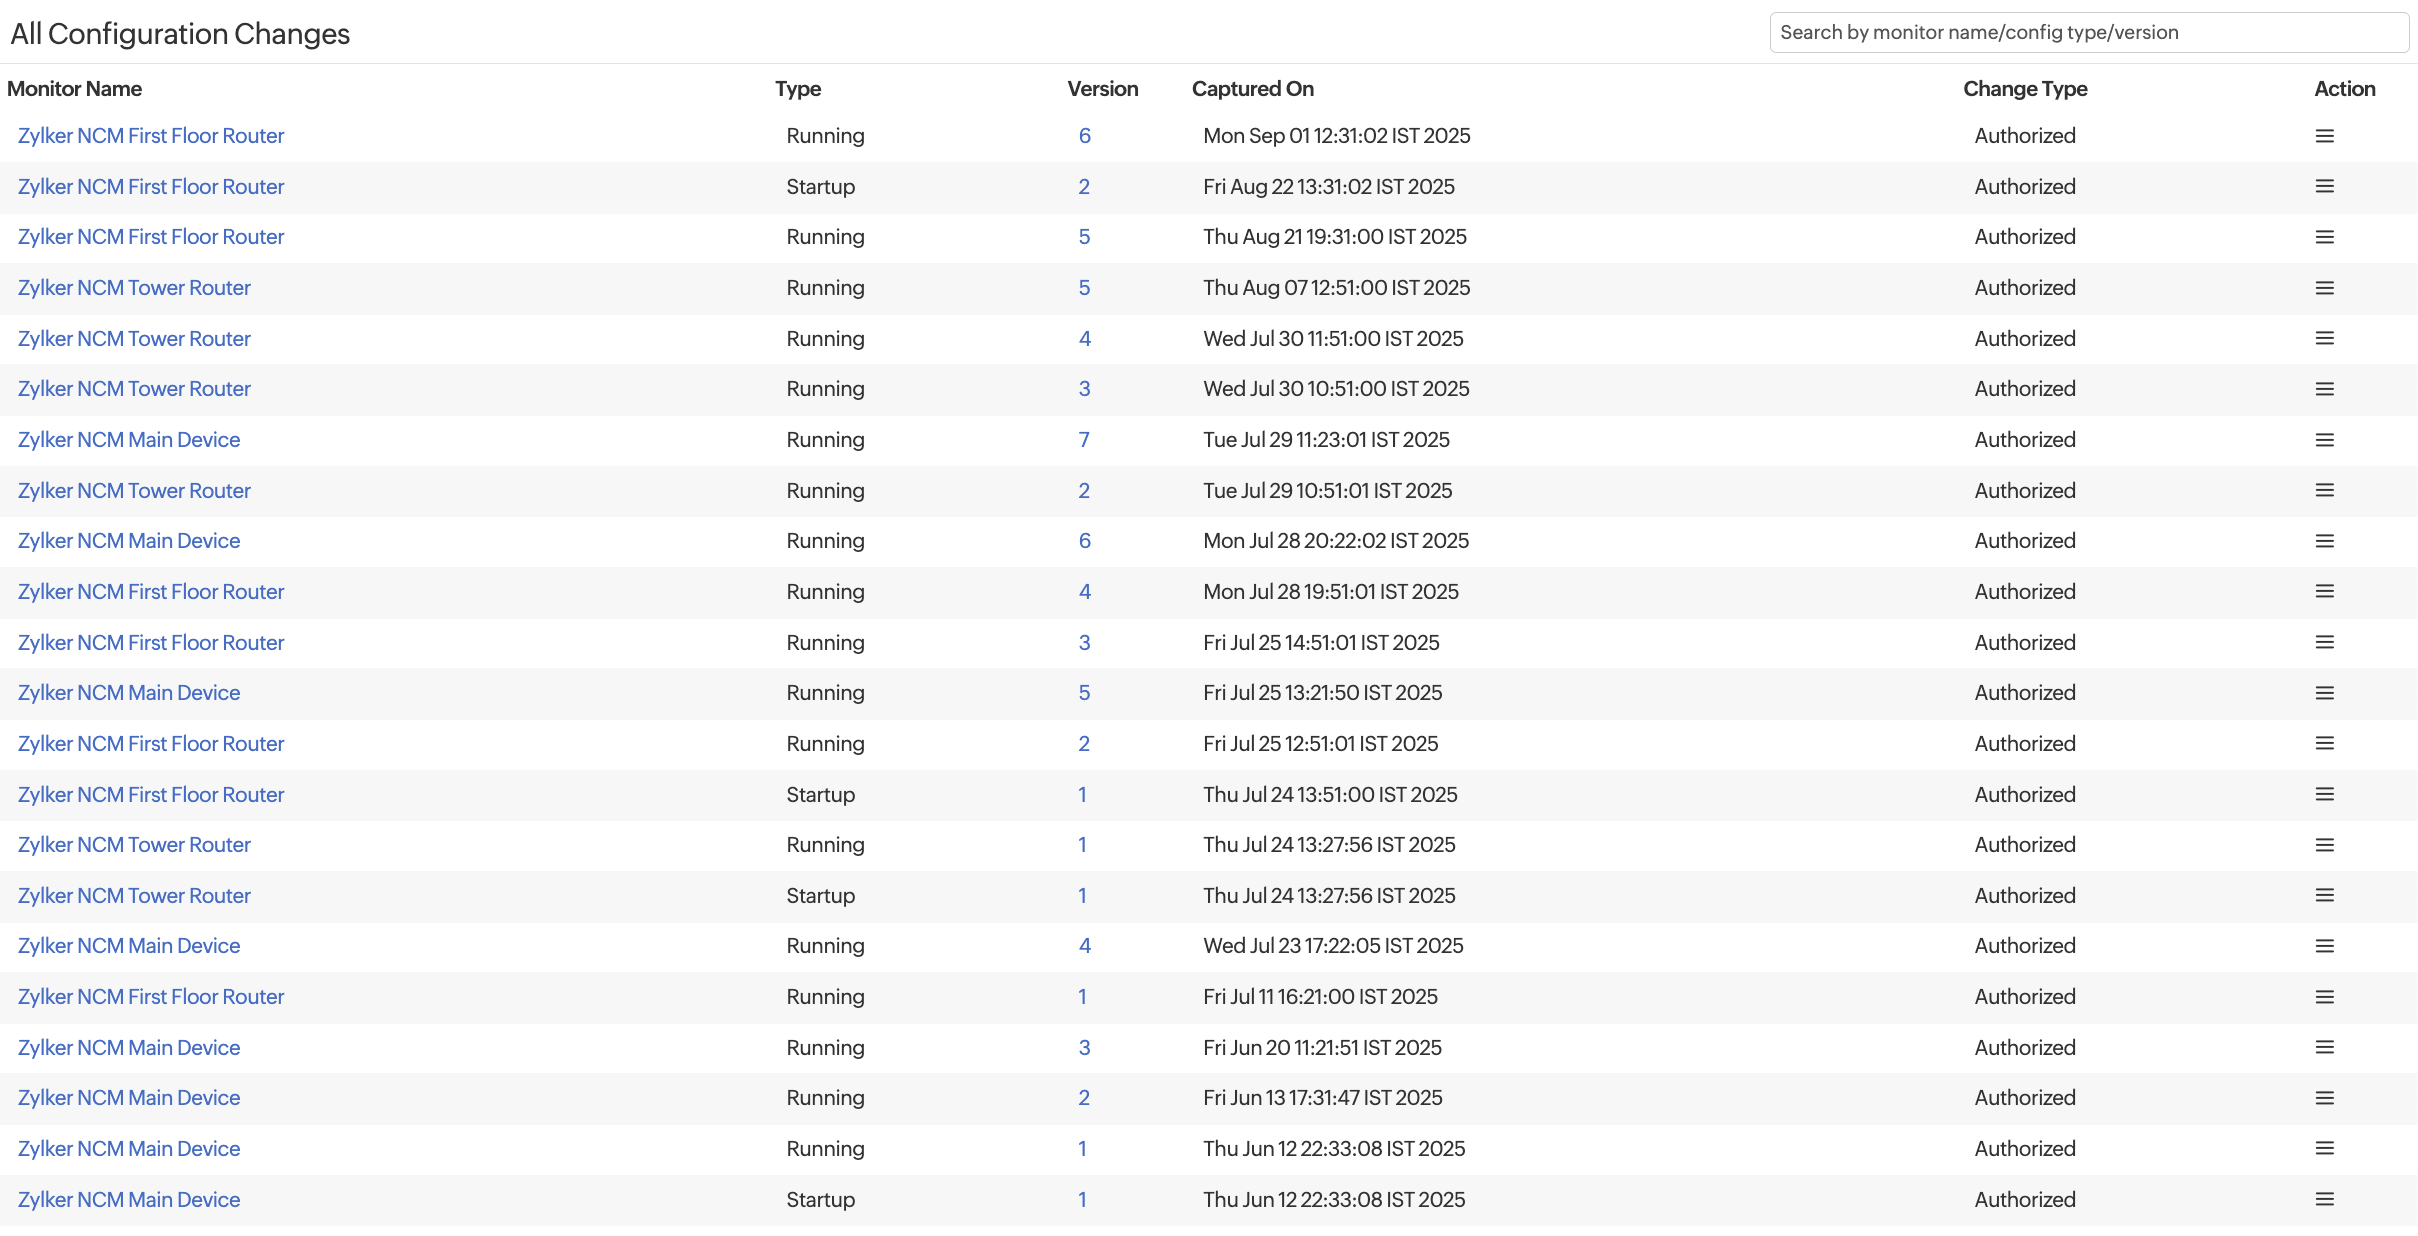
An overview of all the changes, including the list of historical configuration changes for each device, is listed in the All Configuration Changes section. Whenever a device or network associated with a monitor has a configuration changed, its details like configuration type, version, date of capture, and change type are tracked. You can view, analyze, track, and take action on the historical configuration changes for each device discovered by the Network Configuration Manager.
Various actions that can be performed on a configuration change include Set as Baseline, Mark as Authorized/Mark as Unauthorized, Edit Description, Compare with Baseline, Compare with Startup/Compare with Running, Compare with Previous, Compare with Any, or Upload Configuration.

Figure 4. All Configuration Changes view
Compare Configurations
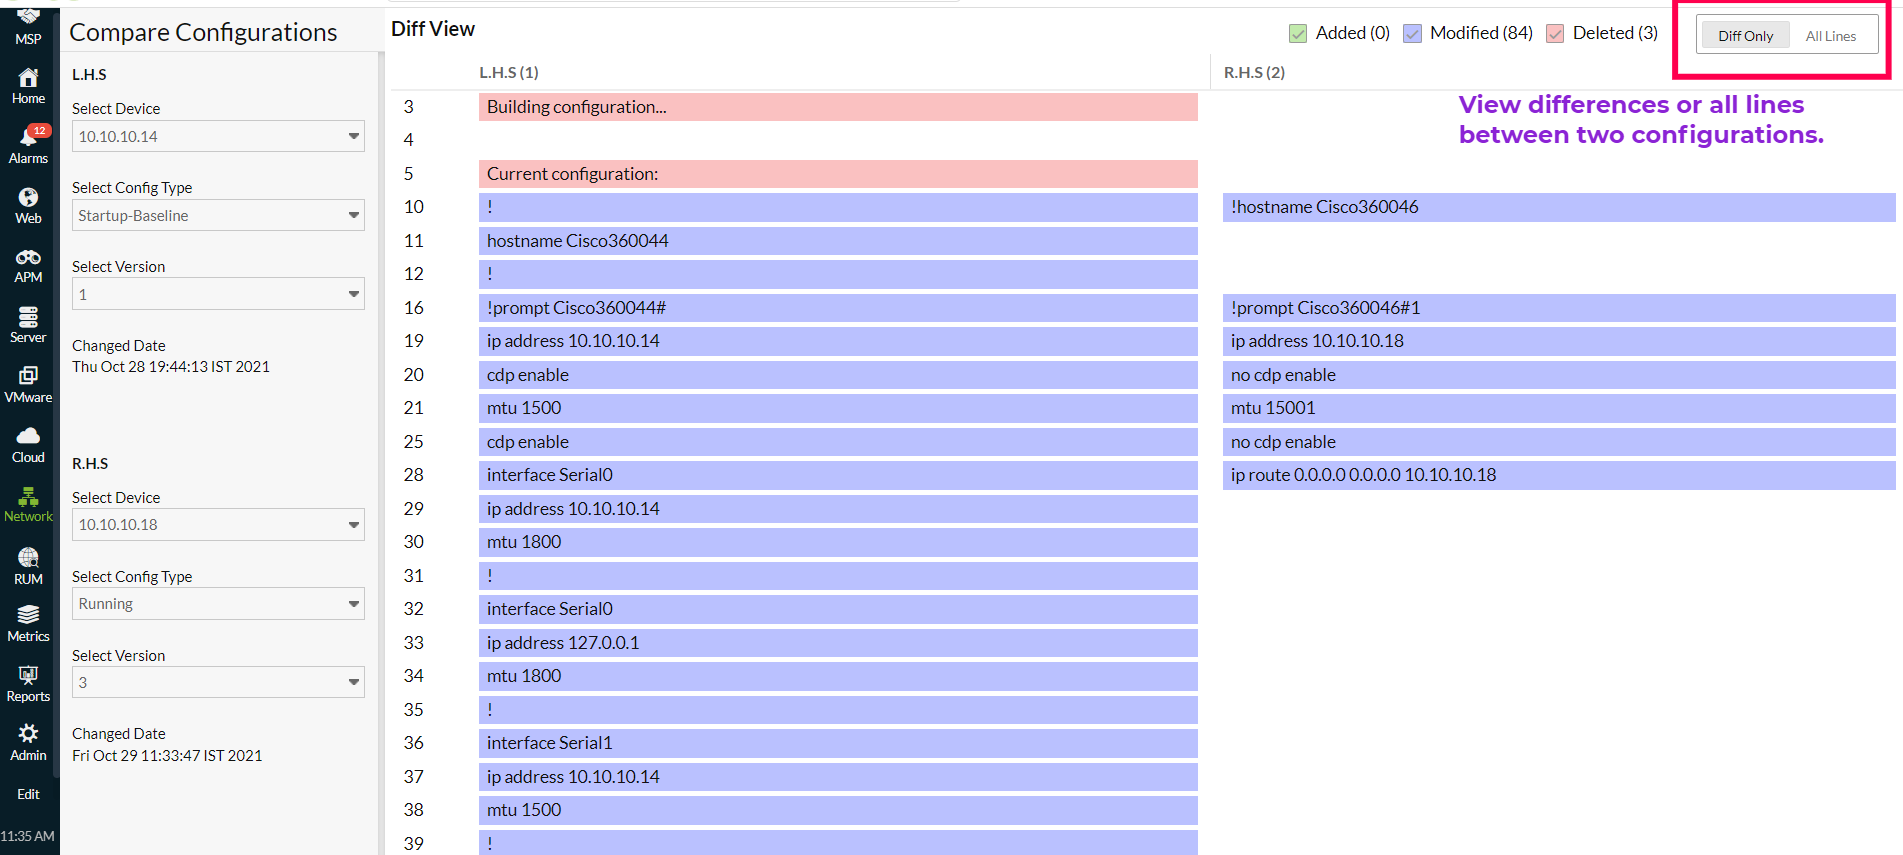
You can compare and analyze the configuration changes made to your device using the Compare Configurations feature.
Select the device, configuration type, and version for L.H.S and R.H.S. The Changed Date section shares insight into when the configuration was changed.

Figure 5. Compare Configurations
Configuration drafts
All the configuration edits that have been saved as drafts will be displayed in this view.
- Click the Monitor Name, you will be navigated to the NCM Monitor Summary page.
- Click the pencil
 icon, and the Edit Configuration pop-up will open. After performing your edits, click Save as Draft to save the changes.
 - Click the trash
 icon to delete the configuration edits. Click Delete in the confirmation pop-up that opens.
 - Click the play
 icon to upload the configuration on the required devices. In the Upload Configuration pop-up, select the required devices in the Device(s) field and click Upload.
Upload history
View the status of the configuration draft uploads in this view.
Firmware Vulnerabilities Dashboard
View all the firmware vulnerabilities in your NCM devices, sort them as needed, and
verify if any patch fixes are available on the firmware vulnerabilities dashboard. Search vulnerabilities according to CVE ID, CVE Type, Severity, Exploit Status, or Description for faster access to a record.
The firmware vulnerabilities are classified as Critical, Important, Moderate, and Low to know which record requires your first attention quickly. You can also view all the vulnerabilities according to exposed devices or version distribution.
Network configuration compliance
Network configuration compliance helps safeguard your networks against potential threats and ensure adherence to industry standards like Cisco IOS, SOX, HIPAA, the PCI DSS, or any custom organizational policies. To ensure compliance with network configurations, our network configuration management tool performs a compliance check whenever a configuration file is backed up and identifies non-compliance based on established policies that contain rule groups and rules. Accordingly, network administrators receive alerts based on their threshold settings.
Download Configurations
You can generate and download device configuration files in Site24x7's NCM. Reports are stored for seven days, with a maximum ZIP file size of 100MB. If the size exceeds the limit, the remaining devices are marked as failed. Email delivery is supported for up to 15MB; larger reports are available only as downloads from the console.
Unmonitored Devices
The Unmonitored Devices tab displays all the devices discovered by the On-Premise Poller that are added as network or NetFlow monitors but not yet managed in NCM. From here, you can review and filter these devices and add them into NCM for configuration backups, compliance, firmware vulnerability management, and automation.
NCM reports
Obtain in-depth understanding of the configuration changes in your NCM devices through NCM reports.
The following are the other reports that are available for NCM devices.
Related Articles
- Network Configuration Manager Device Templates
- Network Configuration Manager Credentials
- NCM Configuration Summary
- Network Configuration Manager best practices guide
- Threshold and Availability for NCM devices
- Configlets in NCM
Troubleshooting Tips
-
On this page
- Prerequisites
- System Requirements
- How it works
- Enabling Network Configuration Manager
- Adding devices to Network Configuration Manager
- Viewing devices added to the Network Configuration Manager
- Network Configuration Manager credentials
- Current Configurations
- All Configuration Changes
- Compare Configurations
- Configuration drafts
- Upload history
- Firmware Vulnerabilities Dashboard
- Network configuration compliance
- Download Configurations
- Unmonitored Devices
- NCM Reports
