Webhooks Integration
Site24x7 makes it easy for you to connect your Site24x7 event with multiple applications using Webhooks. Webhooks work on an event-based output mechanism. Specific events generated in Site24x7—such as the change in status of the monitors to trouble or critical—trigger the webhook, which invokes a signal to the Hook URL via an HTTPS request. Any trigger event in Site24x7 will post the event data to the specified Hook URL. It allows you to streamline and manage your critical Site24x7 alarms, incidents, or messages in any third-party application. Additionally, with our On-Premise Poller support for Webhook integration, you can post event information to any internal application.
Integrate Site24x7 with third-party application using Webhooks
Webhook integration requires you to obtain a Hook URL of the desired third-party service. Once you've the Hook URL, follow the steps below to tightly integrate Site24x7 events data with any third-party application using Webhooks:
- Log in to Site24x7.
- Navigate to Admin > Third-Party Integration.
- Click the plus button + and the Add Third-Party Integration button. Pick Webhooks from the list.

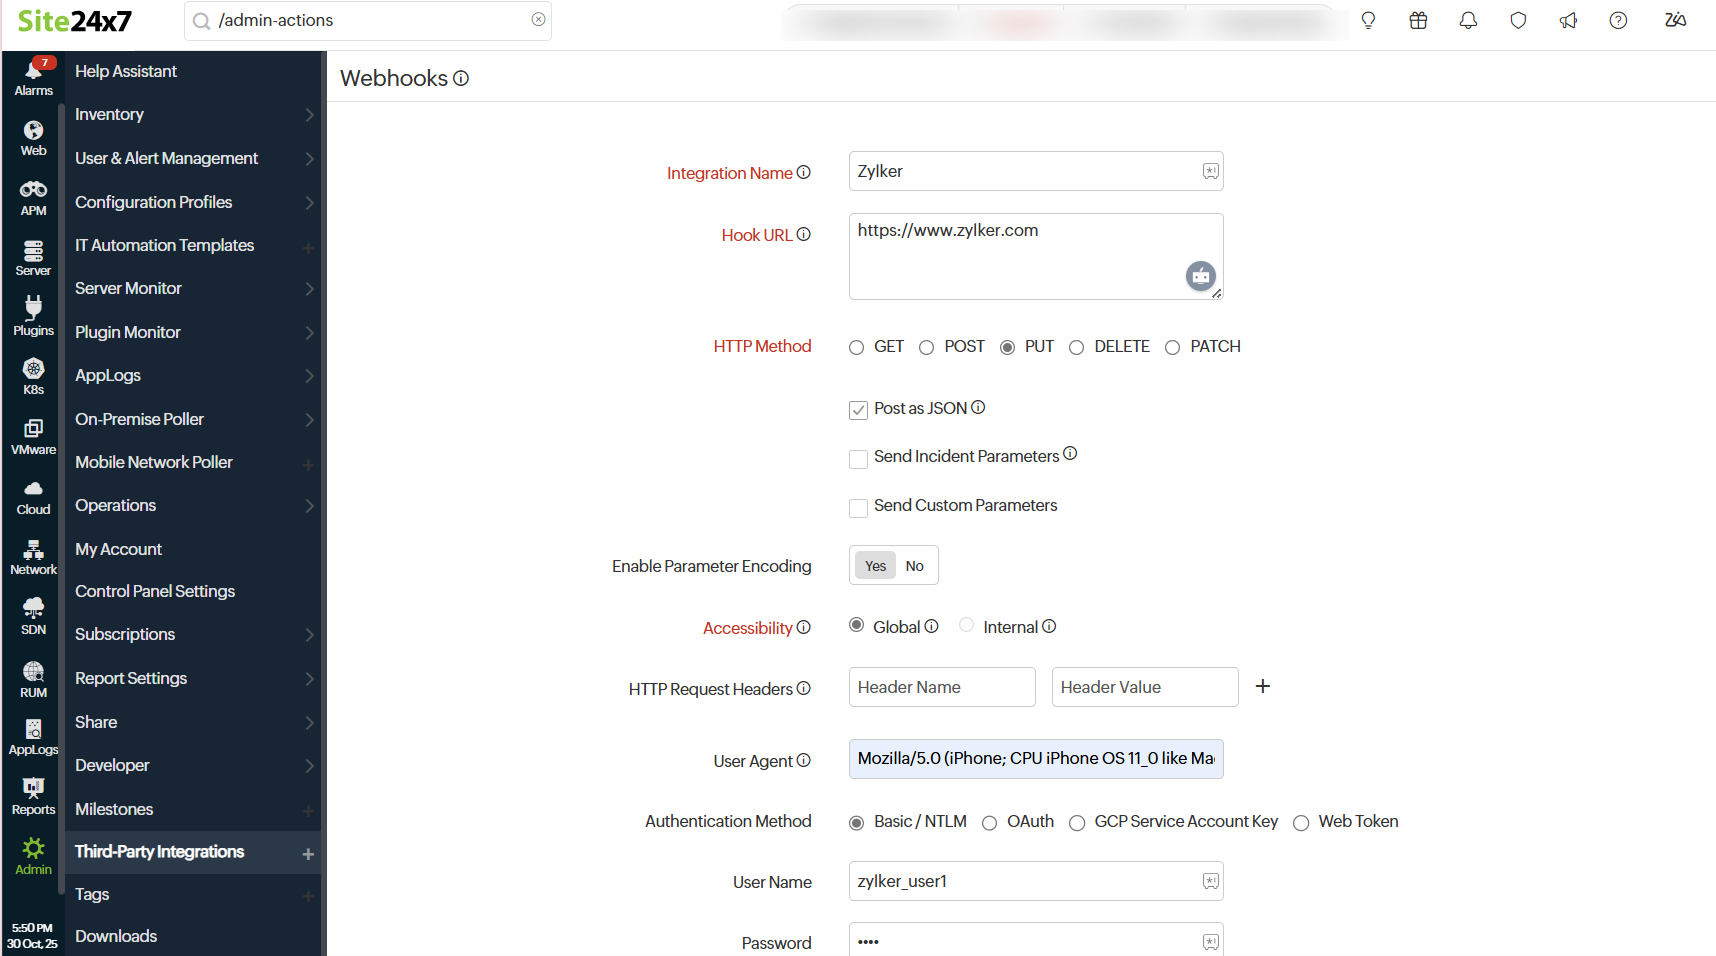
- Fill up the Webhooks Integration form to complete the integration process.
- Integration Name: Provide a name for your integration.
- Hook URL: The complete URL (including the http/https protocol) to which Site24x7 sends data. Alarms from Site24x7 will trigger the webhook to post incidents to this URL.
- HTTP Method: Specify the method to be used for connecting with the URL – GET, POST, PUT, DELETE, or PATCH. Select the radio buttons to configure the form submission method and appropriate body type for the POST, PUT, DELETE, or PATCH HTTP method.
- Post as JSON: Enter the content to be submitted in the JSON request body. The Content-Type header is set automatically.
- Send Incident Parameters: Write specific code in the URL itself and pass the variables using Incident Parameters. The request parameters must be provided as Param name=value pair for the HTTP Methods. Learn more about Incident Parameters.
Note$INCIDENT_DETAILS is currently available only for RBL monitors.
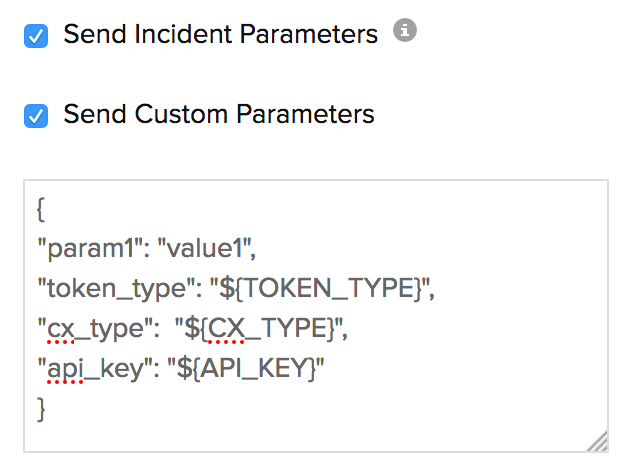
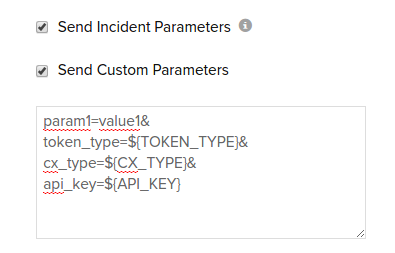
- Send Custom Parameters: Write specific code to pass parameters in the format Param name=value pair for your HTTP CRUD methods. If you want to pass multiple key-value pairs, you must specify each pair one-per-line, each followed by an & symbol. You can POST the request in the JSON format too. While passing the Custom Parameter during your HTTP request, you can specify a predefined Global Parameter in the Name or Value field. Global Parameters get substituted with your defined Constant or the actual Dynamic Values in your HTTP response. Learn more about Custom Parameters.
Custom Parameters should be passed using either of the following syntaxes:
Custom Parameters syntax when specified in JSON format:

Custom Parameters syntax when not specified in JSON format:

- Enable Parameter Encoding: Use this toggle to control whether parameter values are encoded before being sent in a request.
- When set to Yes, it encodes all parameter and form values before sending the request.
- When set to No, it sends parameter and form values exactly as entered, without encoding.
- JSONPath Expression to be Encoded: Provide JSONPath Expression to be encoded, starting from the root of the JSON structure and navigating to the specific key. The field is available only when both Post as JSON and Send Custom Parameters options are selected.
- Accessibility: Determines whether the Hook URL can be invoked from the global Site24x7 server or from within the network using On-Premise Poller.
- Global: Invokes the Hook URL from the Site24x7 central server to perform the integration.
- Internal: Requires On-Premise Poller to perform the integration. Once setup, the central server will notify the On-Premise Poller to invoke the Hook URL to complete the integration.
NoteTo setup an On-Premise Poller, please follow this instruction.
- Choose Poller Type: Determine how the alert notifications for this integration must be routed. This option will be available only if you choose Internal in Accessibility. You have two options for routing alerts through your on-premises monitoring setup:
- On-Premise Poller: Select this option if you want to send alerts through a single, dedicated On-Premise Poller. Alerts will be routed through the selected poller only. Learn more about the On-Premise Poller.
- On-Premise Poller Group: Choose this option to assign a group of pollers instead of a single one. Learn more about On-Premise Poller Groups.
NoteAll pollers in the poller group, as well as those in the high availability poller configuration (both primary and standby), must be reachable for the third-party service (the on-premises version of ServiceDesk Plus or ServiceDesk Plus MSP).
- HTTP Request Headers: Sometimes, you might want to customize the default HTTP request header information. In such cases, the additional header name and header value can be added here.
- User Agent: Set a customized user agent (web browser) for sending your request and the HTTP headers. You can choose from the available user agents.
- Authentication Method: Click the radio button and update the credentials accordingly.
- Basic/NTLM Credentials: Configure your Basic/NTLM based authorization. Windows NTLM is the authentication protocol used on systems running on Windows OS.
- Credentials: Specify your Username and Password for URLs requiring Basic/NTLM based authentication.
- OAuth: Pick the OAuth radio button, if you're monitoring a resource that is secured by the OAuth framework.
- Provider Name: Select the OAuth Provider Name from your preconfigured list or create a new OAuth profile by clicking the + button.
NoteLearn how to configure an OAuth Provider.
- Provider Name: Select the OAuth Provider Name from your preconfigured list or create a new OAuth profile by clicking the + button.
- GCP Service Account Key: Select the GCP Service Account Key radio button if you want to push alert events to Google Cloud APIs via Webhook, that require authentication through Google Cloud's Service Account.
- GCP Service Account: Select the appropriate GCP monitor that has already been added using the GCP Service Account Key JSON file or add a new GCP monitor by clicking the + button and upload the relevant GCP Service Account Key JSON file.
NoteLearn how to configure a GCP Monitor.
- GCP Service Account: Select the appropriate GCP monitor that has already been added using the GCP Service Account Key JSON file or add a new GCP monitor by clicking the + button and upload the relevant GCP Service Account Key JSON file.
- Web Token: Web Tokens provide secure authentication for APIs and protected resources. Choose this option if you want to access your resource via a web token.
- Web Token: Select a Web Token from your preconfigured list or create a new web token profile by clicking the + button. Learn about adding a Web Token.
- Basic/NTLM Credentials: Configure your Basic/NTLM based authorization. Windows NTLM is the authentication protocol used on systems running on Windows OS.
- Time-out: Enter the time in seconds to determine how long the Site24x7 servers should wait before considering the URL as non-responsive. Enter a time in seconds that is not the usual response time of your website. Specify a value between 1-45 seconds.
- Integration Level: Choose your preferred integration level to send alerts from your Site24x7 account to the relevant webhook.
- Monitors: Select at least one specific monitor to send alerts and RCA links from that monitor only to your webhook.
- Tags: Select at least one specific tag to send Site24x7 alerts and RCA links corresponding to that tag to your webhook.
- Monitor Groups: Choose at least one monitor group to send alerts and RCA links from that group to your desired webhook.
- All Monitors: You can opt to send all Site24x7 alerts and RCA links to your webhook.
NoteIf your monitor group has tags with parent monitors and some monitors in subgroups, only alerts from the parent monitors will be sent to your preferred third-party service.
- Tags to Be Sent With Alerts: Select the tag keys associated with the monitor that need to be sent with the alert. When an alert is triggered, tags that match with the monitor will be included in the alert notifications. If no tags are selected, all the tags associated with the monitor will be present in the alert notifications.
- Alternate Notification:If the primary notification medium for sending alerts fails, this alternative service will be utilized to send notifications to ensure that alerts are not missed.
- Trigger Alerts for Monitor Status Change: Use the checkboxes to choose the monitor status changes (Down, Trouble, and Critical) for which you wish to receive alerts. Choose at least one status for integration.
- Click the Save and Test button to save the integration and to receive a test alert. You can also click the Save button to finish the integration.
NoteOnce the set up process is completed, the Webhooks integration will be listed in the Third Party Integration dashboard. You can setup multiple such webhooks in your Site24x7 account.
Manage your tickets with Webhooks integration
Manage Ticket Configuration
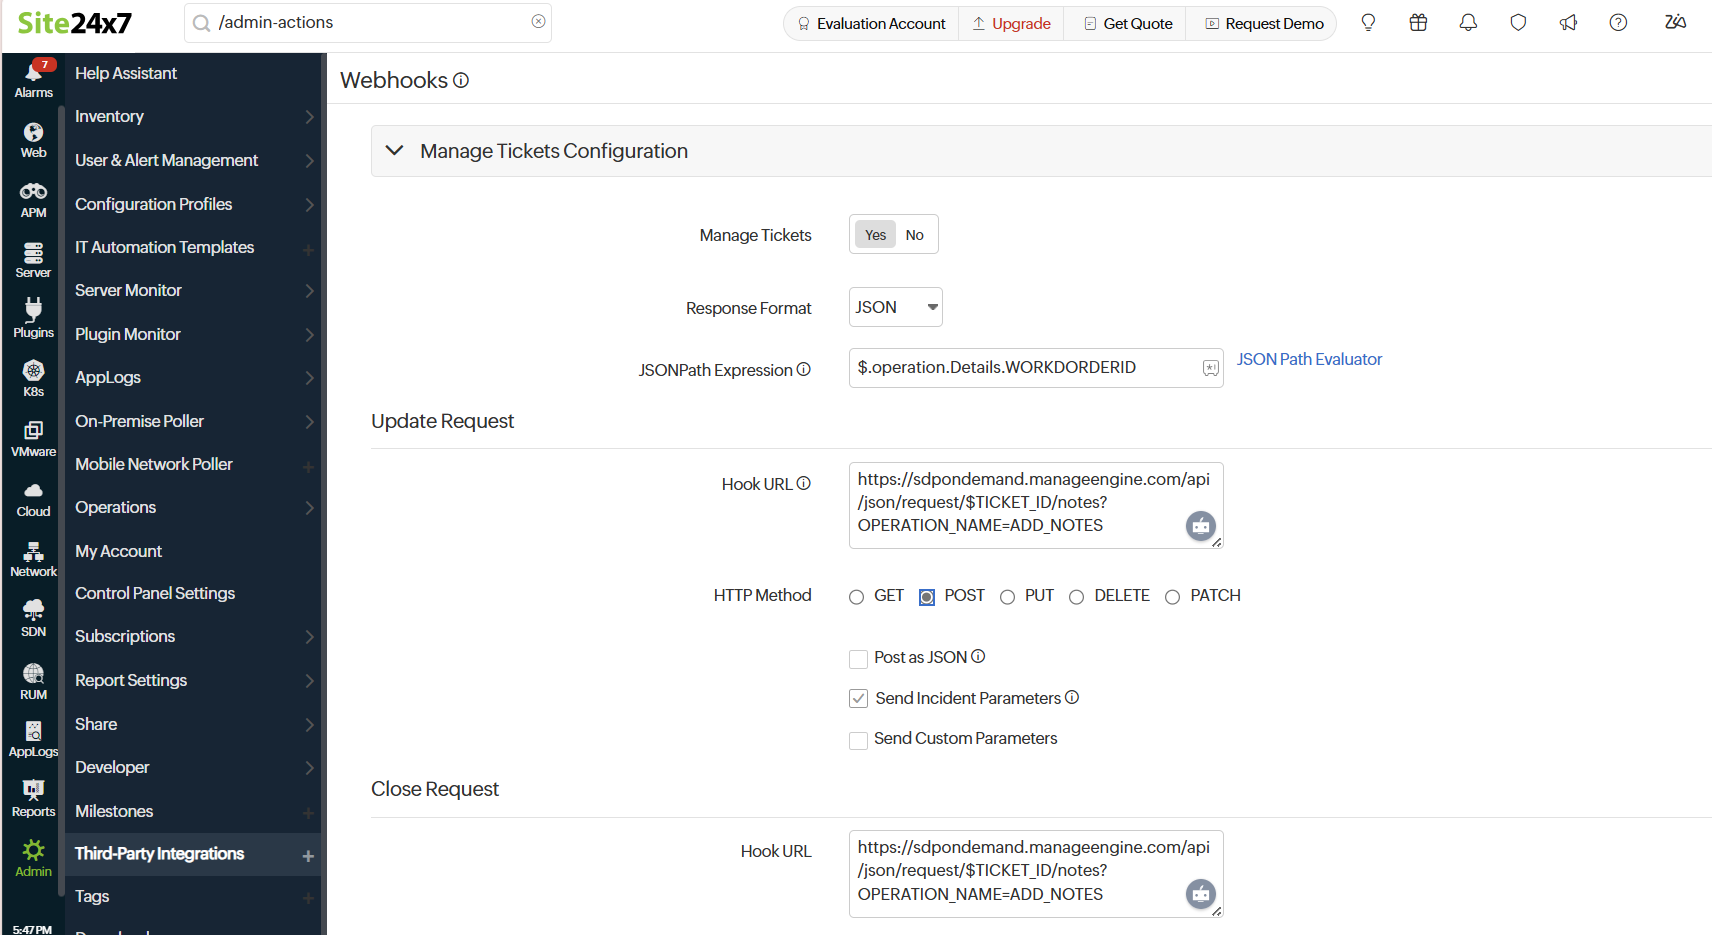
You can use this option when you're using an ITSM tool where the alerts will be channeled to that tool. With the Managing Ticket Configuration, you don't have to close the tickets manually; rather, they'll be closed automatically once the issue is resolved.
- Manage Tickets: Use the toggle button to select Yes or No to indicate whether you want to manage your tickets. If you select Yes, additional fields will appear for configuring the ticket management settings.
Note
With this configuration, Site24x7 alarms integration with any tool can be made possible.

-
Response Format: Choose the response format from the drop-down.
If the selected response format is JSON:- JSON Path Expression: To manage tickets, the ticket ID must be stored so that the same ticket can be updated when the monitor status changes from Down to Up. To retrieve the ticket ID from the response, you need to parse the response using a JSON Path or XPath expression. Provide the appropriate expression to extract the ticket ID accurately.
You can use Site24x7 JSON Path Evaluator to verify the JSON expression.
If the selected response format is XML: - XPath Expression: To manage tickets, the ticket ID needs to be retained so that the same ticket can be updated when the monitor status changes from Down to Up. If the response is in XML format, you must use an XPath Expression to extract the ticket ID from the response.
You can use an XPath Evaluator to validate your XPath expression.
- JSON Path Expression: To manage tickets, the ticket ID must be stored so that the same ticket can be updated when the monitor status changes from Down to Up. To retrieve the ticket ID from the response, you need to parse the response using a JSON Path or XPath expression. Provide the appropriate expression to extract the ticket ID accurately.
Update Request
- Hook URL: Enter the full URL (including the HTTP or HTTPS protocol) to which Site24x7 will send data.
If the ticket ID needs to be dynamically inserted into the URL, specify it using the placeholder $TICKET_ID.
For example:
http://example.com/api/rest/$TICKET_ID/notes
While invoking the URL, Site24x7 will replace $TICKET_ID with the corresponding ID you have provided. - The HTTP Method: Specify the method to be used for connecting with the URL– GET, POST, PUT, DELETE, or PATCH. Select the radio buttons to configure the form submission method and the appropriate body type for the POST, PUT, DELETE, or PATCH HTTP Method.
Close Request
- Hook URL: Enter the full URL (including the HTTP or HTTPS protocol) to which Site24x7 will send data.
If the ticket ID needs to be dynamically inserted into the URL, specify it using the placeholder $TICKET_ID.
For example:
http://example.com/api/rest/$TICKET_ID/notes
While invoking the URL, Site24x7 will replace $TICKET_ID with the corresponding ID you have provided. - HTTP Method: Specify the method to be used for connecting with the URL– GET, POST, PUT, DELETE, or PATCH. Select the radio buttons to configure the form submission method and the appropriate body type for the POST, PUT, DELETE, or PATCH HTTP Method.
Suspend/Activate/Test Alert/Delete Webhooks integration
Follow the steps below to suspend an active Webhook integration:
- Log in to Site24x7.
- Navigate to Admin > Third Party Integration.
NoteAll the integrations will be listed in the Third-Party Integration dashboard listing page.
-
Initiate a test alert to check whether the integration is a success or has any configuration error by clicking the Trigger Test Alert
 button.
 -
Open the active Webhook integration that you want to suspend and click the Suspend button listed in the top-right corner of the integration window.
Note- When your Webhook integration is suspended, all incident tickets to your Webhook account will be temporarily stopped.
- To reactivate a suspended Webhook integration, click the Activate button.
- To delete an integration permanently, open the active Webhook integration and click the Delete button listed in the top-right corner of the integration window.
