How to use an MIB Browser
This document will explain the basics of an MIB browser and Site24x7's on-premises MIB browser in detail.
SNMP: An overview
Simple Network Management Protocol (SNMP) is the standard protocol used by network devices to monitor network components. A management information base (MIB) forms an integral part of network management tools. Every SNMP agent maintains an information database describing the parameters of the device it manages.
An SNMP manager is a software system that uses SNMP to collect data for monitoring. SNMP managers store collected data in an MIB as a commonly shared database between the agent and the manager. The managed objects in an MIB are called object identifiers (object IDs or OIDs). Learn how SNMP works.
MIB browser
An MIB browser is a tool that allows you to pull data from network devices and displays it in a readable format. It loads MIB files and query data, filters out information from an MIB tree, and gives you the option to configure and manage SNMP traps. Every device vendor provides their own set of MIB files, and an MIB browser can load different MIB files from different vendors. An MIB file contains a description of the object hierarchy on the managed device, as well as the syntax and access privileges for each variable in the MIB.
An MIB browser can either be cloud-based or on-premises, i.e., installed on a machine. Site24x7 provides access to its own MIB browser both on-premises (bundled with the Network Module) and with the cloud Site24x7 web client.
How to run an MIB browser
The MIB browser is built-in and bundled with the Network Module on the Site24x7 On-Premise Poller installed machine.
- From the machine in which your Site24x7 On-Premsie Poller is installed, open the Command Prompt as an administrator (Windows) or the Terminal with root privileges (Linux).
- Go to the directory where the On-Premise Poller is installed.
- Navigate to the .../Site24x7OnPremisePoller/Networkplus/bin folder.
- Execute the MibBrowser.sh or MibBrowser.bat file.
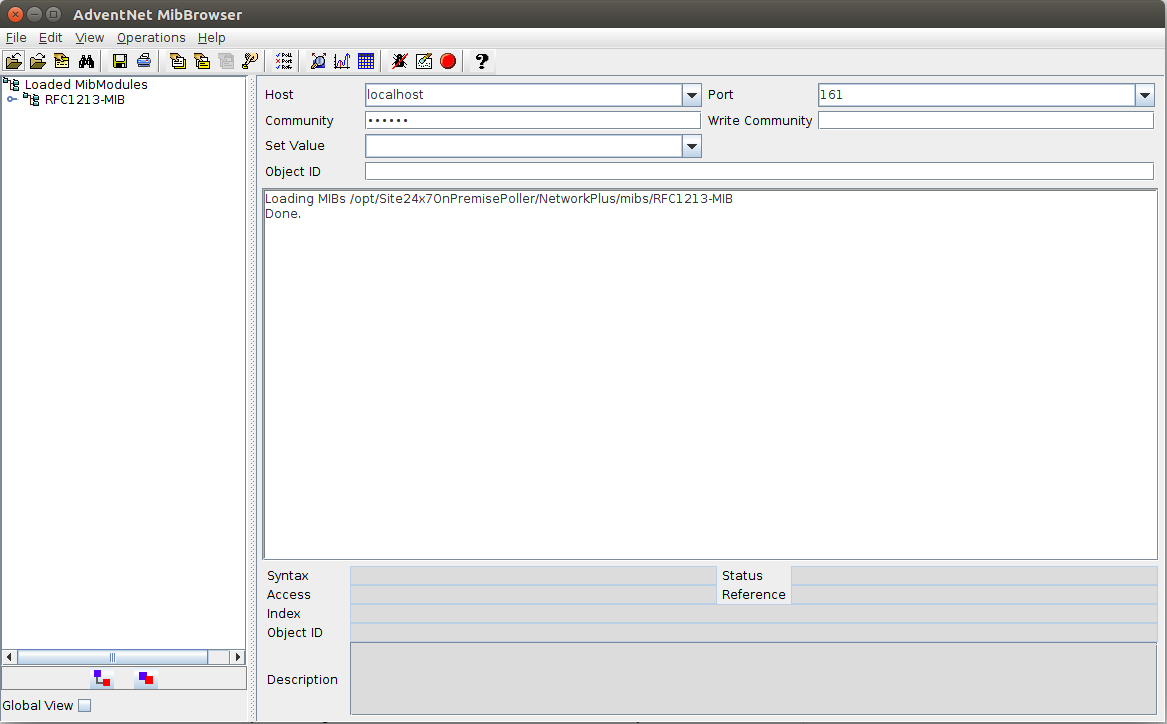
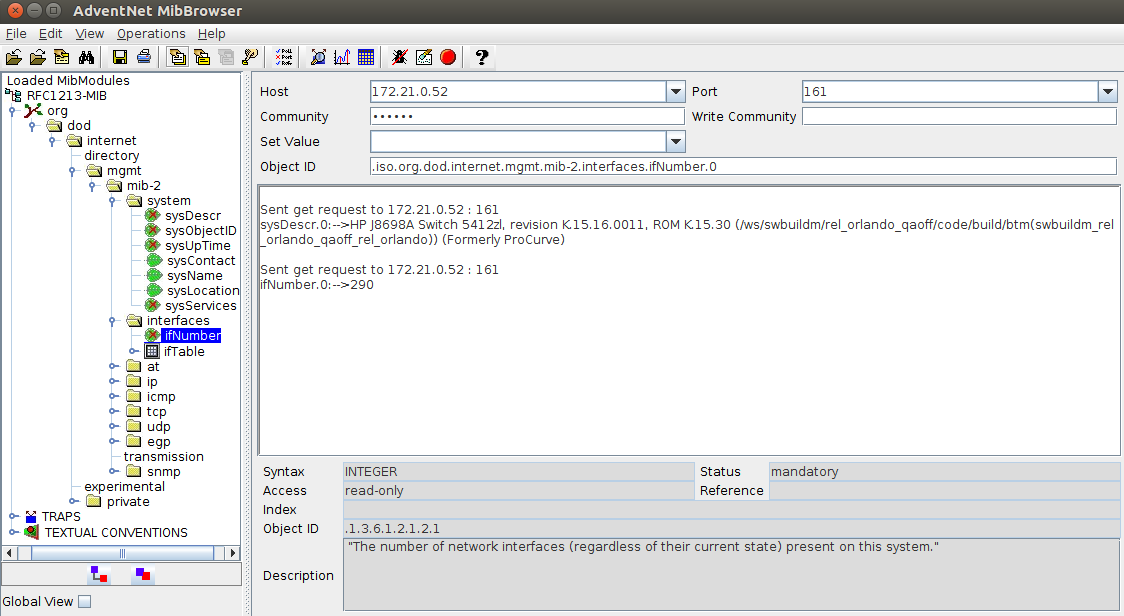
Once the MIB browser is executed, you'll be presented with the window shown below.
Configure SNMP settings
Configure SNMP settings based on the version so you can perform various SNMP operations.
For SNMP v1 and v2c
- In the MIB browser window, set the following:
- Host: The host name or IP address of the SNMP device.
- Port: The port through which SNMP communicates. The default port is 161.
- Community: A password exclusive to your device with which you'll be able to perform SNMP read operations like querying performance metrics. The default value is public.
- Write Community: A password exclusive to your device with which you will be able to perform SNMP write operations like network configuration management.
- Object ID: Object identifiers (OIDs) uniquely identify managed objects in an MIB hierarchy. Each OID corresponds to different device-related information, which Site24x7 uses to monitor custom performance metrics in a device.
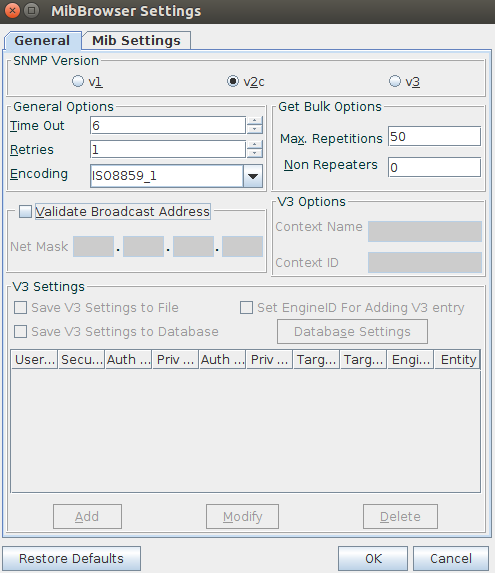
- For advanced settings, go to Edit > Settings.
- Under SNMP version, choose your respective SNMP version (v1 or v2c).
- Under General Options, configure the following. Please note that these are optional.
- Time Out: Increase or decrease your SNMP time out duration.
- Retries: The number of retry attempts.
- Encoding: The default encoding is ISO8850_1.
- Max Repetitions: The number of objects that should be returned for all the repeating OIDs.
- Non Repeaters: The number of variables in the variable list for which a simple GETNEXT operation has to be done.
- Click OK.
For SNMP v3
- Go to Edit > Settings.
- Under SNMP version, choose v3.
- Click Add.
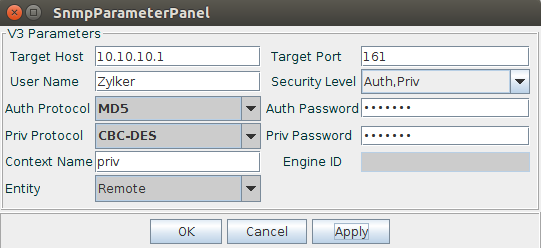
- Configure the following v3 parameters in the SNMP Parameter Panelthat opens.
- Target Host: The host name or IP address of the SNMP device.
- Target Port: The port through which SNMP communicates. The default port is 161.
- User Name: A user name for identification.
- Security Level:Choose the correct security level from the drop-down menu:
- noAuthnoPriv: Communication without authentication and privacy.
- authNoPriv: Communication with authentication and without privacy.
- authPriv: Communication with authentication and privacy. The protocols used for authentication are MD5 and SHA; for privacy, DES (Data Encryption Standard) and AES (Advanced Encryption Standard) protocols can be used.
- Auth Protocol: The protocols used for Authentication are Message Digest Algorithm 5 (MD5) and Secure Hash Algorithm (SHA). Choose either of the above.
- Auth Password: Enter your Auth Password if your Security Level is authNoPriv or authPriv.
- Priv Protocol: The protocols used for privacy are Data Encryption Standard (DES) and Advanced Encryption Standard (AES). If your Security Level is authPriv, choose a privacy protocol from the drop-down menu.
- Priv Password: Enter your privacy password.
- Context Name: An SNMP context name, or context in short, is a collection of management information accessible by an SNMP entity. You can create a context name of your own. If no name is specified, a default context name will be used. These names are based on the Security Level and can be any of the below.
Security Level
Context name noAuthnoPriv noAuth authNoPriv auth authPriv priv
- Click OK.
Loading MIB files
To query the MIB browser and obtain data, MIB files have to be loaded first.
- Go to File > Load MIB.
- This will direct you to the Site24x7OnPremisePoller/NetworkPlus/mibs folder where you can view an exhaustive list of all the MIB files provided by Site24x7.
NoteYou can select an MIB file relevant to your device from any directory. - Choose one or more required MIB file(s) and click Open.
You can view the loaded MIB files in the left pane under Loaded MibModules.
Traversing the MIB structure
To view an MIB's organizational hierarchy, called a tree structure, you need to expand the file. When you double-click a node, it will expand into its sub-nodes. When you select an MIB node from the left pane, its details such as Object ID, Description, Syntax, Access, and Status will be displayed in the bottom-right.
Understanding the MIB
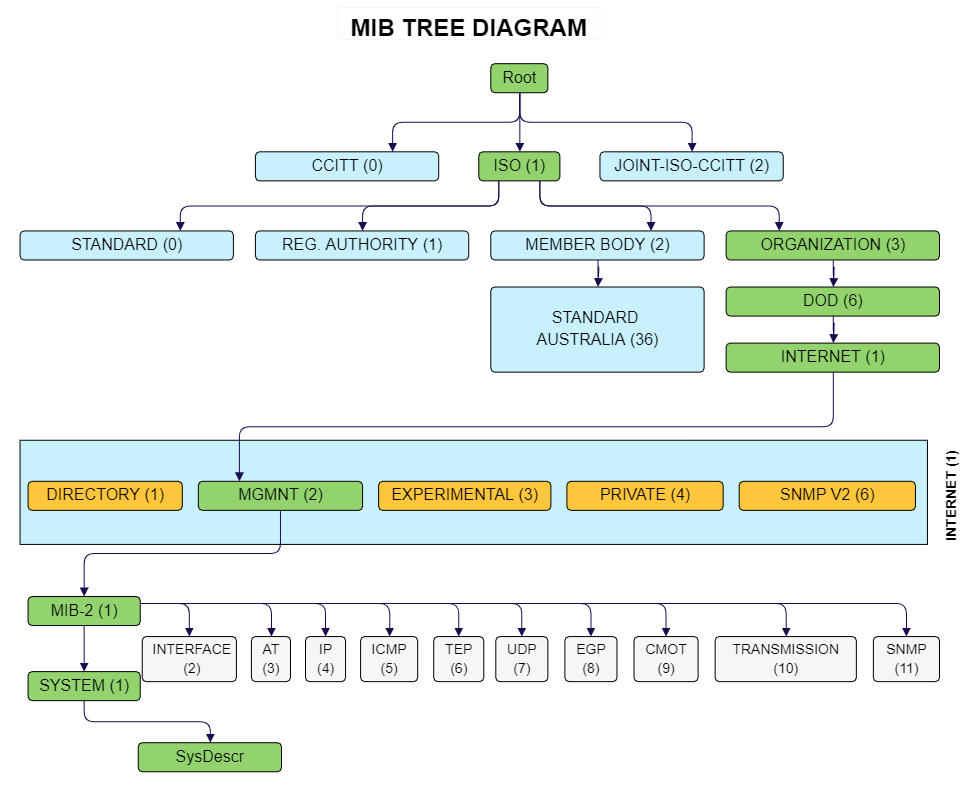
To provide an example from the diagram above, the OID of sysDescr is ".1.3.6.1.2.1.1.1", which can be found by following the path of green points from ROOT to sysDescr:
- ISO is .1
- ORGANIZATION is .3
- DOD is .6
- INTERNET is .1
- MGMT is .2
- MIB-2 is .1
- SYSTEM is .1
- sysDescr is .1
Different icons
| Icon | Meaning | Description |
| |
MIB Module (Tree icon) | The root node of the MIB tree. |
| |
Folder | Contains all the sub-nodes and sub-folders. |
| |
Table | Contains a group of tabular OIDs. |
| |
Read-only node | Can obtain the corresponding SNMP value using Read Community credentials. |
| |
Read-write node | Can obtain the corresponding SNMP value using Read Community credentials, or the set SNMP value using Write Community credentials. |
| |
Traps | Contains a list of SNMP traps. |
Object identifiers could be:
- Scalar: Objects defined by a single object instance; there can only be one result. They are usually a Read-only or Read-write node present inside a folder or sub-folder.
- Tabular: Objects defined by multiple related object instances that are grouped in MIB tables, i.e., a column in a table view. They are usually a Read-only or Read-write node present inside a table.
Querying MIB
Query an SNMP MIB to get the SNMP response value corresponding to the particular OID.
Select the appropriate MIB node and perform a suitable operation from the list below. You can find icons for the following options on the navigation bar below the menu bar.

- Get SNMP variable: Click the Get SNMP variable icon (the seventh from the left) to perform an SNMP GET operation. It sends a request to the host to receive one or more values.
For example, let's consider ifDescr. Here, the values will be displayed as ifDescr.276:-->L12. Here, .276 is the index, which is the index of the OID result. - Get Next: Click the Get Next icon (the eighth from left) to perform an SNMP GET NEXT operation. It sends a request to the host to receive one or more values. Similar to the GET command, GET NEXT retrieves the value of the next OID in the MIB tree.
- Get Bulk: Click the Get Bulk icon (the ninth from the left) to retrieve bulk data from a large MIB table.
- View SNMP data table: From the MIB tree in the left pane, click the table icon () or tabular node. Now, click the View SNMP data table icon (the fifth from the right) from the navigation bar to view the SNMP table. From the SNMP table window, click Start.
Using the queried OID to create performance counters in Site24x7
From the MIB tree in the left pane, navigate and click a Read-only or a Read-write MIB node.
For example, let's consider ifOperStatus. By clicking this, node you'll find the Object ID in the bottom-right. Copy the corresponding Object ID (here, .1.3.6.1.2.1.2.2.1.8) and paste it on Site24x7's Add Custom Performance Counters window to create a custom performance counter.
You can view this option by logging in to Site24x7 and navigating to Network > Device Templates > Add Device Template > Add Custom Performance Counters. Learn more here.
For scalar OIDs, append .0 at the end.
In the Site24x7 web client:
Toggle between SCALAR, TABULAR, and TABLE VIEW based on the type of your OID.
If the fetched result contains a numeric value, set the Type as Numeric. If not, set as String.
Error messages related to an MIB browser
If a timeout occurs, please check if:
- The host name, port, and the SNMP community are specified correctly.
- There is a firewall blocking SNMP connection.
- The On-Premise Poller is on the same network as the device.
There are also chances for the On-Premise Poller to not be in the list of hosts that are allowed to query the device through SNMP. Please check to make sure the SNMP configuration on the device is listed.
