Telegram Integration
Telegram is a free, cloud-based instant messaging application for both mobile and desktop devices. It allows sharing files, images, or videos through end-to-end encrypted channels. By integrating your Site24x7 account with Telegram, you can receive Site24x7 alerts (Down, Critical, Trouble, or Up) as text messages in your preferred Telegram channel and take necessary actions.
Prerequisites
To integrate your Site24x7 account with Telegram:
- You need a valid and active account on Telegram.
- You should create a channel, a new bot, and add that bot as an administrator to your channel.
- Make sure your Telegram web app is either the Z version or the old version.
Integrate Telegram with Site24x7
Creating a new channel in Telegram
- Open the Telegram app and click the pen icon.
- In the New Message page that opens, click New Channel.
- Provide a name for your channel and add a description in the respective field.
- Tap on the tick icon and the new channel will be created.
If you already have a channel in Telegram, you can use that channel to receive the alerts and can skip the above mentioned steps.
Creating a new bot in Telegram
- Open Telegram and sign in to your account, or create a new account.
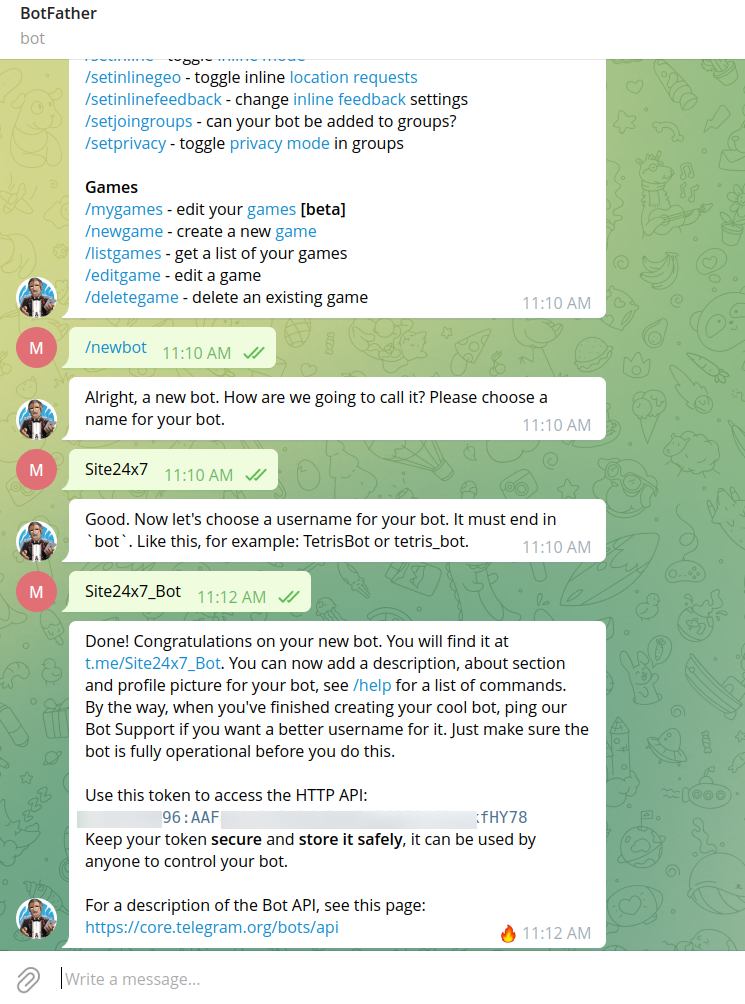
- Enter @Botfather in the Search tab and choose this bot.
- Click Start to activate the Botfather bot. You'll receive a list of commands to manage your bot.
- Choose or type the /newbot command and send it.
- Choose a name for your bot and a User Name. The name should end with "bot". Subscribers will be able to view the name of your bot and the User Name can be used to search for your bot.
NoteOnce the new bot is created, you'll receive a message with the bot token.

Adding the bot as an administrator
If you've already created a Telegram channel, you can add a selected bot as an administrator of your channel. To do this:
- Navigate to your channel on the desktop.
- In the channel, click the three dots on the top right corner and then click Manage Channel.
NoteManage Channel option is available only in the mobile and desktop versions.
- Click Administrator > Add Administrator.
- Search for and select the bot. Ensure that you're providing the bot the permission to post messages to the channel.
- Click Save and now the bot you've selected will be added as an administrator.
To add the bot as an administrator from the mobile application, you can:
- Navigate to the mobile application.
- Tap on the Profile icon.
- Choose Administrators > Add Admin.
- Search for and select the bot.
- Tap on the tick icon to finish adding the bot as an administrator.
How to integrate
- Log in to Site24x7.
- Navigate to Admin > Third-Party Integration.
- Choose Telegram from the list of integrations.
- You'll be redirected to the Telegram integrations page. To complete the integration, provide the following:
- Integration Name: Provide the name of your integration.
- Channel URL: Provide the web URL of your Telegram channel.
Note- Visit the Telegram web app to obtain the web URL of your channel.

- Please ensure that you do not use the channel invitation link as your URL. For example, your web URL should look like https://web.telegram.org/a/#-1000000000001.
- Visit the Telegram web app to obtain the web URL of your channel.
- Bot Token: Once you create a bot, you can obtain a token for the same. Obtain your bot token from the BotFather channel and provide it here.
- Message Title: Use the $ tag to customize the message title of your alert notification. Use Incident Parameters to customize the subject.
- Trigger Alerts for Monitor Status Change: Use the checkboxes to choose the monitor status changes (Down, Trouble, and Critical) for which you'd like to receive alerts.
- Select Integration Level: Site24x7 can post status alerts to the Telegram channel from specific Monitors, from monitors associated with certain Tags, monitors associated with the selected Monitor Groups, or from All Monitors in your account, which is the default option.
- Tags to Be Sent With Alerts: Select the tag keys associated with the monitor that needs to be sent with the alert. When an alert is triggered, tags that match with the monitor will be included in the alert notifications. If no tags are selected, all the tags associated with the monitor will be present in the alert notifications.
- Alternate Notification: Select an alternative service to be activated if the primary or current third-party notification service encounters an issue to ensure that alerts are not missed.
- Click Save and Test to save the integration and to receive a test alert. Or, you can click the Save button to finish the integration.
