Bulk Installation Methods for Windows Agent
You can install the Windows server monitoring agent in multiple machines in one go using one of the following methods:
Active Directory (AD)
Prerequisite
After a reboot, the server monitoring agent will be installed. Make sure that the Active Directory (AD) is configured properly to accommodate the installation process.
Instructions
- Create a network share in your Windows machine. For example: \\MyServer\MyShare
- Download Site24x7WindowsAgent.msi. Refer to the Add a Monitor section. Save the files Site24x7WindowsAgent.msi and InstallAgent.vbs.
- Edit the InstallAgent.vbs file. The following is how a sample InstallAgent.vbs file will look like:

- Find <COMMAND-LINE-PARAMS> and replace it using the parameters given below. Input your Device Key from the Site24x7 web client (Admin > Developer > Device Key).
EDITA1= <Your Site24x7 Device Key>
- Include the path of the network share with Site24x7WindowsAgent.msi.
\\MyServer\MyShare\Site24x7WindowsAgent.msi
- For a proxy server, follow the below format:
EDITA1= <Your Site24x7 Device Key> ENABLEPROXY=yes ProxyServerName=<proxyservername:port> ProxyUserName=<proxyusername> ProxyPassword=<proxypassword>
- To define the Group Policy Management, refer this article.
Once a new Group Policy Management is created, the agent will get installed automatically when the user computer under that particular domain is started.
Custom Scripts
Write your own scripts and execute it in multiple machines and get the agent installed.
For example:
msiexec.exe /i Site24x7WindowsAgent.msi EDITA1=<Your Site24x7 Device Key> ENABLEPROXY=yes ProxyServerName=<proxyservername:port> ProxyUserName <proxyusername> ProxyPassword=<proxypassword> /qn
During Agent Installation
Prerequisites
- File copying permission from the host to the remote machine is necessary during the agent installation.
- Ensure that the remote machine has the required permissions for remote Windows Management Instrumentation (WMI) execution.
Instructions
You can bulk install the agent in multiple servers using the installation wizard itself. Please follow the steps below:
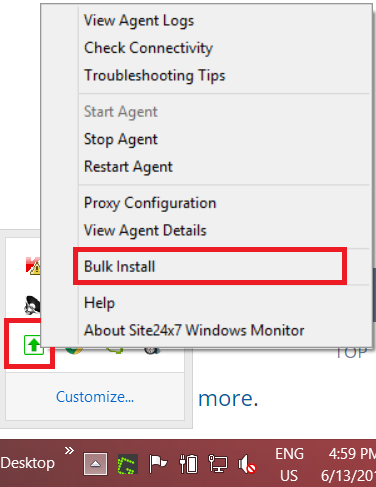
- Log in to Site24x7 and go to Server > Server Monitor > Servers (+) > Windows > Download Site24x7 Windows Server Agent. You can also select Bulk Install from the tray icon to start the bulk installation process.
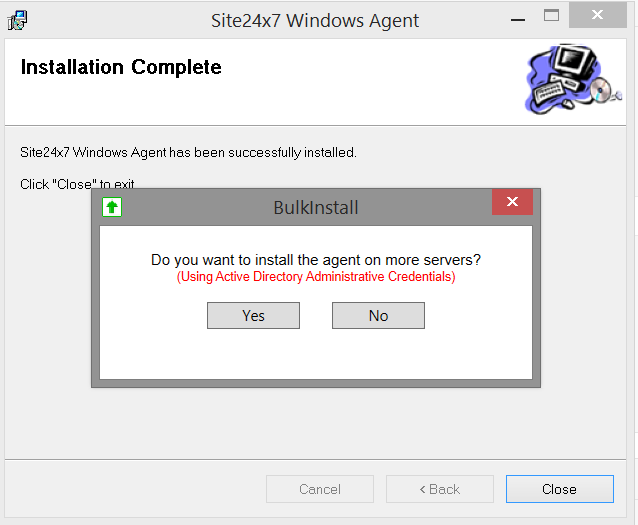
- Follow the steps in the installation wizard to install the agent. Once that's done, you will get an option to bulk install the agent in multiple servers. Click Yes.
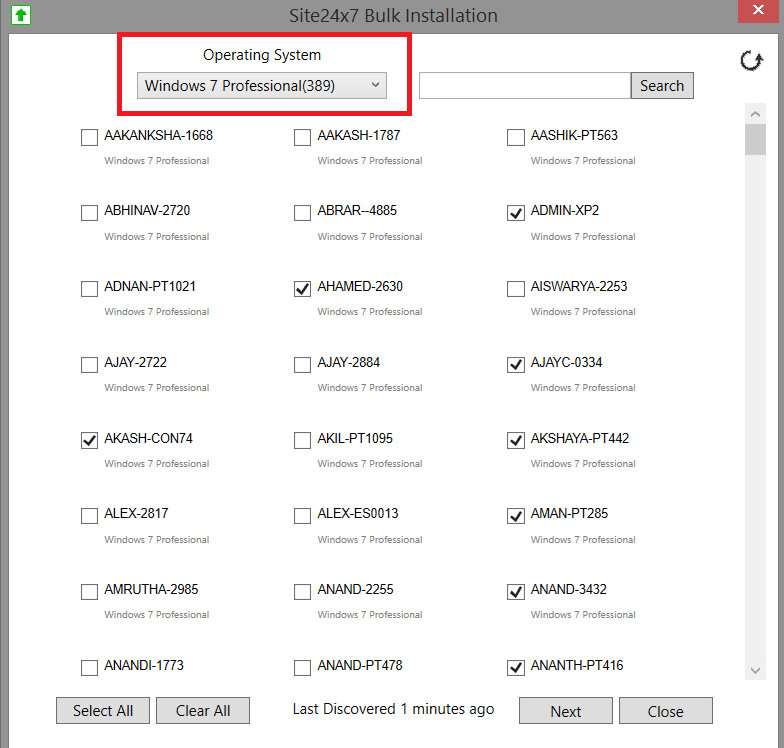
- Choose the Operating System (OS) from the drop-down and check the servers in which you would like to install the agent. Multiple selection is possible by checking on the tick boxes beside every server name listed. Click Next.
- Enter the Active Directory (AD) username and password. You should have Admin privilege to perform this action.
If you have a proxy, check the option Enable Proxy for Selected Servers and specify the proxy details. Check the option Use Host Proxy Configuration to replicate the same proxy details as given during agent installation. Else, select New Proxy Configuration and enter the proxy details.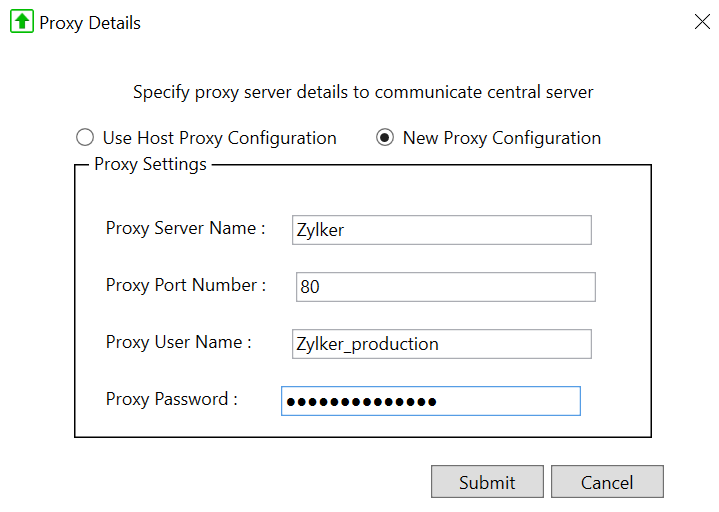
The agent will now be installed in all the selected servers. In case the bulk installation fails, check the troubleshooting steps given in this article to resolve the issue.
PowerShell Desired State Configuration (DSC)
Prerequisites:
- PowerShell version 4.0 and above
- To receive PowerShell remote commands while the localhost configuration is running, ensure that your configuration is set up to allow PowerShell remote commands. For detailed information on this requirement, refer to Microsoft's documentation available here.
Steps to bulk install:
- Download and unzip the Site24x7DSCRemoteInstall.zip folder in your preferred location.
Eg: C:\Site24x7\Site24x7DSCRemoteInstall - Download the Site24x7WindowsAgent.msi from the Site24x7 console. Refer the Add a Monitor section. Place this file inside the Site24x7DSCRemoteInstall folder.
Eg: in the location - C:\Site24x7\Site24x7DSCRemoteInstall - Open the hostnames.csv file present in the Site24x7DSCRemoteInstall folder and fill in the hostnames of the servers to which the agent should be installed.
- Open InstallAgent.ps1 and edit the below configuration variables accordingly:
$userName = "sampleADUserName"
$password = "samplePwd"
$apikey = "sampleDeviceKey" #device key from the Site24x7 web clientIf you have a proxy, fill in the below details as well:
$enableProxy = "YES" #YES/NO
$proxyServerName = "" #<proxyservername:port>
$proxyUserName = "" #<proxyusername>
$proxyPassword = "" #<proxypassword> - Save your changes and close the file.
- Open a PowerShell Command Prompt as an administrator. Change the working directory path to the folder path where you have the above files and run the below commands.
In this case,
cd C:\Site24x7\Site24x7DSCRemoteInstall
NET SHARE msiShare=<the folder path> /GRANT:Domain\UserName`,READ
    sample : NET SHARE msiShare=C:\Site24x7\Site24x7DSCRemoteInstall
/GRANT:SITE24X7\SITE24X7`,READ
 .\InstallAgent.ps1  #<this will create the .mof files under \InstallAgent dir>
Start-DscConfiguration -Path .\InstallAgent -Force -Verbose -wait
net share msiShare /delete
If the hostnames.csv file is modified or the msi file is newly downloaded, then delete the dynamically created "C:\Site24x7\Site24x7DSCRemoteInstall\InstallAgent" folder before running the PowerShell commands.
Via Google Cloud Platform (GCP)
- Download this script and unzip it in the folder path of your choice.
- Edit the config section in the downloaded script file, by entering the device key given in the Site24x7 web client and proxy details, if needed.
- Log in to the Google Cloud Platform (GCP) console and upload this script file to the Google bucket of your choice.
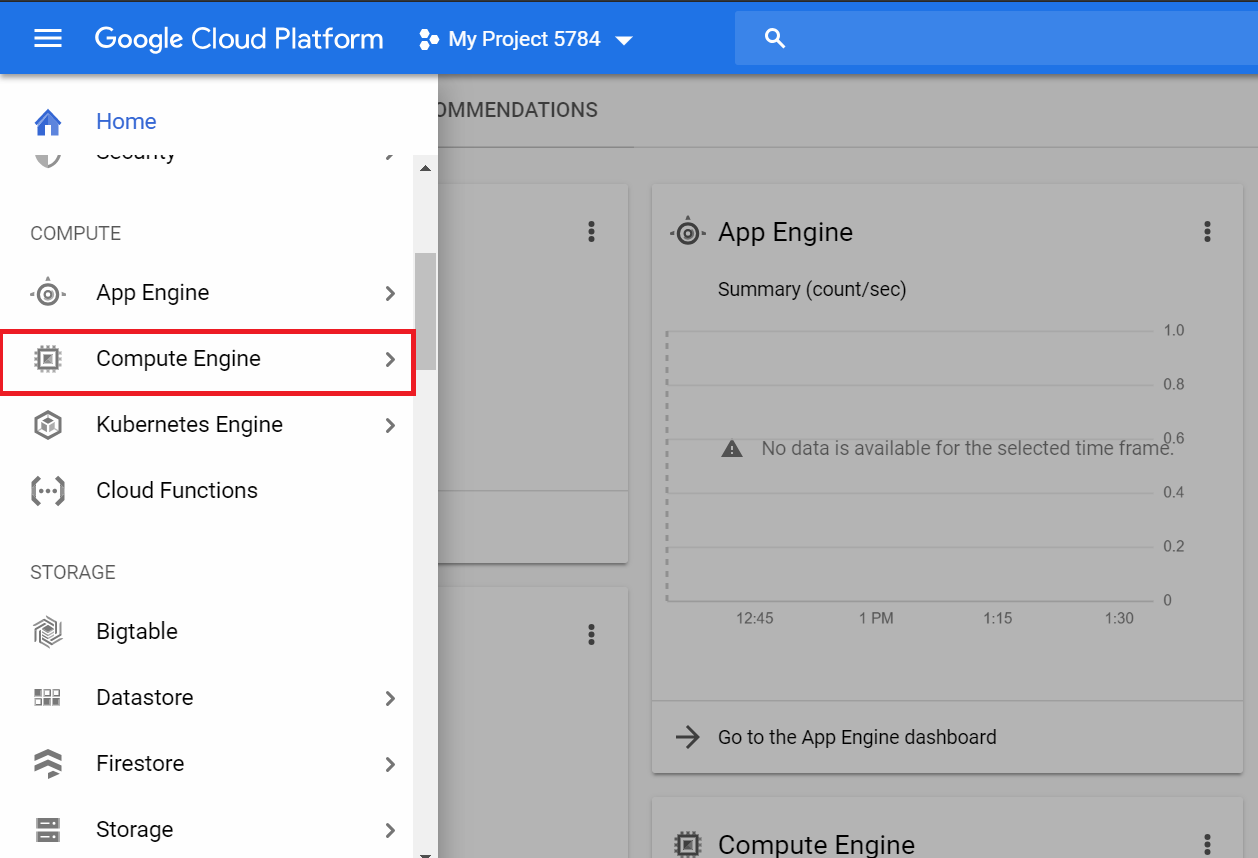
- In the GCP console, click on Compute Engine.
- In the Compute Engine page, click on Create Instance.

- Scroll down and click on Management, security, disks, networking, sole tenancy.
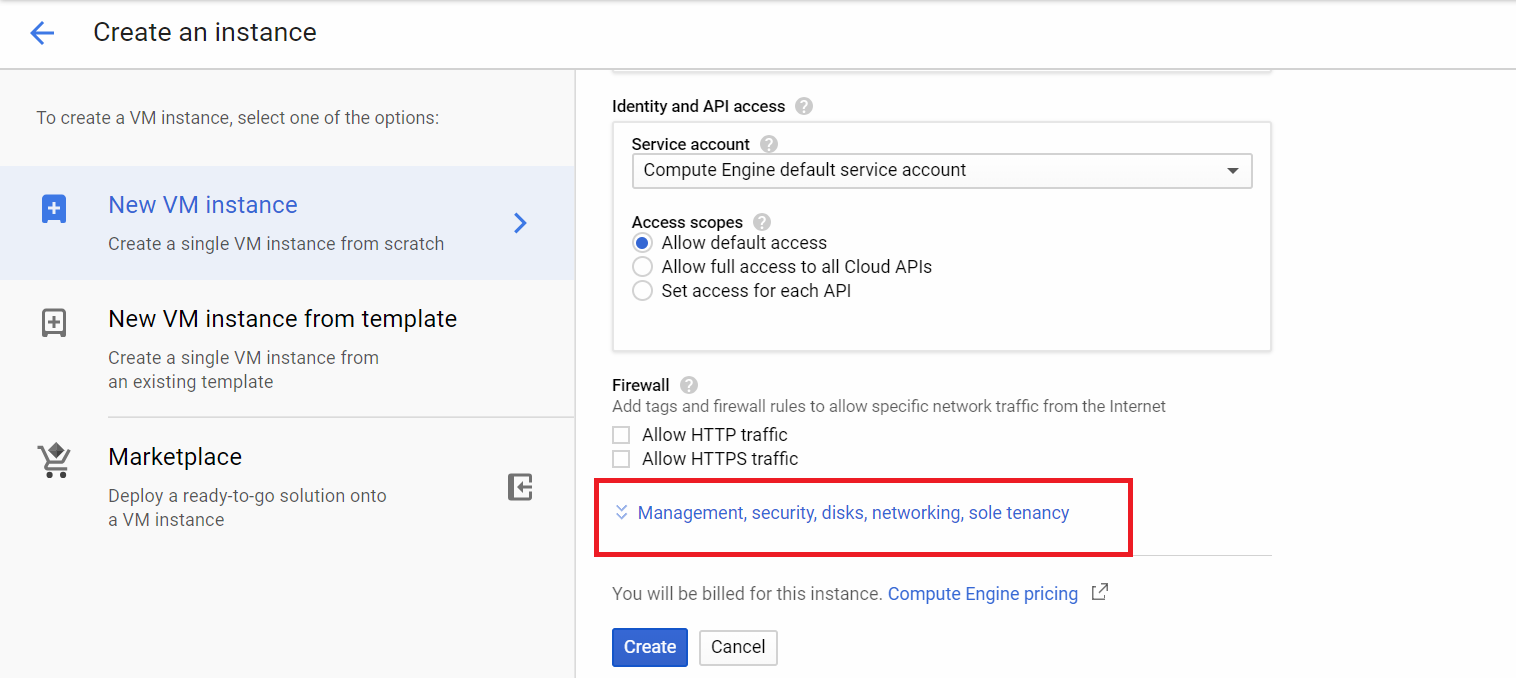
- Under Metadata, paste the following in the Key and Value fields respectively.
Set windows-startup-script-url in the Key field; &
https://storage.googleapis.com/[BUCKET]/[FILE] in the Value field.
For example, https://storage.cloud.google.com/windows-startup-script/Site24x7InstallScript.ps1
- Click Create. The agent will be installed in your GCE instance.
SaltStack
Prerequisite:
- Ensure you have salt-master and salt-minion set up in your infrastructure.
Steps to bulk install:
- Download and unzip the Site24x7WindowsSaltStack.zip folder in your preferred location.
Eg: C:\Site24x7\Site24x7WindowsSaltStack - Copy-paste the following files:
- Copy the file pillar\site24x7.sls to your pillar home directory [<SaltStack directory>\srv\pillar\ for most users]. If pillar directory is not there, create it and also add a corresponding entry for pillars in <SaltStack directory>\etc\salt\master.
- Copy the file states\install.sls into your salt state home directory [<SaltStack directory>\srv\salt\ for most users]. If salt state directory is not there, create it and also add a corresponding entry for salts in <SaltStack directory>\etc\salt\master.
- Make the following changes:
- Edit your salt state top.sls file [<SaltStack directory>\srv\salt\top.sls]. Add - install entries under your required environment.
- Edit your pillar top.sls file [<SaltStack directory>\srv\pillar\top.sls]. Add - site24x7 entry under your required environment.
- Edit the <SaltStack directory>\srv\pillar\site24x7.sls file. Replace the device key field with the key obtained from the Site24x7 web client (Server > Server Monitor > Servers (+) > Windows).
- Replace the Proxy value with Yes, and add proxyservername (with port), proxyusername, and proxypassword. If no proxy is required, set the Proxy value as No.
- Execute the below sample command to bulk install the Site24x7 Windows agent in all the minions in one go:
sudo salt '*' state.sls install
Add as a VM extension in Azure
Add a server monitor via VM extension in Azure and view all your critical metrics in the Site24x7 dashboard. Azure users can now add a Windows monitor in a more simplified way without the need to download the agent.
You can add a Windows VM extension using one of the following ways:
Via System Center Configuration Manager (SCCM)
To start the Create Application Wizard and create the application, please follow the steps below:
- In the Configuration Manager console, choose Software Library > Application Management > Applications.
- On the Home tab, in the Create Group, choose Create Application.
- On the General page of the Create Application Wizard, choose Automatically detect information about this application from installation files. This pre-populates some of the information in the wizard with information that's extracted from the installation .msi file.
- Specify the following information:
Type: Choose Windows Installer (*.msi file)
Location: Type the location (or choose Browse to select the location) of the installation file Site24x7WindowsAgent.msi. Note that the location must be specified in the form \\Server\Share\File for Configuration Manager to locate the installation files.
- Choose Next. On the Import Information page, you'll see some information about the app and any associated files that were imported to Configuration Manager. Once you are done, choose Next again.
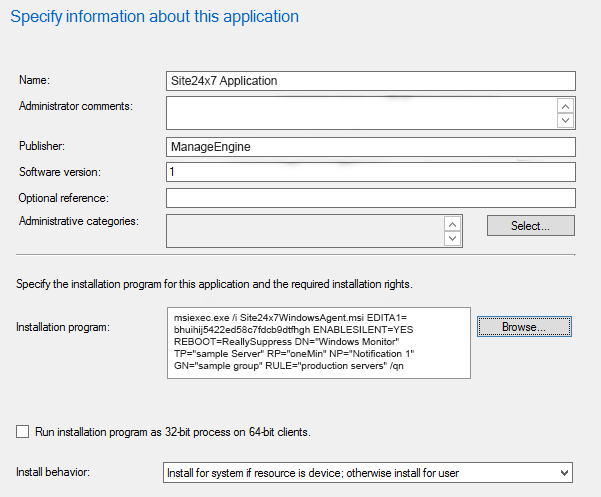
- On the General Information page, you can supply further information about the application to help you sort and locate it in the Configuration Managerconsole.
Note
The Installation program field lets you specify the full command line that will be used to install the application on PCs. Refer to our help document about command line installation for detailed instructions.
- Choose Next. On the Summary page, you can confirm your application settings and then complete the wizard.
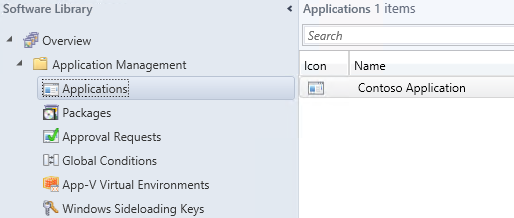
To find the created application in the Software Library workspace, expand Application Management > Applications.
Via ManageEngine Endpoint Central
Follow the instructions in this help document how to deploy Windows server monitoring agent in multiple servers using ManageEngine Endpoint central.
